Tuesday, December 31, 2019

On Page SEO Tips 2020 in Hindi – पहले page पर रैंक करने के लिए

On Page SEO Tips 2020 in Hindi – पहले page पर रैंक करने के लिए


क्या आप अपने post को keyword targeted, SEO-optimized और ज्यादा से ज्यादा traffic derive करने योग्य बनाना चाहते हैं?
क्या आप चाहते हैं कि आप search engines को यह बेहतर तरीके से समझा पायें कि आपको किस keyword के लिए rank करना है?
यदि ऊपर दिए गए किसी भी प्रश्न के लिए आपका उतार हाँ है तो, यह article आपके लिए ही है और इस article में हम अपने blog post को keyword targeted बनाने के बारे में चर्चा करेंगे.
जब भी किसी भी website या blog को optimize करने की बात आती है तो इसके अंतर्ग्रत दो चीज़ें होती हैं:
  1. On-page optimization
  2. Off-page optimization
आज के इस article में हम On-page SEO optimization के बारे में बात करेंगे, और मैं आपके साथ बहुत सी useful On-Page SEO techniques share करूँगा जोकि आपको आपके blog posts को optimize करने के लिए implement करनी चाहिए.
तो अब आप on-page SEO aur on-site SEO में confuse न हों.
  • On-Site में सारी की सारी website के pages की optimization की बात आती है जिसमे sitemaping और permalink structures इत्यादि की settings भी शामिल होती हैं.
  • On-page SEO की बात करें तो इसमें हम अपने किसी single blog post के content को किसी particular target keyword के लिए rank करने के लिए optimize करते हैं. इसमें proper headings को use करना, proper keyword placement करना, content की quality को ensure करना और अन्य factors पर ध्यान देना आदि शामिल है.

आपको On-Page Optimization क्यों करनी चाहिए?

जब कई bloggers SEO optimized articles जैसे शब्दों को सुनते हैं तो उन्हें लगता है कि ये किसी प्रकार की bad practice है.
ये बिलकुल भी पूरी practice नहीं बल्कि एक ज़रूरी practice है.

Search Engines और कुछ नहीं बल्कि बस कुछ algorithms का set होते हैं. वे आपके page में अलग-अलग factors को ढूँढ़ते हैं जिससे कि वे आपके articles को कुछ keywords के लिए rank कर पायें. अब हमें search engine को यह identify करने में help करनी होगी कि आपके blog post में क्या है और आपके blog post को search engine को किस keyword के लिए show करना चाहिए.
सोचने का प्रश्न ये है कि:
  • आप भी search engine की rankings में पहले page पर rank क्यों नहीं कर रहे?
इसके बहुत से कारण हो सकते हैं लेकिन यदि आप SEO पर attention नहीं देंगे, तो ये शायद इसका सबसे बड़ा कारण हो सकता है.
तो जब भी हम किसी भी post की SEO optimization करते हैं तो हम search engine में higher rank करने के लिए use किये जाने वाले कुछ proven methods को follow करते हैं.
अब Google जब भी किसी article को search engine में rank करता है तो केवल on-page SEO score को ही नहीं देखता. इसके इलावा हए और भी बहुत सारे factors को ध्यान में रखते हुए posts की ranking करता है, जैसे कि social media signals (shares, likes, tweets, follows etc.), backlinks, domain authority और बहुत से दूसरे off-page metrics.

On-page SEO का हमारा मकसद किसी article को natural पर smart way में SEO optimize करना होता है ताकि search engines आसानी से target keyword को pick out कर सकें और आपकी website पर targated लोगों को send कर सकें.

इससे पहले कि मैं आगे बढूँ, मैं यह assume कर लेता हूँ कि आपको keyword research के बारे में पता है और आपको यह भी पता है कि target करने के लिए keywords को कैसे ढूँढ़ते हैं. यदि आपको नहीं पता तो आप हमारे नीचे दिए गए posts को ज़रूर पढ़िए:


एक चीज़ जो मैं आपको recommend करूँगा कि आपको अपने blog posts में videos add करना शुरू करना चाहिए. Videos केवल आपके page पर media का amount ही नहीं बढ़ाएंगी, यह आपके post को और भी ज्यादा informative और content-rich बनायेंगी.

2018 में बढ़िया ranking के लिए 10 On-Page SEO Tips

इससे पहले कि मैं आपके साथ tricks को शेयर करूँ, ये रही कुछ non-technical चीज़ें जिन पर आप आज ही गौर कर सकते हैं.
  1. User Experience को improve कीजिये
इस बात को पक्का कीजिये कि आपकी website responsive हो और broken links कम से कम हों.
  1. इस बात को पक्का कीजिये कि search engines से आपकी site पर आने वाले लोग आपकी site पर काफी time भी spend करें. यदि वे जल्दी ही back button को दबा देंगे, आपकी ranking भी जल्दी से drop हो जाएगी.
  • इस बात को पक्का कीजिये कि आपकी site का भी एक अपना professionalism का एक standard हो.
  • लोगों को अपनी site पर चिपकाये रहने के लिए copyrighting skills का use कीजिये.
  1. बढ़िया content create कीजिये
  • अपने content को और engaging बनाने के लिए benefit-driven sub-heading को use कीजिये.
  • अपने articles को fluffy तो बिलकुल मत बनाईये.
  • Feedback लीजिये और improve कीजिये.

तो अब हम Top 10 On-Page SEO Factors देख लेते हैं कि कौन से हैं.


1.  Blog Post Title
आपके blog post का title एक बहुत ही ज्यादा महतवपूर्ण on-page SEO factor है. आपके blog post का title जितना ज्यादा बढ़िया होगा, उतने ही ज्यादा लोग आपके blog के लिंक पर click करेंगे. दूसरे शब्दों में अगर कहें, तो जितने ज्यादा आपके post पर click होंगे, उतनी बेहतरीन आपकी ranking होगी. आपको इस बात को पक्का करना चाहिए कि आप अपने target keyword को अपने blog post के title में ज़रूर use करें.


2.  Post Permalink Structure
Post के title के बाद दूसरी सबसे महत्वपूर्ण चीज़ जो आपको ध्यान से set करनी चाहिए वो है आपकी पूरी site का permalink structure. इस सम्बन्ध में आप हमारे नीचे दिए गए articles को read कीजिये.


एक बात को आप सुनिशित कर लीजिये कि आप अपने target keyword permalink में ज़रूर use करें.


3.  Heading Tags
Heading Tags Search Engine Rankings के लिए कुछ ख़ास important factor तो नहीं है लेकिन यदि फिर भी आप्प सभी तरह कि headings जैसे कि H1, H2 और H3 का proper use अपने पूरे article में throughout करेंगे तो आपको ज़रूर rankings में benefit मिलेगा. कोशिश कीजिये कि आप अपने main keyword को और उसके सम्बन्धत कुछ और keywords का प्रयोग भी आप heading tags में करें.


4.  Keyword Density
Keyword Density भी आजकल कुछ ख़ास important factor नहीं रह गया है क्योंकि जो चीज़ सबसे ज्यादा matter करती है वो है आपके content की quality. फिर भी यदि आप किसी बहुत ही ज्यादा targeted keyword के लिए article लिख रहें है तो आपके लिए यह बढ़िया होगा कि आप main keyword + उससे मिलते जुलते कुछ और words को मिलकर keyword density लग-भाग 1.5% रखें.


5.  Meta Tags
Meta Tags कुछ ऐसे tags होते है जोकि search engine को आपके article के बारे में कुछ valuable information को short में provide करते हैं. एक बहुत ही मत्वपूर्ण meta tag है meta description.
Meta Description वह छोटी सी आपके blog post के बारे में जानकारी होती है कोकी search engine results में आपकी site के title और link के नीचे display होती है. यह मत्वपूर्ण दो पहलूओं से होती है. पहले पहलू keyword का है. यदि आप keyword का प्रयोग इस description में करते हैं तो आपको search engine में किसी particular keyword में ranking प्राप्त करने में मदद मिलेगी. दूसरा factor CTR का है. जितनी ज्यादा बढ़िया आपकी meta description होगी, उतने ही ज्यादा लोग आपके लिंक पर click करेंगे और जिससे आपकी ranking और traffic दोनों बढ़ेगी.


6.  Images
आजकल जमाना images का है और लोग पढने की जगह देखना ज्यादा पसंद करते हैं. इस चीज़ को ध्यान में रखते हुए search engines ने भी media का use करनी वाली sites की ranking को improve करना शुरू कर दिया है. इसलिए आपके लिए यह सख्त recommendation होगी कि आप अपने हर एक blog post जिसे कि आप किसी भी keyword के लिए targeted बनाना चाहते हैं, उसमे images और दूसरे media जैसे की videos आदि का प्रयोग करें. इसके अतिरिक्त आप images के ALT tags और उनके names में भी अपने targeted keyword का प्रयोग कीजिये तो आपको पक्का benefit होगा.


7.  Word Count Per Post
एक चीज़ आम देखी गयी है कि जिन भी posts की length काफी ज्यादा होती है उनकी ranking हमेशा बढ़िया होती है. इसकी सबसे बड़ी Example Wikipedia है.
आपने देखा होगा कि wikipedia के सभी articles बहुत ज्यादा लम्बे होते हैं अर्थात उनका word count per post बहुत ज्यादा होता है. इसलिए उनकी ranking भी अक्सर number 1 होती है. लेकिन इसका अर्थ ये भी नहीं कि आप अपने post की stuffing करी जाएँ और फालतू का content लिखी जाएँ.
आपको इसलिए बढ़ी चालकी से बढ़िया content लिखना चाहिए और जितनी ज्यादा बातें आप अपने posts में बताएं उतना ही बेहतर होगा. Readers को bore होने से बचाने के लिए media का content में thorughout use कीजिये.


8. Internal Linking
Internal Linking एक और बहुत ज्यादा important factor है. इसकी भी मैं आपको सबसे बढ़िया example देना चाहूँगा, Wikipedia. आपने देखा होगा कि चाहे कोई भी wikipedia article हो, उसमे बहुत ज्यादा internal linking की होती है. आपको भी अपने blog posts में related content के साथ Internal Linking करनी चाहिए. Internal linking की example आप हमारे इस post में ही ले लीजिये. मेरे दूसरे posts जो-जो हमारे इस posts के साथ related है उनका लिंक मैं इस post में अलग-अलग जगह दिया है. आपको भी ऐसा ही करना है, यदि आप बढ़िया ranking प्राप्त करना चाहते हैं.


9.  External Linking
जिस प्रकार Wikipedia में internal linking की होती है उसी प्रकार वे एक Reference का अलग से section बनाकर External Linking भी करते हैं. आपको भी आपके article में अलग-अलग जगह पर जहाँ पर ज़रुरत पड़े, external linking भी करनी चाहिए. external linking की बात करें तो एक और important चीज़ है, backlinking जिसके बारे में आप हमारे नीचे दिए गए article में पढ़ सकते हैं.


10. Engaging Content लिखिए
आपको अपना content कुछ ऐसा लिखना चाहिए कि ज्यादा से ज्यादा users ज्यादा से ज्यादा समय के लुए उसके साथ engage हो पायें. एक SEO कुछ ऐसी होती है जिसमे हम केवल search engine factors पर ध्यान रखते हुए articles लिखते हैं. एक SEO ऐसी होती है जिसमे हम उन factors का ध्यान तो रखते ही हैं, उसके साथ में,  engaging content लिखते हुए अपने readers का भी ध्यान रखते हैं. एक बात हमेशा याद रखें कि आप content अपने readers के लिए लिखते हैं नाकि search engines के लिए.


कुछ महत्वपूर्ण बातें:

Keyword Placement के बारे में:
  • Title में keyword
  • Permalink में keyword
  • पहले paragraph में keyword
  • Image के alt tag में keyword
  • Throught Post में LSI keywords
  • Headings में keywords
  • 1.5% overall keyword density

 
कुछ चीज़ें जो बिलकुल न करें:
  • एक से ज्यादा H1 Tags को बिलकुल न use करें. आपके post का title already H1 में होता है.
  • Same H2 और H3 Tags को repeat न करें.
  • Keywords को article में stuff न कीजिये.


Friday, December 27, 2019

Skyrim Console Commands List 2020

Skyrim is a fantastic game that is liked by the audience all around the world, thanks to the scenes present in the game. Skyrim is a replayable game. There are some useful console commands of Skyrim. Using Skyrim console commands list, you can make the game easily playable and also can replay the game. Skyrim commands are handy if you are a beginner.
Today we are discussing console commands and their uses. To use these console commands or cheats you to enter your cheats by clicking tilde key (symbol is ~) on clicking this now you can enter your cheats in the game for your use.


Skyrim Console Commands


Skyrim Console Commands List 2019


1.Addshout you can add your desired dragon shout to your repertoire. To add type the name of dragon shout after the add shout command 2.AdvSkill using advskill command in any particular skill you can raise your level. You can use advskill command type skill id after the advskill. Here skill id is the skill question. 3.Player.advlevel    using this command a player can increase your character each time one level. Just use this command, and you have to do nothing. 4.Player.modav carry weight using this command you can raise your amount of random crap and you are now can stuff into the backpack. 5.Player.setav, speedmult using this command you have to choose a number that defines the faster level of your character. Max level is the highest level it is very fast. 6.Player.setcrimegold        this command is used to change or remove your wanter level. At 000 your wanter level gets clean as a whistle, and on 999 it’s your time to start legging it. 7.Player.setlevel            using the player.set level you can choose or set you decidedly as a hero or unheroic 8.Psb using psb command a player can unlock his every spell in the game.


Skyrim Gold console commands

Skyrim Gold console commands
1.Se-xchange as you understand using this command. You can change worng seen in the game. Use se-xchange to change the wrong seen of your player. 2.Showracemenu in starting a player has to make some decisions. Using showracemenu a player regret some of the decisions. 3.Tgm using tgm command a player get activated to god mode. 4.Tcl using tcl command you can walk in any direction using anything and walk in any direction. Tcl turn clipping off 5.Tim Tcl is endless mode. In tcl mode, you can’t kill, but still, you take some damage. 6.Rm using rm command you can activate or deactivate run mode. 7.Unlock using unlock command you can open any highlighted think like chest. Door any other thing that you wants to unlock.

Many gamers want the “world and environment console commands”. Some of the world and environment console commands given below. You can use these in the gameplay.
1.Fov -fov command is used to set your field or to view on the fly 2.Tai-Tai is a useful command. Tai used when we have to pause all AI command in the game. We can again start these command by again enter tai command. 3.Tcai-if you want to take a string from the flight use Tcai  this will render inhabitants of the game 4.Tfc-when you are in the sky and want the aerial view of the Skyrim then enter the tfc command in the game 5.Tfow-using tfow from the map you can remove all the fog elements


skyrim console commands perks

Tm using tm command every menu item get disable from the console window. By using tm command you can, it makes easy to capture a screenshot of gameplay. Tm also makes disable the console. To create UI enables you to have to enter the code again.
1.Tmm there is map marker in the game. You can make then enable and disable by adding 0 and 1 at the end of the command. 2.Tg-when enter tg toggles grass get on and off 3.Tt-when enter tt toggles tree get on and off 4.Tws-using tws you can disable the appearance of water

Item Console Commands

Many gamers want” item console commands”. Some of the item consoles command given below. You can use these in the gameplay.
1.Player.additem A number which gets enter should enter in 3 digit format. Just like 010 for ten 006 for six and so on.
2.Player.additem 0000000f Using this you can make any change that you want me your wallet. 3.Player.additem 0000000a using this you can add a load on a backpack that you have and this done quickly. 4.Coc qasmoke using this command you get a particular room. For anyone who not have anything or was a beginner, they have to try this. 5.Removeallitems if someone has stuff that you want, then you can enter this to stripped that person. His all the stuff comes to you.

Quest console commands

Quest console commands
1.Caqs    using this command all single stages get wrapped 2.Complete quest QUEST ID    without any effort you get finished all specified quest 3.Kill using kill command you can crash your victim on the floor. Make sure that you have highlighted him. 4.Killall by entering kill all command all the person near you gets die fast. 5.movetoqt    anyone cannot be bothered with your victim using this command 6.Player.sqs     using this command all the stages get displays Resurrect using these command you can bring anyone back to life. Make sure you highlighted them
7.Setstage quest id when you need a quick fix to use these commands this will back you to the particular stage.


Conclusion

On this page, we have mentioned some Skyrim console command. Using these commands, you can play the game more easily. On this page, we have mentioned player console commands, world and environment console commands, item console commands, quest console commands. You can use these commands on your gameplay. If you have any question, you can raise your query in the comment section given below. We will reply to your comment when we are free

Most common Voice search close out in 2019

Nine voice search stats to close out 2019

A look back at some of the year's key voice searches and virtual assistant metrics.


From smartphones to smart home appliances, artificial intelligence, voice and virtual assistants are very much at the center of a shift in the way we interact with digital devices. While voice has not yet lived up to its promise, it’s clear it will be an enduring feature of the digital user experience across an expanding array of connected devices.

Mobile = 59% of search

Way back in 2015, Google announced that mobile search had surpassed search query volumes on the desktop. But it never said anything more precise and hasn’t updated the figure. Hitwise, in 2016 and again in 2019, found that mobile search volumes in the aggregate were about 59% of the total, with some verticals considerably higher (e.g., food/restaurants 68%) and others lower (e.g., retail 47%).
This isn’t a voice stat, but it’s important because the bulk of voice-based queries and commands occur on mobile devices rather than the desktop.

The voice on the cusp of being the first choice for mobile search

According to early 2019 survey data (1,700 U.S. adults) from Perficient Digital, voice is now the number two choice for mobile search, after the mobile browser:
  1. Mobile browser
  2. Voice search
  3. Phone’s search box/window
  4. Search app
  5. Text a friend
However between 2018 to 2019, voice grew as a favored entry point for mobile search at the apparent expense of the browser. Thus it could overtake text input as the primary mobile search UI in 2020.

Nearly 50% using voice for web search

Adobe released survey data in July that found 48% of consumers are using voice for “general web searches.” This is not the debunked “50% of searches will be mobile in 2020,” data point incorrectly attributed to comScore.
The vast majority of respondents (85%) reported using voice to control their smartphones; 39% were using voice on smart speakers, which is a proxy figure for device ownership.
Here are the top use cases for voice usage, predominantly on smartphones:
  1. Directions while driving — 52%
  2. Making a phone call — 51%
  3. Sending a text — 50%
  4. Checking the weather — 49%
  5. Playing music — 49%

Directions a top voice use case

Consistent with the Adobe survey, an April Microsoft report found a more specific hierarchy of “search” use cases on smartphones and smart speakers. Again, however, this is a primarily smartphone-based list:
  1. Searching for a quick fact — 68 percent
  2. Asking for directions — 65 percent
  3. Searching for a business — 47 percent
  4. Researching a product or service — 44 percent
  5. Making a shopping list — 39 percent

Crossing the 100 million smart speaker threshold

During 2019 there were multiple reports and estimates that sought to quantify the overall number of smart speakers in the U.S. and global markets. In early 2019, Edison research projected that there were roughly 118 million smart speakers in U.S. homes. However, other analyst firms and surveys found different numbers, typically somewhat lower.
Because people often own more than one smart speaker, the number of actual individual owners of smart speakers is considerably lower than 100 million: 65 million or 58 million, depending on the survey.

Amazon dominating Google in smart speaker market

Amazon, with its low-priced and aggressively marketed Echo Dot, controls roughly 70% to 75% of the U.S. smart speaker market according to analyst reports. In Q3 2019, for example, Amazon shipped 3X as many smart speaker and smart display units as Google.
Analyst firm Canalys argues Amazon’s success is a byproduct of its market-leading direct channel and discounting. Google’s direct and channel sales have so far not been able to keep pace with Amazon’s efforts.

Virtual assistant usage: Siri and Google lead

In contrast to the smart speaker market share figures, virtual assistant usage is a different story. This is because most virtual assistant usage is on smartphones and Amazon doesn’t have one.
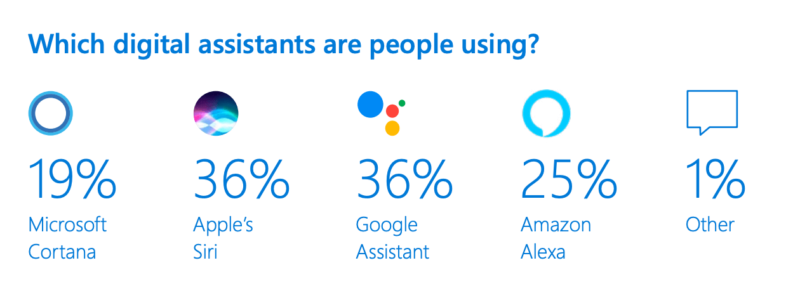
A Microsoft report (in April) found a different market share distribution, with the Google Assistant and Siri tied at 36%, followed by Alexa.
Source: Microsoft (2019)
There are other surveys that suggest Google Assistant’s usage is greater than Siri’s.

58% use voice to find local business information

The connection between mobile and local search is direct. While Google has in the past said that 30% of mobile searches are related to location, there are plenty of indications that the figure is actually higher. Google itself said the number was “a third” of search queries in September, 2010 (Eric Schmidt), 40% in May, 2011 (Marissa Mayer) and, possibly, 46% in October 2018.
Asking for driving directions is not always an indication of a commercial intent to go somewhere and buy something. But as the Adobe and Microsoft surveys indicate, it’s a primary virtual assistant/voice search use case. A voice search survey conducted in 2018 by BrightLocal also found:
  • 58% of U.S. consumers had done a local business search by voice on a smartphone
  • 74% of voice search users (the 58%) use voice to search for local businesses at least weekly
  • 76% of voice search users search on smart speakers for local businesses at least once a week, with the majority doing so daily

79% concerned about privacy with smart speakers

Multiple surveys indicate high satisfaction levels with voice search and virtual assistants. But, as with other digital media experiences, there are growing privacy concerns that may materially impact the development of the market.
A 2019 survey by Path Interactive found that “79% of survey respondents are at least somewhat concerned about the privacy implications of using voice search devices. Only 17% are not concerned.” That’s consistent with a 2018 survey of 1,000 U.S. adults by PriceWaterhouseCoopers, which found that 66% of those who hadn’t bought a smart speaker/display said they were concerned about privacy or data security.
Edison Research also found that concerns about hacking, government eavesdropping and that the devices were “always listening” was impacting smart speaker demand and potential future growth.

Conclusion: Hooked on voice

Even though voice search and voice commands are not utilized by everyone, what might be called the “voice habit” is already established. That doesn’t solve the smart speaker business model problem or suggest that these devices will ultimately fulfill their promise. But consumers will increasingly use voice to control their smartphones, connected devices in their homes and functions in their cars. That’s because the technology is already good and it’s only getting better. Marketers should be paying attention to how their listings render across these devices when voice is the search activator.

best social listening tools for 2020

As more brands turn to social media for customer insights, social listening tools are gaining momentum. Here are our top 6 picks for 2020.


Social listening gives you access to what people are saying about your brand, industry, or competitors across social media and the web – often without them being aware of you listening. If you know how to word your queries and filter the results, you’ll end up with the most authentic, unbiased insights you can get as a business.
In this post, we’ll take a look at some of the best social media and web monitoring tools to help you gain and act on those insights in the coming year. Let’s roll.

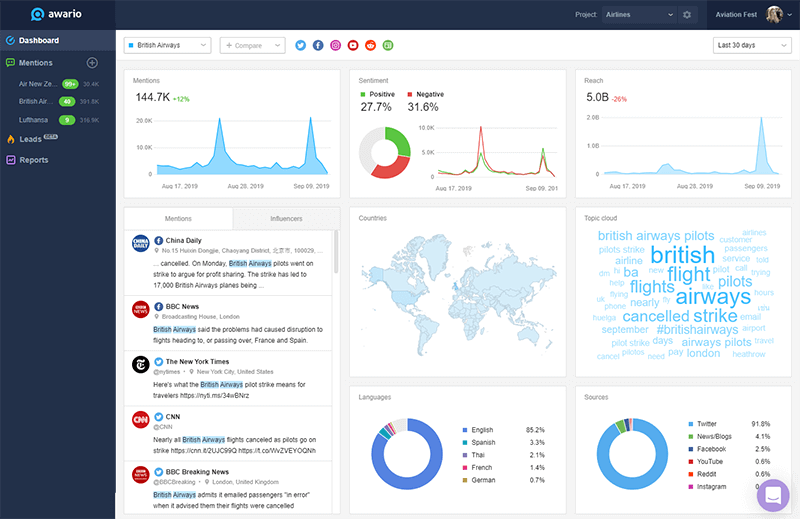
1. Awario

Affordable social listening and analytics with Enterprise-level capabilities.


Awario is a relatively new tool that (finally!) makes social media and web monitoring affordable for businesses of any size: with plans starting at $29/mo, Awario offers a lot of capabilities that you’ll find in Enterprise-level tools.

You can use the tool to monitor mentions of your brand, competitors, industry, or even set up complex Boolean queries for the less obvious use cases. For instance, Awario lets you detect plagiarized copies of your content, find linkless brand mentions that you can turn into links, and monitor new backlinks to your site.

The platform also offers a social selling tool, called Leads, as a free add-on to all users. The tool uses predictive insights to find people who’re asking for recommendations about a product like yours or looking for an alternative to your competitors.


Supported networks: Facebook, Twitter, Instagram, YouTube, Google+, Reddit, news and blogs, the web.


Benefits:
  • A Boolean search mode to set up flexible queries and improve the accuracy of the results.
  • An Influencers report outlining the most influential people talking about your brand, competitors, or industry.
  • A free Leads add-on for sales prospecting on social media.
  • Enterprise-level analytics such as sentiment analysis, location and language breakdown, and unlimited historical data available in all plans.

Pricing: Awario offers a free trial that lets you fully test the app out. Pricing starts at $29/mo for the Starter plan, with 3 monitoring alerts that let subscribers find 30,000 new mentions per month. Awario’s most popular Pro plan costs $89/mo with 10 alerts and 100,000 monthly mentions. Enterprise is $299/mo and includes 50 alerts and 500,000 mentions. If you choose to go with an annual plan, you’ll get 2 months for free.

2. Agorapulse


Social media management and monitoring for a growing business.


If you aren’t quite ready to invest into a standalone social listening or reputation management platform, Agorapulse is an excellent 2-in-1 option: it offers both the scheduling and monitoring bits. The tool will find @mentions of accounts you connect as well as comments on your social media posts, plus allow you to search for keywords of your choice across Twitter. The tool also lets you identify influencers within your social media audience and assign conversations to your team in a mouse click.

While Agorapulse doesn’t offer web monitoring, it’s a great choice if you’re mainly interested in social mentions.

Supported networks: Facebook, Twitter, Instagram, YouTube.

Benefits:
  • The ability to tag important mentions.
  • Being able to assign conversations to team members.
  • Audience insights that let you identify influencers and brand ambassadors.
  • A built-in CRM that lets you create lists of prospects and influencers.
  •  
Pricing: Agorapulse has a free trial if you’d like to test the app out first. The pricing starts at $49/mo for the Small plan, which comes with 3 social media profiles and a single user. Large is their most popular option at $199/mo, with 25 profiles to manage and 6 users. Agorapulse’s Enterprise solution is $299/mo with 40 profiles and 12 users.

3. TweetDeck

A handy tool for managing several Twitter accounts and monitoring mentions.


TweetDeck is Twitter’s official social media dashboard that lets you manage your Twitter presence as a business, particularly if you have multiple accounts that you regularly post to. The tool’s column layout lets you add in several
“streams”: feeds from people you follow, trending posts, direct messages, and mentions of any keywords of your choice.

For the latter, TweetDeck gives you access to Twitter’s search functionality, with the ability to narrow searches down using language and location filters, negative keywords, and date ranges. You can then engage with mentions on behalf of any of the Twitter accounts you connect to the app.
Supported networks: Twitter.
Benefits:
  • Built-in Twitter search filters, such as location, language, and negative keywords.
  • Twitter scheduling capabilities for multiple accounts.
  • A neat column layout that lets you keep your feeds organized.
Pricing: Free.

4. Keyhole

Real-time hashtag and keyword tracker for Twitter, Instagram, and the news.


Keyhole is another 2-in-1 social media tool: it lets you both automate your posts and track keywords or hashtags across Twitter and Instagram. On top of that, you can monitor brand mentions across blogs and news sites. The tool comes equipped with analytics, too, including sentiment analysis, keyword clouds, and mention maps that display which countries your social mentions come from.
Keyhole’s higher-tier plans also include premium features like tracking industry influencers, unlocking historical mentions, and getting API access to Keyhole’s data.


Supported networks: Twitter, Instagram, news and blogs.

Benefits:
  • Social media management capabilities.
  • Powerful analytics, such as sentiment analysis, keyword clouds, and mention maps.
  • API access available in higher-tier plans.

Pricing: Keyhole’s Basic plan costs $49/mo and comes with one keyword search and 5,000 monthly social media posts. The tool has 4 other plans, with the $599 Corporate option being the most popular with 10 searches and 250,000 posts. The highest-tier Enterprise plan can include a custom number of searches and posts, with pricing starting at $1,000/mo.


5. Mention

Real-time social media monitoring with data-rich, customizable reports.


Mention is another social media and web monitoring tool. Its focus is on real-time search – setting up an alert will give you results from the last 24 hours. Historical data is available upon request under the Custom plans.
Apart from social listening, Mention lets you discover Twitter and Instagram influencers by running quick keyword searches. The tool then lets you add influencers of your choice to lists, save your lists in CSV, and import them into your CRM tool.

Mention comes with data-rich reports available out of the box, but the real power is in the Insights Center where you can build your own custom reports and automate delivery.

Supported networks: Facebook, Twitter, Instagram, YouTube, Google+, Reddit, news and blogs, the web.

Benefits:
  • Tags that let you organize your mentions.
  • Influencer discovery and management.
  • An ability to build your own custom reports and automate delivery.
  • A Slack integration to send the latest mentions to your Slack channels.

Pricing: Before settling on a plan, you can test-drive Mention with a free trial. The $29 Solo plan includes 2 alerts and 3,000 mentions. Starter is offered at $99/mo and comes with 5 alerts and 5,000 mentions. There’s also a Custom plan available on request.

6. Brandwatch

Social media measurement and in-depth analytics for the Enterprise.


Brandwatch is one of the most powerful social listening tools in terms of analytics – but it’s also one of the more expensive ones. On top of the monitoring aspect, Brandwatch offers image recognition, demographic data about your audience, trending topics in your niche, API access, and dashboards that can be exported into customizable PowerPoint presentations.

Brandwatch also has its own data visualization platform called Vizia. The tool lets you visualize your Brandwatch data, plus combine it with insights from a number of integrations (including Google Analytics, Buzzsumo, and Hootsuite).

Supported networks: Facebook, Twitter, Instagram, YouTube, Google+, Pinterest, Sina Weibo, VK, QQ, news and blogs, the web.

Benefits:
  • Demographic data including gender, interests, occupation and location of your audience.
  • Image analysis that lets you find images containing your brand’s logo.
  • An ability to add preferred sites to collect mentions from.
  • A possibility to identify trending topics in your industry.
Pricing: Brandwatch is an Enterprise-level tool. Their most affordable Pro plan costs $800/month with 10,000 monthly mentions and 30 days of historical data. Custom Enterprise plans are available upon request.

Before you go
As more and more brands are turning to social media for market research, customer insights, competitor analysis, and even sales, social listening tools are getting increasingly powerful and affordable.
Whichever social media listening tool you settle on, don’t forget that the monitoring itself isn’t worth it if you’re not going to act on the data. Engage with the people mentioning you on social and make use of your social listening tool’s analytics to spot trends and adapt your marketing, customer service and product strategies – before your competitors do.


Why is Digital Marketing Important? What are the Advantages of Digital Marketing?

Computerized promoting envelops all advertising endeavors that utilization the web.

Where would it be a good idea for you to begin on the off chance that you need to build up your advanced advertising system? All the more significantly, for what reason do you need one?

Regardless of whether you take a gander at India or universally, there has been an immense move in showcasing and promoting. Purchasers are supported in their basic leadership process with their cell phones, influencers, content, online networking, and different clients. Brands are additionally managing a colossal measure of progress – shifting capacities to focus, rivalry, evolving inclinations, monetary difficulties, and increasing expenses.

We're here to address your questions and help you develop. For brands nowadays, contacting present day crowds accompanies its own chances and complexities. In this innovation driven time, utilizing advanced advances and channels is basic to accomplishing promoting goals.


Digital Marketing is more cost-effective than traditional marketing

Since digital marketing is measurable for varying objectives, brands can optimize their spends and have a better ROI. According to a study by Gartner, 40% of respondents claimed to gain considerable savings by using digital marketing methods. Digital marketing levels the field for small and big businesses alike, where even limited resources can go a long way.

Digital Marketing Helps You Engage With Targeted Audiences

Digital marketing helps you interact with mobile consumers ( the fastest-growing subset of the overall audience ) and precisely target them based on their demographics, attributes, and preferences. This increases marketing efficiency, improves retention rates, and increases customer satisfaction.

Digital Marketing Builds Trust and Reputation

Digital marketing leverages social media, reviews, testimonials, and the power of sharing to build a brand’s reputation. Easily-searchable and brands with a great presence on the internet tend to be trusted more by customers as well. Digital marketing opens doors to new customers through word-of-mouth and established credibility.

Digital Marketing Prepares You For The Future

You can’t compete or get ahead in this day and age without a digital presence or digital marketing. Businesses that adapt to the changing business environment have a better chance of success. According to Google, companies using digital marketing strategies have 2.8x better revenue growth expectancy.

Boost your Brand with Digital Marketing

A well-structured digital marketing plan can help you achieve the following for your brand:

Effective Social Media Presence

An effective social media presence means increased customer retention, new avenues for discoverability, and improved customer service. Social media encourages a dialogue between brands and their consumers and is one of the most proactive and real-time ways of building an audience.

Acquire New Customers and Retain Existing Ones

All marketing efforts, traditional and modern, aim to acquire new customers and improve retention. Among the many benefits of digital marketing, this is the most important – Digital marketing can help you reach the right audience, with precision, offer personalised attention, and bring in more business.

Creative Content

A well-thought-out content strategy with a multi-channel approach serves to engage existing and potential customers alike. A brand strategy with a unique and uniform design identity also creates a distinctive imprint on customers – you’d recognise a Coke or an Adidas logo anywhere and in all formats. Creating and disbursing content for consumption will build your brand identity and tell your story to potential customers.

Shareability

Shareable content such as blogs, memes, videos, infographics, podcasts have the potential to go viral and rapidly spread through the internet. This introduces new consumers to your brand and stories, helping you seek new leads and attract new customers.

Brand Profile

We’ve talked about a brand’s reputation and building trust before. Digital marketing truly helps your brand build a profile on the internet, be it through a website, an offline address in a local directory or social media. All of this information impacts SEO, brand searchability, and page rankings – customers actively seek out a brand’s profile and trust those brands with established credibility, reviews, and a strong history.

Why Do You Need a Digital Marketing Plan?

Failing to plan is planning to fail. In digital marketing strategy, the adage is even truer – every brand needs a well-defined strategy to create awareness, get leads, and convert them into customers.

Defines your Goals and Objectives

A well-defined digital marketing strategy will set objectives and goals first – what does your brand value the most – revenue? profit? engagement? sales? leads? Building a plan of action can help you get from where you are to where you want to be by outlining the answers to crucial questions such as target audience, budgets, frequency, direction etc.

Helps You Get to the Digital Consumer

We’re not just shopping online more – we’re spending time, energy, and much of our resources digitally. Purchase decisions are increasingly influenced by social media and search engines. A well-defined digital marketing strategy keeps the digital consumer and his/her habits at the centre and defines a path to driving awareness and engagement.

Measurable Results

The beauty of digital marketing is its measurability, you can measure the results from your campaigns, including visitors, sales, time spent, conversions, growth rates and much, much more. With a solid digital marketing strategy in place, you can track your current results, optimise your efforts or change strategy and direction to achieve success.

Interactive Experience

With so many digital channels available such as email, social media marketing, podcasts, videos, affiliate marketing, and blogs – you can truly take your content experience to the next level. You can offer your customers the content they want, personalise it, and tell interactive stories. A great digital marketing strategy also includes a dialogue with your customers, encouraging user-generated content, feedback, reviews, and community-building.

Increased Reach and Visibility

With a well-built digital marketing plan, you can strategically increase your reach and visibility, and leave your competitors behind. You can reach your target audience, explore newer segments, and run A/B tests in different markets through a digital medium. It is easier than ever to move beyond a local audience and go national or even global.
Businesses must define their goals, KPIs, and tactics through multiple digital channels and execute their strategy consistently and effectively.

What are the Best Digital Marketing Strategies for 2020? What are the Trends to Look Out For?

Investing in Digital Marketing can no longer be ignored. According to eMarketer, “worldwide digital ad spend is set to reach $375 billion by 2021”. Take a look at the trends you should watch out for when you’re drawing up your digital marketing strategy for 2020:

Modern Technologies That Are Enhancing Digital Marketing

  • Automation in marketing is the next phase of digital marketing evolution. With vast quantities of data available, there is an increased focus on personalisation and automation
  • Technology and marketing go hand-in-hand – the future is here, especially with artificial intelligence. Marketing insights, customer experience, and technology is the answer to providing a holistic experience to the customer.
  • Digital innovations such as AR, VR, and voice will help marketers provide better service to consumers. Tech giants such as Facebook are rolling out interactive experiences such as AR ads in order to drive conversion.
  • Customers prefer omnichannel retail as opposed to just online or offline-only businesses. Businesses with offline presence are investing in measuring technologies for footfalls and online campaign results

Digital Marketing Channels to Focus On in 2020

  • Google and Facebook aren’t the biggest digital ad players anymore – Amazon ads have entered the fray and are taking off.
  • Huge changes are expected in Google Shopping – ready your brand to be shopping-heavy. Google has already started rolling out shopping tabs through organic searches.
  • With the advent of voice assistants such as Alexa, Siri and Google Home, voice search and voice advertising is on the rise. This marks a big change in search patterns and SEO as well.
  • Changes in search algorithms mean that Search engine optimization will continue to get refined. This will result in new opportunities as well as changes in existing rankings.
  • Video remains king and consumption is at an all-time high – video production, content creation and native advertising in video are all opportunities to be explored in 2020.

Improving Customer Experience With Digital Marketing

  • Chatbots will continue to be popular. They save costs by answering questions on your behalf. Consumers love the unbiased, personalised attention of software programs that interact with website visitors and customers.
  • Private messaging apps such as Whatsapp, Wechat and Viber are gaining popularity with brands – for shopping, for chatting, and for communication. The huge reach of these is still untapped and they are expected to grow as a mass reach marketing channel.
  • As social media channels continue to evolve and add new features, social media remains an important channel to spend your time on. It is a great way to showcase your creativity and storytelling and create a brand connect.

Planning your digital marketing strategy for 2020 can be a daunting task. How should you allocate your budget to achieve the greatest return on investment? What new technology and trends should you plan for? What is best for your brand?
We understand the coming and current digital trends and recommend that you build a digital marketing plan keeping in mind your customer and the most effective way to reach him/her. You can be exceptional at digital marketing in 2020 – determine your goals and objectives, build an appropriate plan, experiment, measure, implement, and revise. Personalised communication, a focus on holistic experience, and newer, updated digital channels and technologies are coming in 2020 – are you ready?


What is Portal use and difference from Iframe

We’ve written a comprehensive guide to Google Portals – an ambitious new concept for mobile web design. A new page transition experience for Chrome, this seems to be Google’s attempt at rethinking navigation. The goal is to help developers create web experiences with links that feel as seamless and fluid as a native app. In the world of cross-domain experiences, this is exciting news!

What are Portals and how do they work?

In May 2019, Google announced a new upgrade to iFrame technology – Portals are a new web platform API that aim to provide a new way of loading and navigating through web pages. Similar to classic < iframe> tags, portals will work with a new HTML tag < portal >, allowing web developers to embed remote content in their pages.
“Portals are like iFrames that you can navigate to,” explained Barb Palsar, who leads Google’s global product partnerships. “When a user opens a Portal, the Portal becomes the top-level page. Portal enables fluid, composed journeys within a site or across multiple sites.”
Portals are only supported in the latest version of Chrome Canary for Android, Mac, Windows, Linux, and Chrome OS.

Benefits of Portals

  • Seamless Transitions
  • Faster Page Loading Time
  • Increased Security and Privacy

Concerns Surrounding Portals:

  • Data Usage
  • Backward transition to the parent page

Why Did IFrames Need an Upgrade?

Issues that are commonly seen with IFrames include:
  • Your site becomes vulnerable to malicious sites and cross-site attacks
  • They can lead to phishing your user’s data
  • They can be confusing and causes usability issues
  • They are bad for SEO
  • They are slow to load, resulting in terrible user experience
  • Cookie support is limited

Why are portals better than using iframe or classic links?

  • Portals allow users to navigate inside the content they are embedding – something that iframes do not allow for security reasons.
  • Portals can also overwrite the main URL address bar, meaning they are useful as a navigation system, and more than embedding content – the most common way in which iframes are used today.
  • Portals have the potential to provide protection against potential phishing attacks by changing the URL bar without forcing the user to break into an entirely new popup window or tab.
  • The content inside portals can be pre-loaded while the user scrolls through a page, and be ready to expand into a new page without having the user wait for it to load.
  • Portals support speedier and better transitions between web pages and could be used to improve web page navigation on mobile devices, where touch gestures make using portals a seamless experience.
  • Portals allow a user to watch/listen to embedded content and then transition seamlessly to its origin page, where they could leave comments or open other media.
  • If you have multiple websites that cross-reference one another, you can also use Portals to create seamless navigations between two different websites.

How to use Google Portals with Your Website or Blog?

Portals are slated to be the standard way in which websites transition between links. For e.g., when a user is navigating a news site and they reach the bottom of a story, related links for other stories are embedded as portals, which the user can click and seamlessly transition to a new page.
See Portals in Action:

Portals in HTML

If you’re not using it yet, start using Chrome Canary – an experimental version of the Chrome browser aimed at developers, experienced techies, and browser enthusiasts. Try out Portals in Chrome Canary by flipping an experimental flag: chrome://flags/#enable-portals. Once Portals are enabled, confirm in DevTools that you have the new shiny HTMLPortalElement.
A simple example is showcased on web.dev. If you want to quickly experience what Portals feel like, try using uskay-portals-demo.glitch.me.on Chrome Canary.
There are 3 features you must be familiar with:
  • The <portal> element: The HTML element itself. The API is very simple. It consists of the src attribute, the activate function and an interface for messaging (postMessage). activate takes an optional argument to pass data to the upon activation.
  • The portalHost interface: Adds a portalHost object to the window object. This lets you check if the page is embedded as a element. It also provides an interface for messaging (postMessage) back to the host.
  • The PortalActivateEvent interface: An event that fires when the is activated. There is a neat function called adoptPredecessor which you can use to retrieve the previous page as a element. This allows you to create seamless navigations and composed experiences between two pages.
The demo below demonstrates how Portals can enable a seamless user experience between a website and third party embed content

How to embed Google Portals in WordPress

Since Google Portals are only available on Chrome Canary right now, we will talk through how to embed iFrame in WordPress. Embedding portals in WordPress is expected to be similar once the feature is rolled out in its entirety.
Embedding WordPress iFrame is easier than you imagine. The traditional way to do it is by using the HTML attributes <IFrame>.To do this, simply take the URL of the page you want to embed, and use it as the source for the Tag. Then, your code becomes:
<iframe src=”your_webpage_url” iframe>
You can add more parameters to your tag:
  • Width/Height– For height and Width of the iFrame window, define values in Px
  • Frameborder – For displaying or hiding the Frameborder, use values ‘0’ or ‘1.’
  • Align – For defining the window’s page alignment, Use values “left” “right” “right” “top” “bottom.”
  • Scrolling – For disabling or enabling Scrolling inside the Window. Use values “yes,” “no”
Then simply paste your code into the text editor of your post on WordPress, and that should display your post easily.
Following this process, you should be able to easily embed any page on your posts. Furthermore, content websites such as Youtube have an in-built embedding feature for you to share the content. Simply click on Share and Embed and copy the given URL.
You can also use plugins such as Advanced iFrame plugin by Michael Dempfle to embed cross-domain content.

How can you style Google Portals? How can you center Google Portals?

Once again, we’ll take the example of IFrames since Google Portals will tend to work similarly. When you embed an element in your HTML, you have two opportunities to add CSS styles to it:
You can style the IFRAME itself or you can style the page inside the IFRAME. Here are some CSS styles we should include on iframes:
  • margin
  • padding
  • border
  • Width
  • height
For your styles, you can try adding scrolling borders, rotation, shadows, corners – just like any other web page.
To center align an ‘IFrame’ or any other HTML element you can use CSS ‘margin’ property. To achieve this you should have to define the width of the element. You can set ‘margin-left: auto;’ and ‘margin-right: auto;’ to center align our iframe block.

New HTML Attributes of IFrame

HTML5 brought three new elements to the IFrame element to address certain security and design issues.
  • Sandbox Element: The “sandbox” attribute of the “IFrame” element is a very useful security feature of iframes. When you place it in an IFrame element, you are instructing the user agent to disallow features that might cause a security risk to the site and its users. You can also use it to re-enable some features.
  • srcdoc Attribute: The “srcdoc” attribute is an attribute that gives the web designer more control over the iframes as well as more security. Instead of linking to a Web page at a different URL, the web designer places the HTML that is to display in an IFeame inside the “srcdoc” attribute.
  • Seamless attribute: The “seamless” attribute is a boolean attribute that tells the browser to display the IFrameas though it were a part of the parent document. If you want your IFrame to display seamlessly, just include this attribute in the element.

Alternatives to IFrames

One of the important things to note here is that IFrames can hold back your SEO efforts. This is because anything within a <iframe> cannot be indexed and Google credits the page where the embed code was grabbed and not the page where it is embedded.
To improve your content optimisation, try the following alternatives to IFrames for common used cases:
  • Instead of Google Maps embed, try Google Maps API that generates a JavaScript code.
  • When it comes to Youtube videos, use the old embed code. You can also use a tool like Wistia.
  • Make sure to add closed captions or subtitles on videos by using a .srt file
  • Encourage reviews and ratings on site instead of embedding a widget from a third-party site
  • Use AJAX to update a container on your web page.
  • Use elements like <object> and <embed>
  • Use tools like Zoid

Conclusion

While it is early days for Google Portals, it has potential. It could become the standard technology for embedding content, replacing IFrames. Portals allow a user to watch/listen to embedded content and then transition seamlessly to its origin page, where they could leave comments or open other media.
Google has announced that it has now launched the Portals API as an experimental feature behind a flag in Chrome Canary and is looking for developer community feedback.
Have you tried using them yet? Comment below and let us know your experience!

Thursday, December 26, 2019

Connect EC2 using Putty generator

Connecting to Your Linux Instance from Windows Using PuTTY


  1. The following instructions explain how to connect to your instance using PuTTY, a
                      free 
                         SSH client for Windows. If you receive an error while attempting to connect to
                      your instance, 
                         see Troubleshooting Connecting 
                            to Your Instance.
                   
    After you launch your instance, you can connect to it and use it the way that you'd use a computer sitting in front of you.
    Note
    After you launch an instance, it can take a few minutes for the instance to be ready so that you can connect to it. Check that your instance has passed its status checks. You can view this information in the Status Checks column on the Instances page.

    Prerequisites

    Before you connect to your Linux instance using PuTTY, complete the following prerequisites:
    • . If you already have an older version of PuTTY installed, we recommend that you download the latest version. Be sure to install the entire suite.
    • Convert your private key using PuTTYgen
      Locate the private key (.pem file) for the key pair that you specified when you launched the instance. Convert the .pem file to a .ppk file for use with PuTTY. For more information, follow the steps in the next section.

    Convert Your Private Key Using PuTTYgen

    PuTTY does not natively support the private key format for SSH keys. PuTTY provides a tool named PuTTYgen, which converts keys to the required format for PuTTY. You must convert your private key (.pem file) into this format (.ppk file) as follows in order to connect to your instance using PuTTY.
    To convert your private key
    1. From the Start menu, choose All Programs, PuTTY, PuTTYgen.
    2. Under Type of key to generate, choose RSA.
      
       RSA key in PuTTYgen
      If you're using an older version of PuTTYgen, choose SSH-2 RSA.
    3. Choose Load. By default, PuTTYgen displays only files with the extension .ppk. To locate your .pem file, select the option to display files of all types.
      
       Select all file types
    4. Select your .pem file for the key pair that you specified when you launched your instance and choose Open. Choose OK.
    5. To save the key in the format that PuTTY can use, choose Save private key. PuTTYgen displays a warning about saving the key without a passphrase. Choose Yes.
    1. Note
      A passphrase on a private key is an extra layer of protection. Even if your private key is discovered, it can't be used without the passphrase. The downside to using a passphrase is that it makes automation harder because human intervention is needed to log on to an instance, or to copy files to an instance.
    2. Specify the same name for the key that you used for the key pair (for example, my-key-pair). PuTTY automatically adds the .ppk file extension.
    Your private key is now in the correct format for use with PuTTY. You can now connect to your instance using PuTTY's SSH client.

    Connecting to Your Linux Instance

    Use the following procedure to connect to your Linux instance using PuTTY. You need the .ppk file that you created for your private key. If you receive an error while attempting to connect to your instance, see Troubleshooting Connecting to Your Instance.
    To connect to your instance using PuTTY
    1. Start PuTTY (from the Start menu, choose All Programs, PuTTY, PuTTY).
    2. In the Category pane, choose Session and complete the following fields:
      1. In the Host Name box, enter user_name@public_dns_name (see Get Information About Your Instance for how to get the public DNS name of the instance). Be sure to specify the appropriate user name for your AMI. For example:
        • For Amazon Linux 2 or the Amazon Linux AMI, the user name is ec2-user.
        • For a CentOS AMI, the user name is centos.
        • For a Debian AMI, the user name is admin or root.
        • For a Fedora AMI, the user name is ec2-user or fedora.
        • For a RHEL AMI, the user name is ec2-user or root.
        • For a SUSE AMI, the user name is ec2-user or root.
        • For an Ubuntu AMI, the user name is ubuntu.
        • Otherwise, if ec2-user and root don't work, check with the AMI provider.
      2. (IPv6 only) To connect using your instance's IPv6 address, enter user_name@ipv6_address. Be sure to specify the appropriate user name for your AMI. For example:
        • For Amazon Linux 2 or the Amazon Linux AMI, the user name is ec2-user.
        • For a CentOS AMI, the user name is centos.
        • For a Debian AMI, the user name is admin or root.
        • For a Fedora AMI, the user name is ec2-user or fedora.
        • For a RHEL AMI, the user name is ec2-user or root.
        • For a SUSE AMI, the user name is ec2-user or root.
        • For an Ubuntu AMI, the user name is ubuntu.
        • Otherwise, if ec2-user and root don't work, check with the AMI provider.
      3. Under Connection type, select SSH.
      4. Ensure that the Port value is 22.
      
       PuTTY configuration - Session
    3. (Optional) You can configure PuTTY to automatically send 'keepalive' data at regular intervals to keep the session active. This is useful to avoid disconnecting from your instance due to session inactivity. In the Category pane, choose Connection, and then enter the required interval in the Seconds between keepalives field. For example, if your session disconnects after 10 minutes of inactivity, enter 180 to configure PuTTY to send keepalive data every 3 minutes.
    4. In the Category pane, expand Connection, expand SSH, and then choose Auth. Complete the following:
      1. Choose Browse.
      2. Select the .ppk file that you generated for your key pair and choose Open.
      3. (Optional) If you plan to start this session again later, you can save the session information for future use. Under Category, choose Session, enter a name for the session in Saved Sessions, and then choose Save.
      4. Choose Open.
      
       PuTTY configuration - Auth
    5. If this is the first time you have connected to this instance, PuTTY displays a security alert dialog box that asks whether you trust the host to which you are connecting.
    6. (Optional) Verify that the fingerprint in the security alert dialog box matches the fingerprint that you previously obtained in (Optional) Get the Instance Fingerprint. If these fingerprints don't match, someone might be attempting a "man-in-the-middle" attack. If they match, continue to the next step.
    7. Choose Yes. A window opens and you are connected to your instance.
    1. Note
      If you specified a passphrase when you converted your private key to PuTTY's format, you must provide that passphrase when you log in to the instance.
    If you receive an error while attempting to connect to your instance, see Troubleshooting Connecting to Your Instance.

    Transferring Files to Your Linux Instance Using the PuTTY Secure Copy Client

    The PuTTY Secure Copy client (PSCP) is a command line tool that you can use to transfer files between your Windows computer and your Linux instance. If you prefer a graphical user interface (GUI), you can use an open source GUI tool named WinSCP. For more information, see Transferring Files to Your Linux Instance Using WinSCP.
    To use PSCP, you need the private key you generated in Convert Your Private Key Using PuTTYgen. You also need the public DNS address of your Linux instance.
    The following example transfers the file Sample_file.txt from the C:\ drive on a Windows computer to the ec2-user home directory on an Amazon Linux instance:
    pscp -i C:\path\my-key-pair.ppk C:\path\Sample_file.txt ec2-user@public_dns:/home/ec2-user/Sample_file.txt
    (IPv6 only) The following example transfers the file Sample_file.txt using the instance's IPv6 address. The IPv6 address must be enclosed in square brackets ([]).
    pscp -i C:\path\my-key-pair.ppk C:\path\Sample_file.txt ec2-user@[ipv6-address]:/home/ec2-user/Sample_file.txt

    Transferring Files to Your Linux Instance Using WinSCP

    WinSCP is a GUI-based file manager for Windows that allows you to upload and transfer files to a remote computer using the SFTP, SCP, FTP, and FTPS protocols. WinSCP allows you to drag and drop files from your Windows machine to your Linux instance or synchronize entire directory structures between the two systems.
    To use WinSCP, you need the private key that you generated in Convert Your Private Key Using PuTTYgen. You also need the public DNS address of your Linux instance.
    1. Download and install WinSCP from http://winscp.net/eng/download.php
  2. . For most users, the default installation options are OK.
  3. Start WinSCP.
  4. At the WinSCP login screen, for Host name, enter the public DNS hostname or public IPv4 address for your instance.
    (IPv6 only) To log in using your instance's IPv6 address, enter the IPv6 address for your instance.
  5. For User name, enter the default user name for your AMI.
    • For Amazon Linux 2 or the Amazon Linux AMI, the user name is ec2-user.
    • For a CentOS AMI, the user name is centos.
    • For a Debian AMI, the user name is admin or root.
    • For a Fedora AMI, the user name is ec2-user or fedora.
    • For a RHEL AMI, the user name is ec2-user or root.
    • For a SUSE AMI, the user name is ec2-user or root.
    • For an Ubuntu AMI, the user name is ubuntu.
    • Otherwise, if ec2-user and root don't work, check with the AMI provider.
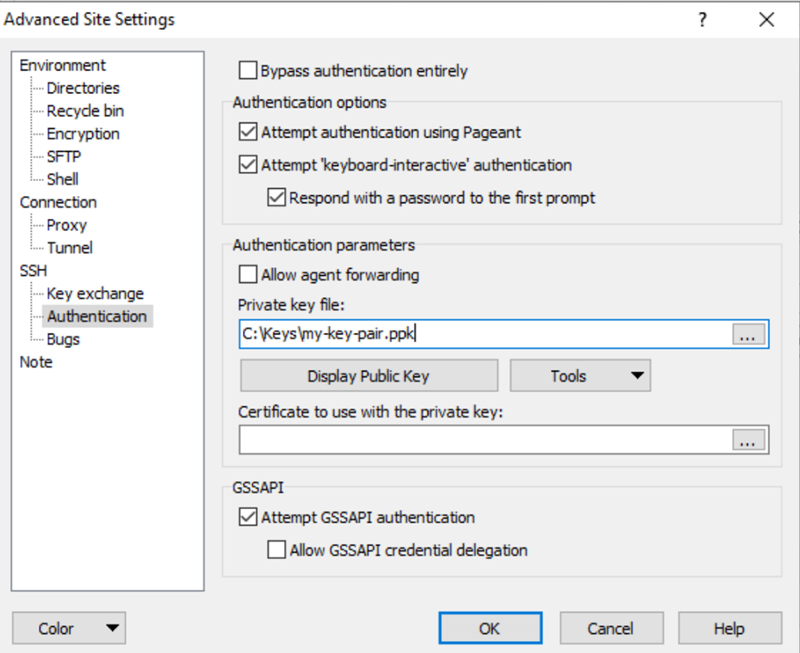
  6. Specify the private key for your instance. For Private key, enter the path to your private key, or choose the "..." button to browse for the file. To open the advanced site settings, for newer versions of WinSCP, choose Advanced. To find the Private key file setting, under SSH, choose Authentication.
    Here is a screenshot from WinSCP version 5.9.4:
    
       WinSCP Advanced screen
    WinSCP requires a PuTTY private key file (.ppk). You can convert a .pem security key file to the .ppk format using PuTTYgen. For more information, see Convert Your Private Key Using PuTTYgen.
  7. (Optional) In the left panel, choose Directories. For Remote directory, enter the path for the directory to which to add files. To open the advanced site settings for newer versions of WinSCP, choose Advanced. To find the Remote directory setting, under Environment, choose Directories.
  8. Choose Login. To add the host fingerprint to the host cache, choose Yes.
    
       WinSCP screen
  9. After the connection is established, in the connection window your Linux instance is on the right and your local machine is on the left. You can drag and drop files directly into the remote file system from your local machine. For more information on WinSCP, see the project documentation at http://winscp.net/eng/docs/start
  10. .
    If you receive a "Cannot execute SCP to start transfer" error, you must first install scp on your Linux instance. For some operating systems, this is located in the openssh-clients package. For Amazon Linux variants, such as the Amazon ECS-optimized AMI, use the following command to install scp.
    [ec2-user ~]$ sudo yum install -y openssh-clients