Friday, February 14, 2020

State the use of tree component in application in Java

This article explains working with JTree and proceeds to show some examples.
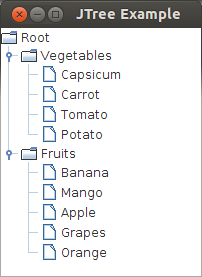
We will write code to achieve a JTree output like:
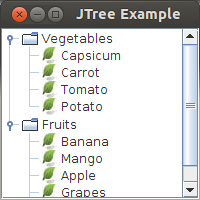
JTree with Custom Image Icon
Output

Table of Contents:

1.Introduction
2.Developing a Simple JTree
3.Adding More Children
4.Customizing Tree's Display
5.Adding a Scrollpane
6.Showing Root Handles
7.Hiding Root Node
8.Changing Visual Icons
9.Event Handlers
 

1. Introduction to JTree:

JTree is a Swing component with which we can display hierarchical data. JTree is quite a complex component. A JTree has a 'root node' which is the top-most parent for all nodes in the tree. A node is an item in a tree. A node can have many children nodes. These children nodes themselves can have further children nodes. If a node doesn't have any children node, it is called a leaf node.
The leaf node is displayed with a different visual indicator. The nodes with children are displayed with a different visual indicator along with a visual 'handle' which can be used to expand or collapse that node. Expanding a node displays the children and collapsing hides them.
 

2. Developing a Simple JTree:

 Let us now attempt to build a simple JTree. Let us say we want to display the list of vegetables and fruits hierarchically.
The node is represented in Swing API as TreeNode which is an interface. The interface MutableTreeNode extends this interface which represents a mutable node. Swing API provides an implementation of this interface in the form of DefaultMutableTreeNode class.
We will be using the DefaultMutableTreeNode class to represent our node. This class is provided in the Swing API and we can use it to represent our nodes. This class has a handy add() method which takes in an instance of MutableTreeNode.
So, we will first create the root node. And then we can recursively add nodes to that root. Let us start with a simple root with just 2 nodes:
1
2
3
4
5
6
7
8
9
10
11
12
13
14
15
16
17
18
19
20
21
22
23
24
25
26
27
28
29
30
31
32
33
34
35
36
37
38
39
package net.codejava.swing;
import javax.swing.JFrame;
import javax.swing.JTree;
import javax.swing.SwingUtilities;
import javax.swing.tree.DefaultMutableTreeNode;
public class TreeExample extends JFrame
{
    private JTree tree;
    public TreeExample()
    {
        //create the root node
        DefaultMutableTreeNode root = new DefaultMutableTreeNode("Root");
        //create the child nodes
        DefaultMutableTreeNode vegetableNode = new DefaultMutableTreeNode("Vegetables");
        DefaultMutableTreeNode fruitNode = new DefaultMutableTreeNode("Fruits");
        //add the child nodes to the root node
        root.add(vegetableNode);
        root.add(fruitNode);
         
        //create the tree by passing in the root node
        tree = new JTree(root);
        add(tree);
         
        this.setDefaultCloseOperation(JFrame.EXIT_ON_CLOSE);
        this.setTitle("JTree Example");       
        this.pack();
        this.setVisible(true);
    }
     
    public static void main(String[] args)
    {
        SwingUtilities.invokeLater(new Runnable() {
            @Override
            public void run() {
                new TreeExample();
            }
        });
    }       
}
As explained earlier, we create a root node and add child nodes to it. Note that, when we create the JTree instance, we just pass the root node instance. This is because, the root node contains all the information including the children.

The output shows the root node and the two children. Note the difference in the icon that is displayed prior to the text. The nodes which have children are indicated with a folder icon and the leaf nodes are displayed with a different icon.


3. Adding More Children to JTree

Let us now add more children to the vegetable and fruits node. This is very simple. We just need to add DefaultMutableTreeNode instances to the vegetableNode and the fruitNode instance, like:
1
2
3
4
5
6
7
8
9
10
11
DefaultMutableTreeNode vegetableNode = new DefaultMutableTreeNode("Vegetables");
vegetableNode.add(new DefaultMutableTreeNode("Capsicum"));
vegetableNode.add(new DefaultMutableTreeNode("Carrot"));
vegetableNode.add(new DefaultMutableTreeNode("Tomato"));
vegetableNode.add(new DefaultMutableTreeNode("Potato"));
DefaultMutableTreeNode fruitNode = new DefaultMutableTreeNode("Fruits");
fruitNode.add(new DefaultMutableTreeNode("Banana"));
fruitNode.add(new DefaultMutableTreeNode("Mango"));
fruitNode.add(new DefaultMutableTreeNode("Apple"));
fruitNode.add(new DefaultMutableTreeNode("Grapes"));
fruitNode.add(new DefaultMutableTreeNode("Orange"));
When we run the program, we get the following output:

JTree Collapsed Parent Nodes
More Children Added

We can see that the icon displayed for the 'Vegetables' and 'Fruits' node has changed from a leaf icon to a folder icon. This indicates that these nodes have children themselves now. Also, note the handler icon (the one that looks like a key) that is displayed besides these nodes. These can be clicked on to expand the nodes.

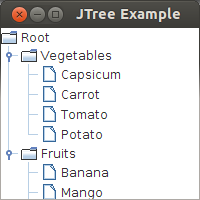
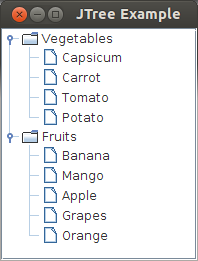
Let us now run the program again and click on both these handles to expand them. We get the following output:

JTree Expanded Parent Nodes
Expanded Tree

Once we expand the nodes, we can see all the items in the tree displayed in a nice hierarchical structure. Also note that the handler is shown with a different indicator icon.


4. Customizing JTree's Display:

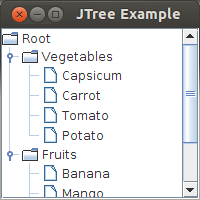
Let us now try and customize a JTree's display. Let us now run the program again and click on the handles. Then, resize the frame to use less height. We will get the following output:

JTree without Scrollpane
Tree without Scrollbars

As we can see, when the frame is resized, the items are hidden. Instead, we would
want to display a scrollbar and allow the user to scroll up and down to see the entire tree data.


5. Adding a Scrollpane for JTextField

Doing this is very simple. Like many other Swing components, we just need to wrap our tree within a JScrollPane and add it to the frame. Instead of adding the tree to the frame, we add the scrollpane, like:

add(new JScrollPane(tree));

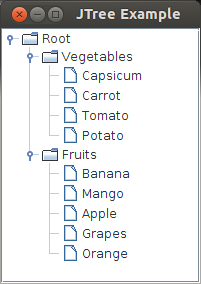
Let us now run the program again, click on the handler icons to expand the nodes and resize the frame. We will get an output like this:

JTree with Scrollpane
Tree with Scrollbars

We can see that now a scrollbar is added and we can scroll to see the nodes. Now, try and collapse one of the nodes. We can see that the scrollbar disappears. The scroll bar appears when it has items beyond the display area.

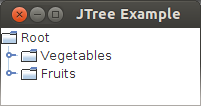
6. Showing Root Handles for JTree:

When you have a close look at the output again, we see that the 'Vegetables' and 'Fruits' nodes have the 'handler' icon, but the 'Root' node doesn't. The root node is the parent of all nodes, so, it would be possible for us to expand and collapse this too. If you double-click on the root node, you can actually collapse and expand it. However, this is not very convenient and consistent with the rest of the tree.

So, let us now try and display the handle for the root node. This can be done with a simple API call such as:

tree.setShowsRootHandles(true);

Let us now run the program again. We can see that the root handle is shown:

JTree with Root Handles
Tree with Root Handles Displayed

7. Hiding Root Node of JTree

The root node is the topmost in the hierarchy. However, the display of root node may not be needed in some cases. For example, we have been using a root node displayed with the text 'Root'. This is not very useful. So, what if we want to hide it? This is possible with a simple API call:

tree.setRootVisible(false);

Let us now run the program. We get the following when the trees are expanded:

JTree Root Node Hidden
Tree with Root Node Hidden
Note that we still make the call to tree.setShowsRootHandles(true) as otherwise we will not see the root handles for the 'Vegetables' and 'Fruits' node.


8. Changing the Visual Icons for JTree

JTree uses different icons to represent leaf node and nodes with children as we have seen above. What if we need to provide our own icons for this purpose? It is very much possible. We need to make use of the renderer to do this.

JTree Rendering:

JTree delegates the display of its items to Renderers. By default, a renderer is automatically created for a JTree to display all its items. The rendering is represented by an interface called TreeCellRenderer. The Swing API provides a default implementation of this interface known as DefaultTreeCellRenderer. This class has some handy methods which we can use to customize the display.

Using the DefaultTreeCellRenderer:

We will be creating an instance of DefaultTreeCellRenderer class and using the method setLeafIcon() to set the icon for all our leaf nodes. This method takes an instance of ImageIcon class. The ImageIcon class is used to handle the display of images. So, we will first create an ImageIcon instance and then use it with the renderer:

1
2
3
ImageIcon imageIcon = new ImageIcon(TreeExample.class.getResource("/leaf.jpg"));
DefaultTreeCellRenderer renderer = new DefaultTreeCellRenderer();
renderer.setLeafIcon(imageIcon);
 
The first line uses the standard mechanism to load images where the image is part of the application (packaged within the jar). Then we create a DefaultTreeCellRenderer instance and call the setLeafIcon() method by passing in this ImageIcon instance. Let us now run the program and expand the nodes to see the image being used for the leaf nodes.
JTree with Custom Image Icon
Tree with Custom Image Icon for Leaf Nodes


9. Set Event Handlers for JTree

Let us now try and develop event handlers for tree. Knowing the currently selected node will be one of the most useful events to know. Event handling in JTree is very similar to that of other Swing components. We register an event listener and are notified when the event happens.

Developing a SelectionListener:

We need to add a TreeSelectionListener to listen for selection events. This is an interface defined in Swing API and we need to implement the valueChanged() method. The source of the selection is passed as a parameter to this method.

The selection in JTree is handled by a class called TreeSelectionModel. So, the JTree delegates all the selection related work to this class.

We will first add a JLabel to be displayed at the bottom. Whenever a node in the tree is selected, we will display the path of the selected node.

Let us first declare a JLabel instance variable:
private JLabel selectedLabel;

We will then add it to the bottom of the frame:
selectedLabel = new JLabel();
add(selectedLabel, BorderLayout.SOUTH);

We will then add the selection listener as follows:

1
2
3
4
5
6
tree.getSelectionModel().addTreeSelectionListener(new TreeSelectionListener() {
    @Override
    public void valueChanged(TreeSelectionEvent e) {
        selectedLabel.setText(e.getPath().toString());
    }
});
 
We add a selection listener to the tree selection model. The TreeSelectionListener has one method which we implement. We use the event source to invoke the getPath() method and set it to the label that we added earlier. When we run the program, we get the following output:

JTree Selection Path

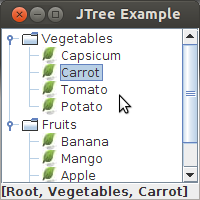
Adding a Selection Listener

An even better usage of the selection listener would be to get the selected node and make use of it. To get the selected node, we can make use of the getLastSelectedPathComponent() method of JTree. This method returns the selected node. We can then invoke the getUserObject() method on the DefaultMutableTreeNode class which returns the actual object we added. Since this method returns an Object instance, we need to call the toString() method on it and add it to the label. We can modify the code as follows:

1
2
3
4
5
6
7
tree.getSelectionModel().addTreeSelectionListener(new TreeSelectionListener() {
    @Override
    public void valueChanged(TreeSelectionEvent e) {
        DefaultMutableTreeNode selectedNode = (DefaultMutableTreeNode) tree.getLastSelectedPathComponent();
        selectedLabel.setText(selectedNode.getUserObject().toString());
    }
});
 
When we run the program and select a leaf node, we get the following output:
JTree Selected Node

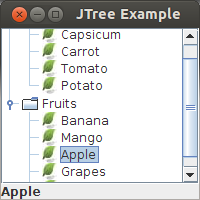
Selection Listener to get the Selected Node

Here is the full source code of our GUI:
1
2
3
4
5
6
7
8
9
10
11
12
13
14
15
16
17
18
19
20
21
22
23
24
25
26
27
28
29
30
31
32
33
34
35
36
37
38
39
40
41
42
43
44
45
46
47
48
49
50
51
52
53
54
55
56
57
58
59
60
61
62
63
64
65
66
67
68
69
70
71
72
73
74
75
76
77
78
79
package net.codejava.swing;
import java.awt.BorderLayout;
import javax.swing.ImageIcon;
import javax.swing.JFrame;
import javax.swing.JLabel;
import javax.swing.JScrollPane;
import javax.swing.JTree;
import javax.swing.SwingUtilities;
import javax.swing.event.TreeSelectionEvent;
import javax.swing.event.TreeSelectionListener;
import javax.swing.tree.DefaultMutableTreeNode;
import javax.swing.tree.DefaultTreeCellRenderer;
/**
 * JTree basic tutorial and example
 * @author wwww.codejava.net
 */
public class TreeExample extends JFrame
{
    private JTree tree;
    private JLabel selectedLabel;
     
    public TreeExample()
    {
        //create the root node
        DefaultMutableTreeNode root = new DefaultMutableTreeNode("Root");
        //create the child nodes
        DefaultMutableTreeNode vegetableNode = new DefaultMutableTreeNode("Vegetables");
        vegetableNode.add(new DefaultMutableTreeNode("Capsicum"));
        vegetableNode.add(new DefaultMutableTreeNode("Carrot"));
        vegetableNode.add(new DefaultMutableTreeNode("Tomato"));
        vegetableNode.add(new DefaultMutableTreeNode("Potato"));
         
        DefaultMutableTreeNode fruitNode = new DefaultMutableTreeNode("Fruits");
        fruitNode.add(new DefaultMutableTreeNode("Banana"));
        fruitNode.add(new DefaultMutableTreeNode("Mango"));
        fruitNode.add(new DefaultMutableTreeNode("Apple"));
        fruitNode.add(new DefaultMutableTreeNode("Grapes"));
        fruitNode.add(new DefaultMutableTreeNode("Orange"));
        //add the child nodes to the root node
        root.add(vegetableNode);
        root.add(fruitNode);
         
        //create the tree by passing in the root node
        tree = new JTree(root);
        ImageIcon imageIcon = new ImageIcon(TreeExample.class.getResource("/leaf.jpg"));
        DefaultTreeCellRenderer renderer = new DefaultTreeCellRenderer();       
        renderer.setLeafIcon(imageIcon);
         
        tree.setCellRenderer(renderer);
        tree.setShowsRootHandles(true);
        tree.setRootVisible(false);
        add(new JScrollPane(tree));
         
        selectedLabel = new JLabel();
        add(selectedLabel, BorderLayout.SOUTH);
        tree.getSelectionModel().addTreeSelectionListener(new TreeSelectionListener() {
            @Override
            public void valueChanged(TreeSelectionEvent e) {
                DefaultMutableTreeNode selectedNode = (DefaultMutableTreeNode) tree.getLastSelectedPathComponent();
                selectedLabel.setText(selectedNode.getUserObject().toString());
            }
        });
         
        this.setDefaultCloseOperation(JFrame.EXIT_ON_CLOSE);
        this.setTitle("JTree Example");       
        this.setSize(200200);
        this.setVisible(true);
    }
     
    public static void main(String[] args)
    {
        SwingUtilities.invokeLater(new Runnable() {
            @Override
            public void run() {
                new TreeExample();
            }
        });
    }       
}
 

YS Jaganmohan Reddy Phone Number, Address, Email ID, whatsapp no

We Will Provide Here YS Jaganmohan Reddy Phone Number, YS Jagan Mohan Reddy Contact Number, YS Jaganmohan Reddy Whatsapp Number, YS Jaganmohan Reddy Address, YS Jaganmohan Reddy Email ID, YS Jaganmohan Reddy Contact Details And Many More Informations Related To YS Jaganmohan Reddy.
Do You Want To Contact YS Jaganmohan Reddy, Do You Want Talk To Him, Do You Want To Complaint To Him? If Your Answer Is ‘Yes’ Then Read This Post Carefully Till The Last. We Will Also Provide The Social Media Accounts Information And We Will Tell You That How To Contact YS Jaganmohan Reddy.


YS Jaganmohan Reddy(Born: 21 Dec. 1972) Is A Popular Politician Of Andhra Pradesh. He Is The Member Of The YSR Congress Party. He Is Also A Leader Of The YSR Congress Party. Currently, He Is The Chief Minister Of Andhra Pradesh. He Is Representing Pulivendla Constituency In Andhra Pradesh Legislative Assembly. He Has Also Served As A Member Of The Indian National Congress Party. In 2011, He Formed His Political Party Named As The YSR Congress Party.
He Completed His Graduation In Bachelor Of Commerce(B.Com). In 1996, He Is Married To Bharati Reddy. His father YS Rajasekhara Reddy Has Also Been The Chief Minister Of Andhra Pradesh.

YS Jaganmohan Reddy Personal Details

YS Jaganmohan Reddy Father: YS Rajasekhara Reddy
YS Jaganmohan Reddy Mother: YS Vijayamma
YS Jaganmohan Reddy Wife: Bharati Reddy

CM Of Andhra Pradesh YS Jaganmohan Reddy Contact Details-

It’s Not Easy To Contact With YS Jaganmohan Reddy At Any time And Anywhere, But You Can Contact In The Working Hours With The Help Of Given Informations. All Given Information Is Authentic Because All Are Taken From Official Websites Or Authentic Sources. Many Fake Information Available On the Internet So Please Avoid Them.
YS Jaganmohan Reddy Office Address: First Floor, A.P. Secretariat, Velagapudi, Andhra Pradesh
YS Jaganmohan Reddy Email ID: N/A
YS Jaganmohan Reddy Official Website: CLICK HERE
YS Jaganmohan Reddy House Address: N/A
YS Jaganmohan Reddy Contact Number: 0863 – 2441521
YS Jaganmohan Reddy Phone/Mobile Number: N/A
Also Read:-

YS Jaganmohan Reddy Whatsapp Number-

Many People Want To Contact YS Jaganmohan Reddy With The Help Of Whatsapp Number And They Search It On Internet And Most Of Times They Got Fake Details So Please Avoid These Types Of Information And Don’t Trust them.
We Always Provide An Authentic Informations To Our Visitors And We Have Not Authentic Whatsapp Number Of YS Jaganmohan Reddy So We Will Not Provide Any Type Of Information Here.
If In The Future We Have Any Information Regarding This, Surely We Will Provide Here And Then You Can Contact YS Jaganmohan Reddy With The Help Of Whatsapp Number.

YS Jaganmohan Reddy Social Media Accounts-

Here We Will Provide Social Media Accounts Of YS Jaganmohan Reddy, Mostly He Is Active On Social Media So You Can Easily Convey Your Point To Them.
I Think His Social Media Accounts Are Handled By Managing Staff But If Your Message Is Genuine Then It Should Be Forwarded To Them.
  • Facebook: https://www.facebook.com/ysjagan/
  • Twitter: https://twitter.com/ysjagan
  • Instagram: N/A
  • Website: N/A
  • YouTube: N/A 

Frequently Asked Questions By Our Visitors-

Q. Can We Meet YS Jaganmohan Reddy? If Yes Then What Is The Procedure.
Ans. Yes, You Can Easily Meet Them. YS Jaganmohan Reddy Is A Simple And Great Person. He Gives Time To Everyone So You Can Easily Meet Them.
Due To The Security Purpose And Lake Of Time, You Should Take An Appointment To Meet Them Otherwise You Have To Face The Problem.
Q. Is The Information Given Above Correct?
Ans. Yes, All This Information Are Correct. We Have Collected all This Information After A Lot Of Hard Word, But If You Find Any Wrong Information Then You Must Tell Us We Will Try To Correct It.

Whatsapp status for Holi in English

Holi Status for Whatsapp, Facebook fb: Every year, people celebrate Happy Holi with their friends and neighbors. Popularly known as the Festival of Colors, Holi is indeed a colorful festival that defines life and love of every person. Like Holi, we hope everyone lives with utter joy in their life without any regrets. A lot of color powders and Gulal will be applied all over many faces in India on this Joyful day of Holi., but before you step outdoor to enjoy Holi on roads, you must wish your friends early in the morning with Happy Holi Status for fb, whatsapp to your online friends on Fb and Whatsapp.

op 15 Amazing Happy Holi Status for Facebook, Whatsapp in English

Use this Holi Status for Whatsapp and Facebook as status messages or timeline status and wish all your friends at once by uploading on your timeline. There will be many friends online waiting for your Holi Status wishes.
Holi Status 2017 whatsapp dp image
Cute Holi Whatsapp status dp
MAY GOD GIFT YOU ALL THE COLORS OF LIFE, COLORS OF JOY, COLORS OF HAPPINESS, COLORS OF FRIENDSHIP, COLORS OF LOVE AND ALL OTHER COLORS YOU WANT TO PAINT IN YOUR LIFE. HAPPY HOLI

HAPPY HOLI TO YOU AND YOUR FAMILY. WE WISH YOUR HEALTH, PROSPERITY AND BUSINESS ACHIEVEMENTS AT THIS PRISMIC COLOUR EVE. MAY ALLAH BLESS YOU WITH ALL HIS MERCIES! AAMIN

HOLI IS A TIME TO REACH OUT WITH THE COLOURS OF JOY. IT IS THE TIME TO LOVE AND FORGIVE. IT IS THE TIME EXPRESSES THE HAPPINESS OF BEING LOVED AND TO BE LOVED THROUGH COLOURS.

IT’S TIME TO CELEBRATE THE DIFFERENT COLORS OF OUR BEAUTIFUL RELATIONSHIP. I WISH YOU AND YOUR FAMILY ALL THE BRIGHT HUES OF LIFE ON THIS HOLI!

AUSPICIOUS RED. SUNRISE GOLD. SOOTHING SILVER. PRETTY PURPLE. BLISSFUL BLUE. FOREVER GREEN. I WISH U AND ALL FAMILY MEMBERS. THE MOST COLORFUL HOLI.

A TOUCH OF RED I SEND TO U
A DROP OF GREEN TO COOL THE HUE
A TINGE OF BLUE FOR WARMTH
AND ZEST A COLORFUL HOLI
HAPPY HOLI STATUS!
happy holi status for whatsapp image
Holi Status images
IF WISHES COME IN RAINBOW COLORS THEN I WOULD SEND THE BRIGHTEST ONE TO SAY HAPPY HOLI.

MAY THE FESTIVAL OF COLORFUL HOLI DRIVE OUT DARKNESS,
AND EVIL FROM THE WORLD. WE WISH YOU HOLI IN ADVANCE.

AND YOU ENJOYED THEM AT THEIR BRIGHTEST SHADE..
I WISH YOU THAT EVEN AFTER THE HOLI,
THOSE COLORS BE THERE IN YOUR LIFE AND
ALWAYS SPAWNING AROUND YOU CREATING BEAUTIFUL

MAY THE FIRE OF HOLI PURIFY YOUR HEART…
MAY THE COLOURS, COLOUR YOUR LIFE…
MAY THE SWEETS, SWEETEN THE JOURNEY OF YOUR LIFE..
I WISH YOUR AND YOUR FAMILY VERY HAPPY HOLI.

I HOPE THIS HOLI FULFILLED YOUR LIFE WITH SUCCESS,
WITH LOT OF GLORY,
WITH LOT OF JOY,
HAPPY HOLI…

THE DOMINANT IDEA BEHIND HOLI FESTIVAL IS THAT WE SHOULD LIVE MORE IN HARMONY WITH NATURE INSTEAD OF TRYING TO DESTROY HER AND MAKE HER OUR SLAVE.
holi status quotes, images hindi
Happy Holi Status image quotes in Hindi
AB D K BOSS SONG ME BHAG SAKTA HE,
PAPPU PASS HO SAKTA HAI,
SHILA JAWAN HO SAKTI HAI,
MUNNI BADNAM HO SAKTI HAI
TO KYA MAIN HUM DIN PEHLE HOLI WISH NAHI KAR SAKTE?
HAPPY HOLI IN ADVANCE!!

VERY HAPPY AND COLORFUL HOLI TO U AND UR FAMILY. I WISH THAT THIS YEAR WILL BRING EVERY MOMENT HAPPINESS.

RANG UDAYE PICHKARI, RANG SE RANG JAYE DUNIYA SARI, HOLI KE RANG AAPKE JEEVAN KO RANG DE… YE SHUBHA KAMANA HAI HAMARI. HAPPY HOLI.
These are the Best Happy Holi Status for whatsapp, fb that you can send to your online friends who aren’t in touch with your anymore/to your foreign friends.

mtlb ka matlab watsapp mai kya hota hai?

Mtlb shortform hota h Matlab ka.
In english "Matlab" is known as "Meaning"


DP ka Full Form क्या हैं या डीपी किसे कहते है ? पूरी जानकारी आपको इस आर्टिकल में मिलेंगी ।
डीपी ( DP ) के बारे में हमे सोशल मीडिया जैसे व्हाट्सएप्प, फेसबुक, इंस्टाग्राम आदि पर सुनने को मिलता है । सोशल मीडिया खासकर Whatsapp पर एक शॉर्ट फॉर्म DP / डप का उपयोग किया जाता है और अक्सर लोग एक दूसरे को Nice DP या Awesome डीपी वाले मैसेज भी करते रहते है । बहुत से लोग जब इस प्रकार के मैसेज देखते है, तो वे DP Meaning या Nice Dp का मतलब या DP ki full form समझ नही पाते है । हो सकता है आपको यह तो पता होगा की DP किसे कहते है, लेकिन फिर भी बहुत से लोगो को यह जानकारी नही होगी की आखिर डी पी का फुल फॉर्म क्या होता है ।

Is Internet needed to share videos from computer to pendrive?


No, No need of internet in sharing any file from computer to pen drive/


PC Transfer Software for PC to PC File Transfer Software Without Internet

Here we highly recommend you download and try one of the best PC transfer software - EaseUS Todo PCTrans to transfer files without internet. This tool allows you to directly transfer files from old PC to new PC in three patterns like demonstrated below.
Download
 For Windows 10/8/7/Vista/XP
PC to PC: This feature enables you to transfer files via the network connection. Connect two Windows laptops/PCs by IP in the same LAN and move your files, apps & accounts off the old PC to a new one.
Image Transfer: This function is what can help you here. You can use this mode to transfer files from PC to PC without the internet. Make images of files, folders, or software on the previous computer, and transfer to the next one. It also works as a backup.
App Migration: This one allows you to copy installed programs from one disk to another locally and free up space to resolve low disk space issue.  
You can follow the steps below and apply EaseUS Todo PCTrans to start using the Image Transfer function to transfer your files from PC to PC without using the internet.
Activate this software to gain the ability for transferring unlimited files and folders to a new device. 
 
EaseUS Todo PCTrans
Start transferring unlimited files now
 
Click to Activate
$49.95
 
Step 1. Create a file image to transfer
  • Launch EaseUS Todo PCTrans on the source PC. Click "Image Transfer" and click "Start" to go on.
Transfer files from PC to PC without network - step 1
  • Choose "Create Image File" > "Create". Name the image file, and set the external USB drive as the destination to save the image.
Transfer files from PC to PC without network - step 2
  • At the "Files" section, click "Edit" to choose files. Then, click "Finish" > "Create" to wait for the process to complete.
Transfer files from PC to PC without network - step 3
When the creating process has completed, click "OK" to confirm. Safely eject the USB drive and connect it to the target PC. Move to recover the image of files to the new PC using USB.
Step 2. Recover and Transfer Image files to PC without network
  • Connect the external USB drive with the file image created from source PC to the target PC. Launch PCTrans, click "Image Transfer" > "Start" > "Recover via Image File" > "Recover".
Transfer files from PC to PC without network - step 1
  • Click "Browse" to find the image file in your USB drive. Then, choose the correct image file and click "Recover" to continue.
Transfer files from PC to PC without network - step 2
  • You can choose to transfer all the files or click "Edit" > choose specific files > "Finish" > "Recover" to recover specific files.
Transfer files from PC to PC without network - step 3

Use a USB-USB Cable to Transfer Files from PC to PC Without Internet

If you don't want to use a third-party program to transfer files offline, another way is taking the USB-USB cable for help. To do so, you need a USB-to-USB bridging cable or USB networking cable as shown below. 
how to transfer files from PC to PC using USB
This PC data transfer cable works great for transferring files and folders (do not transfer programs) when upgrading from an older Windows 10/8/7 computer to a newer one. Both Windows 32-bit and 64-bit versions are supported. You can buy a USB transfer cable on amazon for $54.45.
Now, let's learn how to transfer files from PC to PC without internet via the USB transfer cable.
Step 1. Boot both the PCs. Wait till both of them finishes the startup process and are ready to be used.
Step 2. Insert one end of the cable into the USB port of your PC 1, and the other end into the USB port of PC 2. Wait till both the PCs recognize the USB cable. This should also start an installation wizard.
Step 3. Choose the installation type by selecting the "USB Super link adapter." Then, click "Next" to continue.
Step 4. Select "High-Speed Data Bridge" from the "Mode" drop-down menu.
Step 5. Click on the "Start" menu and select "Run...". Type devmgmt.msc and hit "Enter".
Step 6. Click on the little plus sign to expand "System Devices." Check to make sure your USB cable is listed as "Hi-Speed USB Bridge Cable." Your cable may use a slightly different name, depending on the manufacturer.
Step 7. Insert the installation disk that was packaged with the USB cable into your CD/DVD-ROM drive. Follow the guided prompts to install the data transfer software. Repeat this step for the other computer to install the same software.
Step 8. Launch the program on both computers. You should see a two-sided window. On its left side, it will show your computer, and on its right side, it will show the remote computer or the new computer where you want to transfer the data.
Step 9. Select the drive/partition as per your preference. Drag the folders and files you want to transfer and drop them to the desired location. Disconnect the cable when the transfer is done.
As you can see, this method has three obvious disadvantages:
  • This method is very complicated and extremely difficult to operate.
  • A USB-to-USB bridging cable is expensive. It's more expensive than buying third-party PC data transfer software.
  • The USB cable doesn't support migrating applications, only files, and folders.
So, to avoid these inconvenience, we highly recommend you try EaseUS Todo PCTrans to transfer files without internet in a much simpler way. It takes only two steps to complete the transfer - creating the file image on source PC and restoring the image on the target PC.

Wrap It Up

This article covers the two most useful solutions to transfer files from PC to PC or move files from laptop to laptop without internet. After reading the content and making a comparison, we believe that it's better for you to do it with an easy and reliable PC transfer program instead of the complicate USB cable. Additionally, if the data is not very large, you can use an external hard drive to copy and paste files from one computer to another offline.

See More: How to Transfer Files from PC to PC Using WiFi


Online transfer is the counterpart of offline transfer, which is also the actual needs of most people. You can transfer files from one PC to another or transfer files from one laptop to another wirelessly in a few ways. The how-article - transfer files from PC to PC in Windows 10 shows you the two easiest ways to migrate data from PC to PC by using a 1-click PC data transfer tool and Windows 10 Nearby sharing feature. 

roland gw8 pendrive me tone save kaise kare backup