This is a step by step guide on how to start a blog in 2020 that makes $1000 every month.
If you want to create a blog and are wondering where to start, you’ll love this easy guide.
In this guide, I will cover:
- How to Choose Blog Niche
- How to set up a blog on WordPress
- How to optimize a blog for Search Engine Ranking
- How to write your first blog post, optimize for SEO and Publish
- How to promote it On Social Media
- How to create backlinks for your blog
- How to monetize Your Blog
Let’s get started and learn how to make a blog and earn money.
How to Start a Blog in 2020 and Make Money

How to Choose Blog Niche
Choosing blog niche is one of the first and most important steps towards starting a blog.
If you are clear what you are going to write about on your blog then you can jump to the second step by clicking here.
If you don’t have any idea what to write then keep reading.
Your blog should be focused around a central topic. So, the question arises; how are you going to choose the topic?
Here are some questions which can help you choose the right topic:
Do you have any kind of experience which you want to share with others?
For example, when I started my first blog, I had a bit of experience with SEO, so I started the blog to share “backlink resources”.
Back then, I thought the resources will be useful for everyone. So, I put them all on my first blog.
Eventually, people found my blog, liked the content, and some requested for more similar content, that’s how I became a blogger.
So, if there is something that you’ve knowledge of and think others can benefit from, that’s your topic right there.
Are you passionate about something?
Is there something that you find most interesting and can’t stop doing it, reading about it, or learning more of it?
If yes, then you already know what to write about.
Now this has double benefits, if it’s something that interests you and you’re passionate about, you can easily generate a lot of content on the topic.
So now, you know how to choose your niche.
Let’s move to step 2. The actual setting up of the blog.
Start Your WordPress Blog with BlueHost
There are several cheap web hosting companies out there which you can use to start your WordPress blog.
But if you’re just starting out, there’s nothing is better than BlueHost in terms of cost & performance.
It’s one of the most widely used and popular hosting providers.
In fact, I personally use it for a few of my micro niche blogs.
Ready to start your awesome journey? Follow the steps mentioned below.
Step1: Choose Hosting Plan
First of all click here to get started.
After clicking, you will land on a page which looks like the following screenshot. Here, you will see three plans which are- Basic, Plus and Choice Plus.
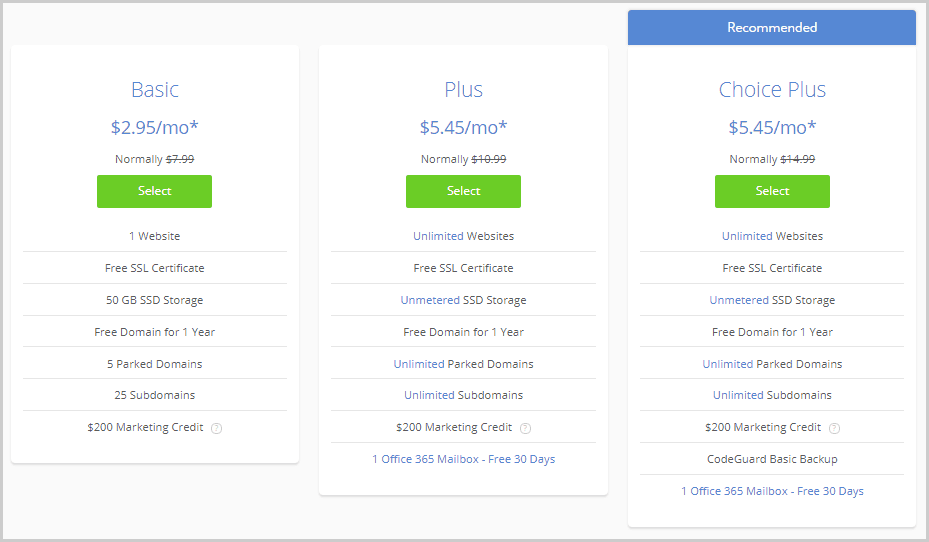
Choice plus is best plan for you if you’re just starting out.
It offers everything that you need now, and in the future for your blog. It starts at $5.45/month.
WordPress hosting package is specially built for WordPress. That makes your blog 2.5x faster and more secure.
It costs you more as compared to shared web hosting packages. But, if I’m being honest, I’d say it’s worth every penny.
With WordPress hosting package plan, you don’t need to worry about WordPress installation and technical aspects of your website.
BlueHost will take care of it all for you.
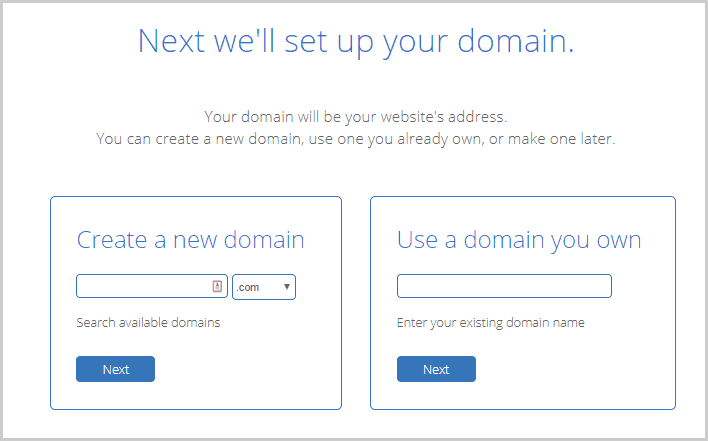
Step2: Enter Your Blog Name
After clicking the “Select” option, you will be redirected to order page where first option is Domain. Here you need to enter your blog name. And click “Next”.
Naming a blog is one of the most crucial aspects of starting your blog.
You name it once and it sticks forever.
Hence, spend some time and be creative.
Quick tips for choosing a good name for your blog:
- It should be meaningful, short and memorable.
- Easy to spell
- Don’t use hyphen (-).
- Easy to pronounce
- Use keywords
- Your first priority should be getting a .com domain
- Avoid copyright issues & legal conflicts
- Check social media handler availability
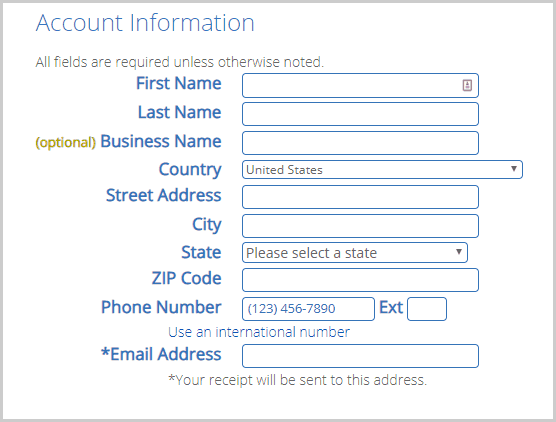
Step 3: Enter Account, Package & Payment Info
In “Account information” section, you need to fill all required details. It’s pretty straight-forward, no explanation needed.
It’s like registering on any other website, you’ve done it dozens of times.
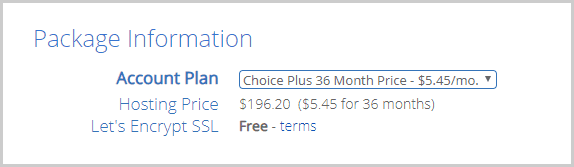
Next is the “Package Information” Section. Here you need to pay attention.
If you can afford it , I will recommend you to go with 36 months plan.
It reduces the overall cost up to $5.45/month.
On the contrary, if you’re limited on the budget, then the 12 months hosting plan will be good choice for you as well. That will cost you $7.45/month.
One of the best things with BlueHost is that it offers 30 days money back guarantee.
If within 30 days you feel blogging isn’t for you, you get 100% of your money back.
Yes, Blogging is the only business that can you start in today’s time with 0 risk.
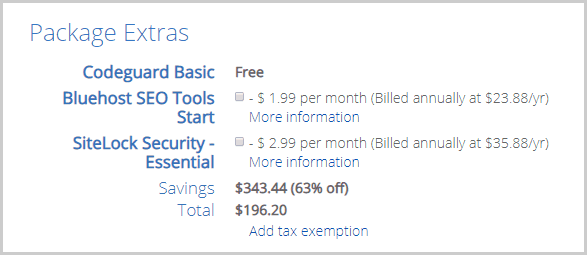
Then you’ll see the “Package Extras” section.
Here you need to deselect “Bluehost SEO Tools Start” and “SiteLock Security Essential” check boxes.
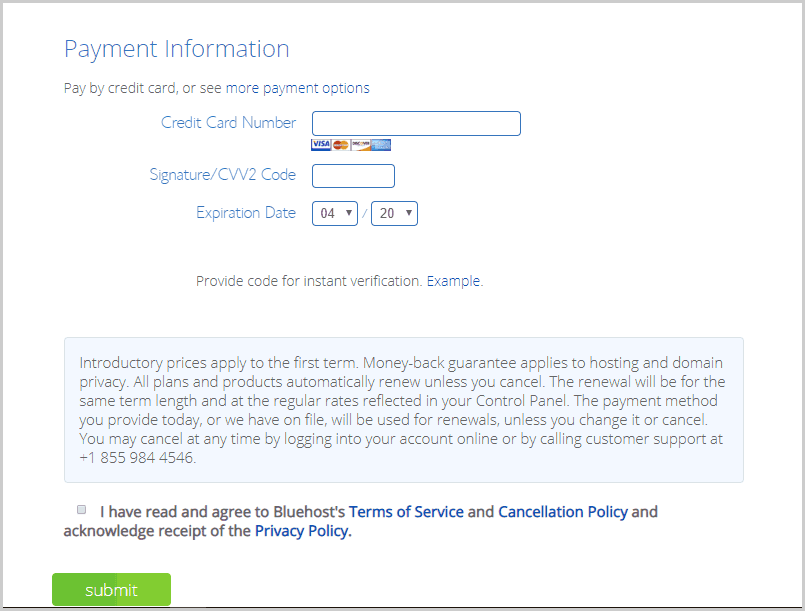
“Payment information” is the last section. Fill all the required details.
I suppose you’re now at the end of the form?
Go through all the options to ensure everything is correct.
After verifying the entered data, accept Bluehost’s terms of services and cancellation policy by ticking the checkbox just above the “submit” button, and then click “Submit”.
Now you have done your job. Let Bluehost do theirs.
Once your blog is live, Bluehost will send you a confirmation email with all the essential details to access your WordPress blog.
Usually this process takes 10 – 20 minutes, occasionally, a couple hours may be required . So, don’t worry if it is taking more time.
Once you get BlueHost’s confirmation email with the login credential such as the username and password, you’re ready to design your blog.
Step 4: Design Your Blog
To give a professional look to your blog, you need a WordPress theme.
It’s basically the design of your blog. You can obviously customize it to the core.
Here are three popular and best theme provider.
- StudioPress
- ThemeForest
- MyThemeShop
I use StudioPress theme at UpdateLand, and for some of my other blogs I use themes from MyThemeShop.
StudipPress themes are pricey as compared to ThemeForest and MyThemeShop. And I am in love with them because they are simple, clean and easy to customize.
If you can afford StudioPress theme then go with them, highly recommended.
If you are on a tight budget, get one from ThemeForst or MyThemeShop. You can change it anytime in the future. No worries.
After purchasing a theme, log into WordPress Admin dashboard using this URL: http://yourblogname.com/wp-admin/ (replace yourblogname with your blog name as in my case I will replace yourblogname with updateland).
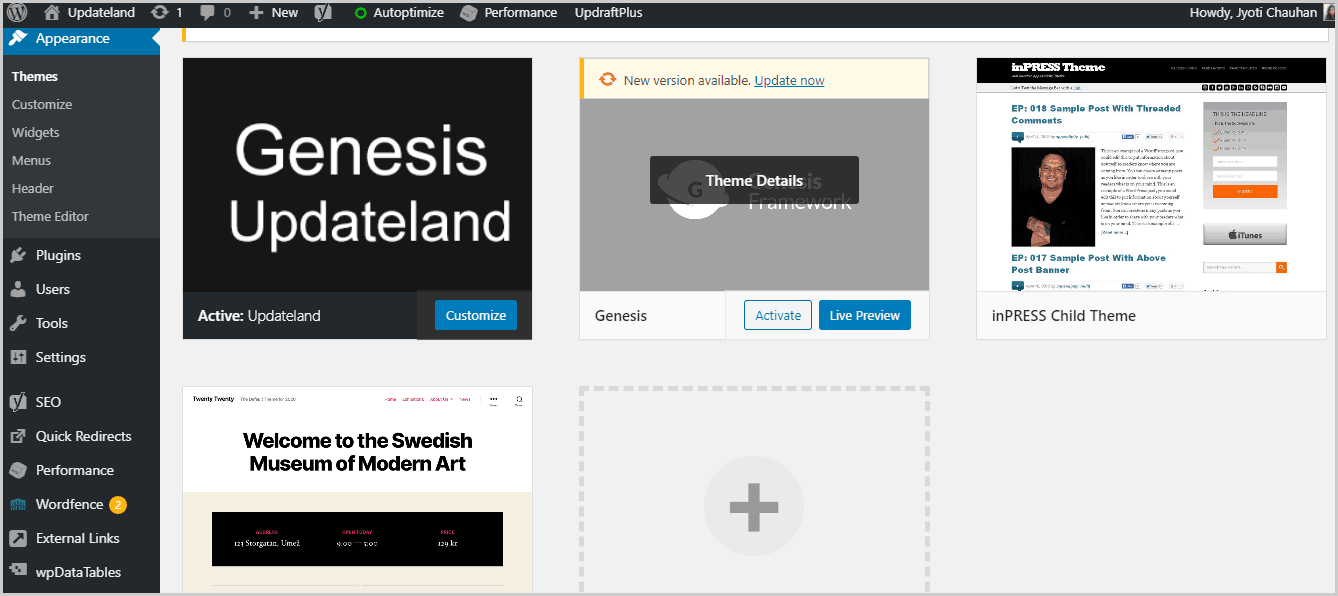
And then go to “Appearance” and click “Theme”.
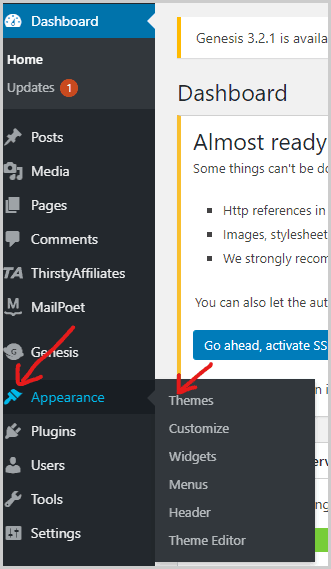
After Then you will see Add New option at Top. Click on it

After clicking, you will see “Upload theme” button at the top. Click on it and then you will see a drop down with the “choose file” option.
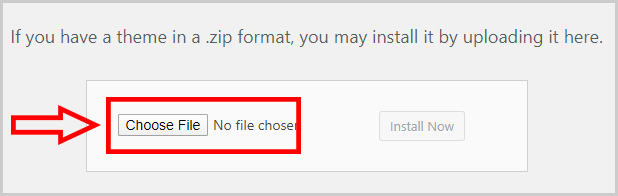
Click ”Choose File” to upload your WordPress theme and click “Install Now”.
After installing, you can manage your theme from theme section. You can design sidebar with the help of widgets (available under theme section).
You can add “categories” for your blog posts. E.g. I have SEO, Blogging, Reviews and so on. Pinning your posts to these categories keeps them organized (it also helps with the SEO, but that’s for a later discussion.)
For adding category for your blog, Go to Appearance > Menus. Now, add categories to the menu according the requirements for your blog.
If you’re stuck, feel free to drop a comment below right away. I will love to help you asap.
Step 5: Install WordPress Plugins
Here are some must have WordPress plugins which every new blog needs.
- W3 Total Cache
- Wordfence Security
- Yoast SEO
- ThirstyAffiliates
- Autoptimize
- Akismet Anti-Spam
- Contact Form 7
- WP Smush.it
Now, you’ve successfully set your WordPress blog up.
Time to optimize it for Search Engine Rankings.
How to optimize a blog for Search Engine Ranking
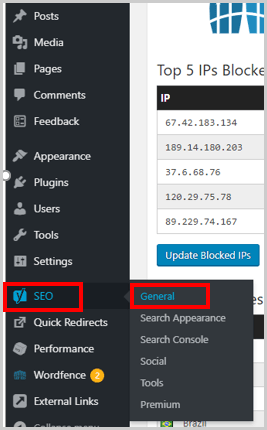
Go to your blog dashboard, click Yoast SEO > General in sidebar.
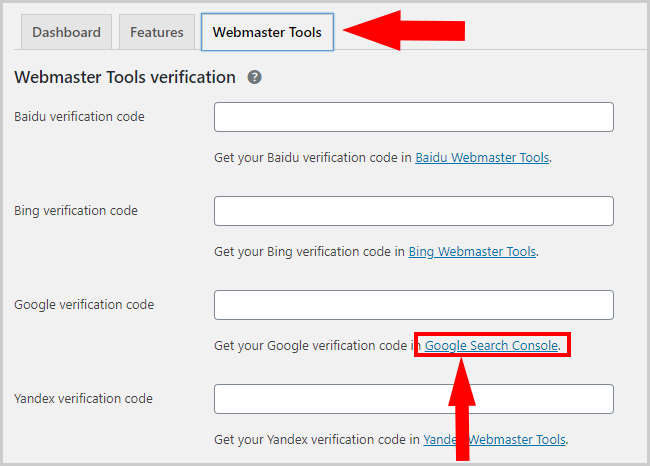
Now click on the “Webmaster Tools” tab and hit “Google Search Console”.
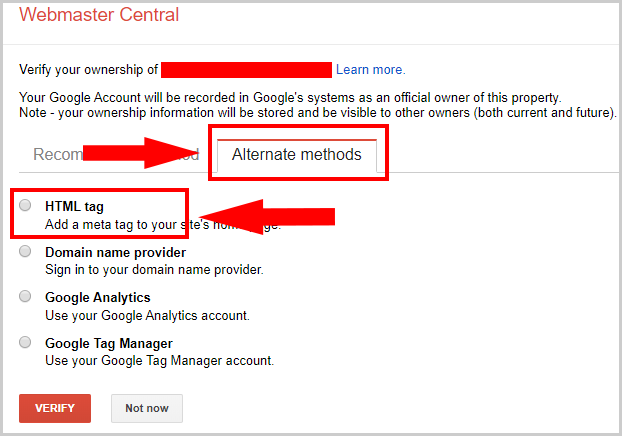
After clicking, you will need to login into your Gmail account. If you’ve already logged in, click “Alternate Methods” and select “HTLM tag” option.
After clicking, you will have a new drop down with Meta tag properties. From this code, copy content value or alphanumeric string without inverted commas.
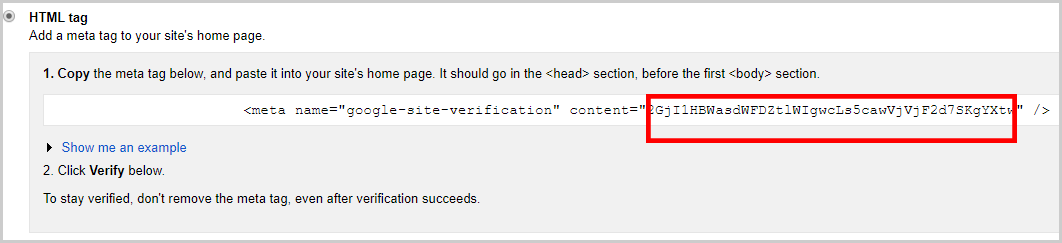
Paste this into “Google Verification code” field under “Webmaster Tools” tab. And then click “Save Changes”.
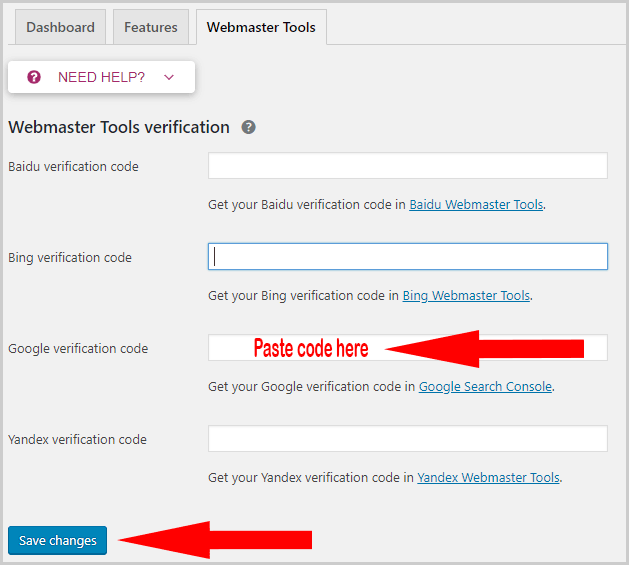
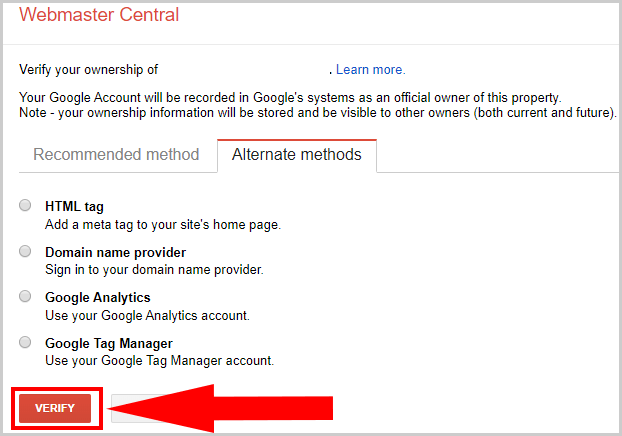
Now click “Verify”. And now, your Google Webmaster Tools configuration is done.
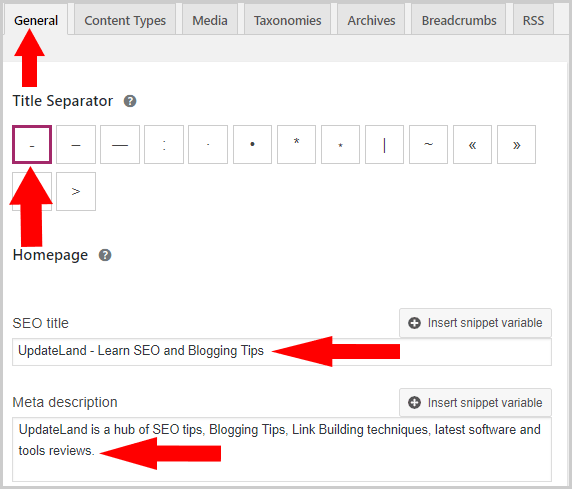
Next, Go to Yoast SEO and click “Search Appearance”.
And then click on the “General” tab. Now select a title Separator. Enter your blog title into SEO title box and blog description into Meta description box.
Next, choose “organization” if your blog represents an organization otherwise choose “Person” and enter your name in next field.
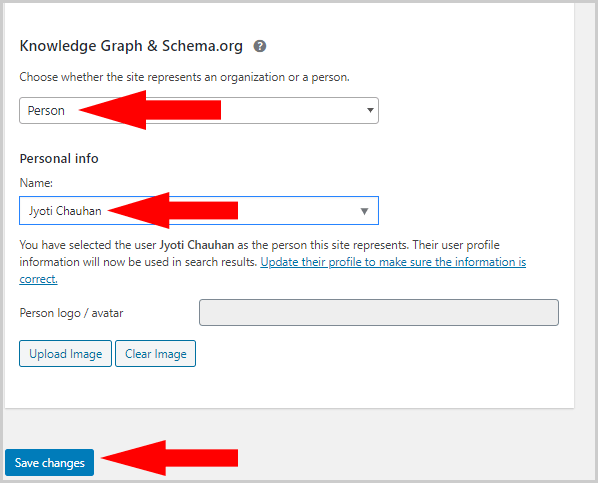
Click “Save Changes”.
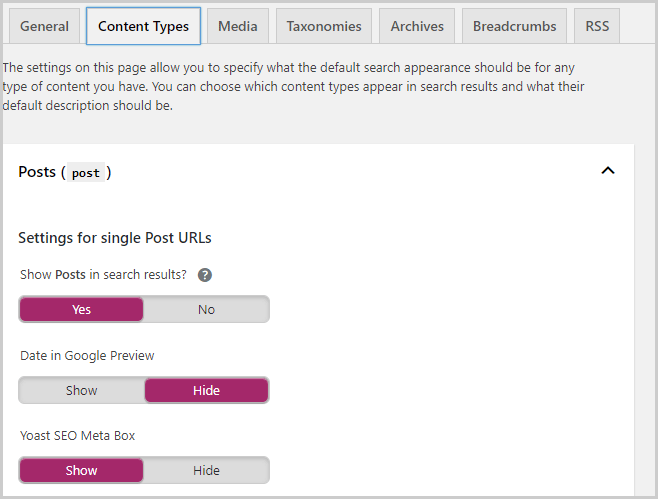
Next, Got to Content Types tab, enable Show posts in search results. Show or hide “Date in Google Preview” whatever you want.
Enable Yoast SEO meta box. And apply same setting for pages. After completing, click “Save changes”.
The next tab is “Media”. Setting this to “Yes” is recommended.

Next you’ll find Taxonomies. It gives you control to allow/disallow categories and tags in search result pages. Set “No” for both to avoid duplicate content issues.
Finally, Click “Save Changes”.

You can set the settings of the other tabs according to your own requirements.
Next, Go to Yoast SEO > General. And then go from the Dashboard to “Features” tab. Enable all features by clicking on the “ON” button.

And finally click “Save Changes” button. And so, you’ve done Yoast SEO settings for your blog.
Set Up Blog Post Permalinks
Permalinks are your blog post URLs.
They play an important role in SERP (rankings). Google love short and descriptive permalinks. (This is why I said categories are important, they may reflect in your URLs and that affects your SEO.)
Go to “Settings” in the left side and then click “Permalinks”.
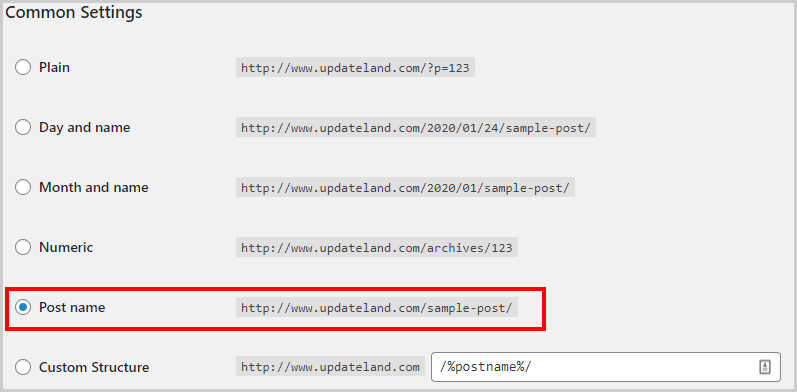
Select “Post Name” and hit Save Changes. Post Name format is the most widely used format. I also use the same format here at UpdateLand.
Now, your blog is optimized for search engines. Time to write your first blog post or in other words, start blogging? Let’s jump to the actual “How to blog” part.
How to write your first blog post, optimize for SEO and Publish
For writing a blog post, first you need to get a keyword research done.
In simple words, by doing keyword research, we find a keywords around which we write blog posts.
For example: For this post, the keyword is how to start a blog.
If you are thinking why you need to do keyword research, let me help you with this.
Keyword research helps you in knowing how many people are searching for a specific query.
I remember my initial blogging days, when I ended up writing blog posts with zero searchers.
I will recommend you check this guide on keyword research.
If you already have some idea regarding keyword research, you can write your first blog post right away, simply follow the steps:
- Login to WordPress dashboard https://yourblogname.com/wp-admin/
- Now click on Posts.
- After clicking on Posts, you will see four options: All Posts, Add New, Categories, and Tags. You need to click on “Add New” Option. After clicking, you will be redirected to the editor.
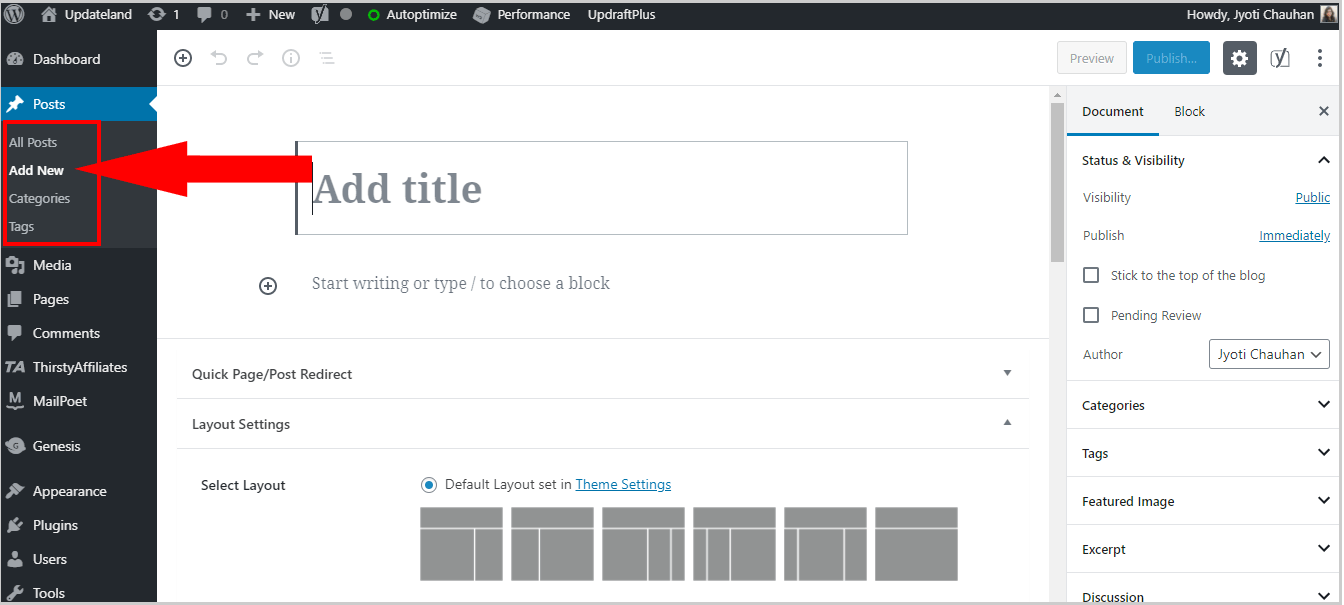
Now you are ready to write.
Enter a title of your blog post in the first section.
And,the second section is for blog post content.
You can use “plus into circle” symbol to add block like heading, paragraph and image etc.
If you are find this process a bit complicated, you can simply write in Microsoft doc or any other offline text editor, and paste it into the WordPress editor (I mostly do the same).
Once you are done with the title and content, click on “Save Draft” option at the top-right to save the content you have written.
Now, it’s time to add Meta descriptions, keyword and modify permalinks.
To do the same, scroll down on the editor. And you will find Yoast SEO (The screenshot below will help you).
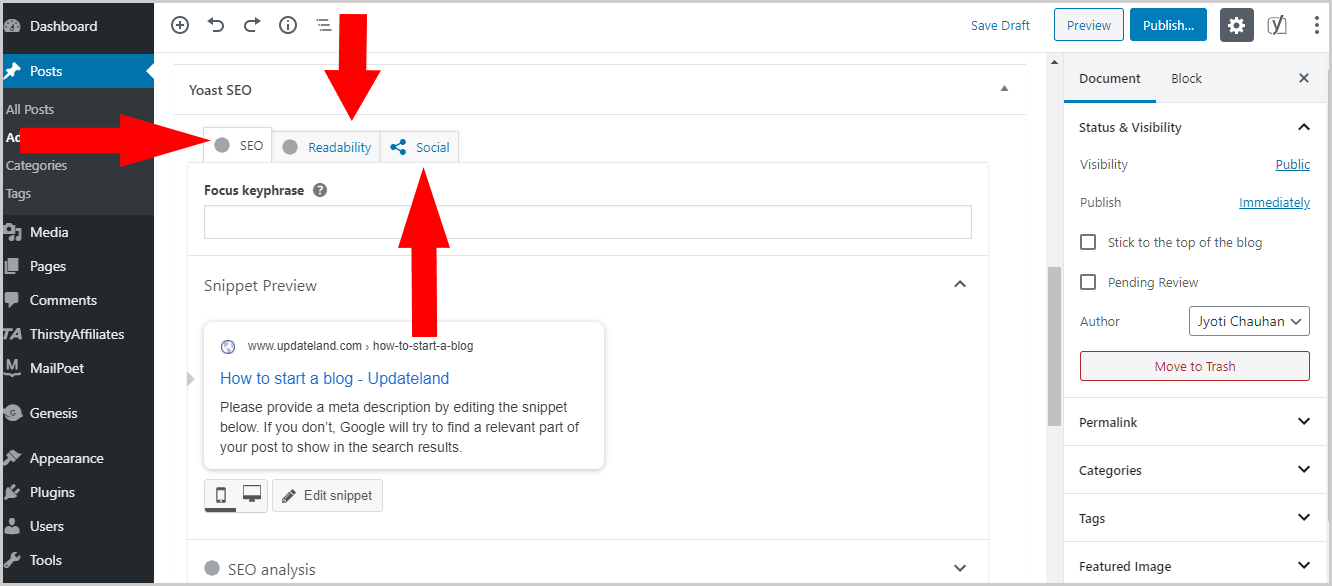
At the top, you will see three options: SEO, Readability, & Social. Click on “SEO” and enter your primary keyword in the focus keyphrase field.

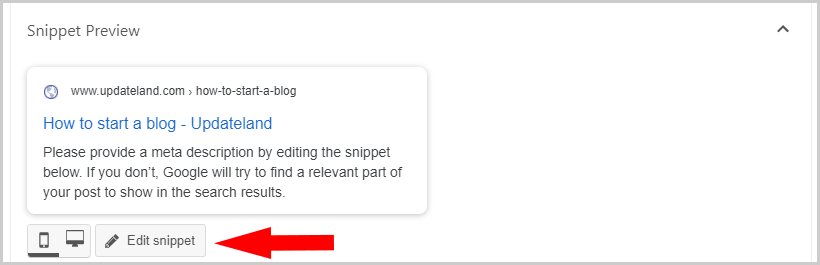
Now click on the “Edit snippet” option.
After clicking, you will see three fields: SEO Title, Slug, & Meta Description as shown in below image.
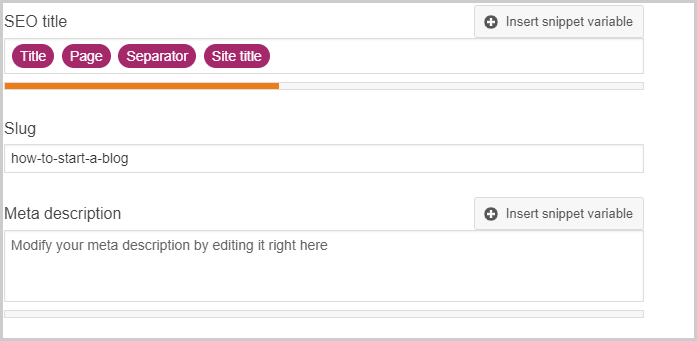
Let me explain these terms for better understanding.
SEO Title: SEO title is the title which shows on the search engine result pages.
Better you optimize it, more the chances to rank (it’s not the only factor which determines the rank, but it matters to huge extent). Note that it can be different from the Blog post’s title, but doesn’t necessarily have to be.
Slug: It tells you how your blog post URL will look like. Keep it short. Avoid stop words (Examples a, an, the, and etc.) and year also.
Meta Description: Meta description gives a brief to users about your blog post. And, it displays in search results. Every time you write Meta description, ensure you place your primary keyword at the starting of the description.
It should be unique. Thus, try not to copy meta descriptions from other blog posts.
Next, click on SEO analysis to see Analysis results. It shows problems, improvements and the good results for your post.
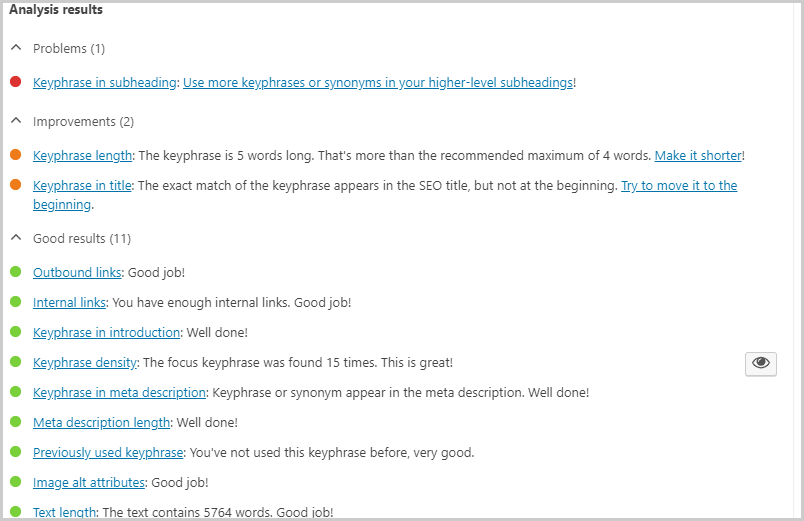
If you think, you can implement suggestions, that’s great but don’t do anything blindly.
Green light shows you are doing great. Red indicates there’s room for improvements.
With the help of readability analysis, you know how readable your blog post is. If you are getting a red score, you should consider taking Yoast SEO’s suggestions.
I will simply advise you to write short sentences to avoid confusion. Always use conversational tone. Simple is best. Make sure everyone can understand your words.
Social option will help you set a Title, description and image for Facebook. If you want to show some specific image and Meta tags then you can make changes otherwise leave it blank.
Featured Image, Categories & Tags Settings
You will find featured image, categories and tags options in the right side of editor under the document option (as shown in image).
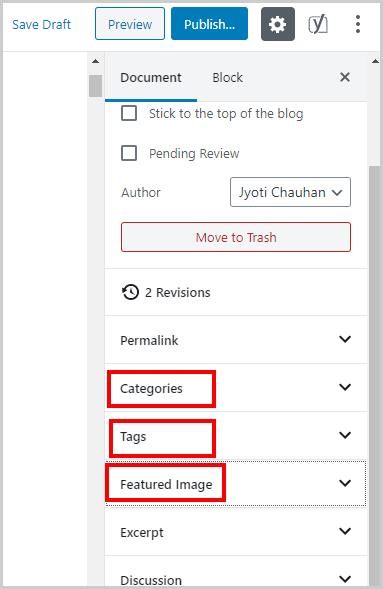
To add featured image, click on featured image > set featured image > Upload files > Select files.
Now, you will see a new window to choose an image.
Go to the specific folder where you have the image. Select the image and click on the “open” button. Now, add alt text in the field of Alt text and click on Set featured image. It is done. Notice how easy it was?
To add categories, Go to Categories > Add New Category.
Then you will see a field named “Add New Category”. Enter category name and click on Add New Category button. This way, you can add all the relevant categories to your blog.
To add Tags, Go to Tags. You will see here a field named “Add New Tag”. Add all relevant tags here (I personally add 3 – 4). Tags are closely related words to your keyword.
Finally, your first blog post is ready to go live on the web. Click on Publish button (at top in right side). And it is done.
Now you know how to write & publish a blog post with WordPress. Time to learn how to promote it on social media to bring instant traffic. Let’s jump in.
How to Promote Your Blog Post at Social Media
Social media plays important role when comes to driving instant traffic to your blog.
Popular social media platforms that send huge traffic to your blog are Facebook, Twitter, LinkedIn, Instagram & Pinterest.
To promote your blog on social media, follow these steps:
Step1: Create Social Media Handles
It is easy process. Let’s start with Facebook.
Facebook Fan Page Creation for Your Blog
To create your blog handle on Facebook, first login into your account.
Now you will see Create Option at top into right side. Click on it and after this click on the Page option. Then, you will see two options: Business or Brand and Community or public figure.
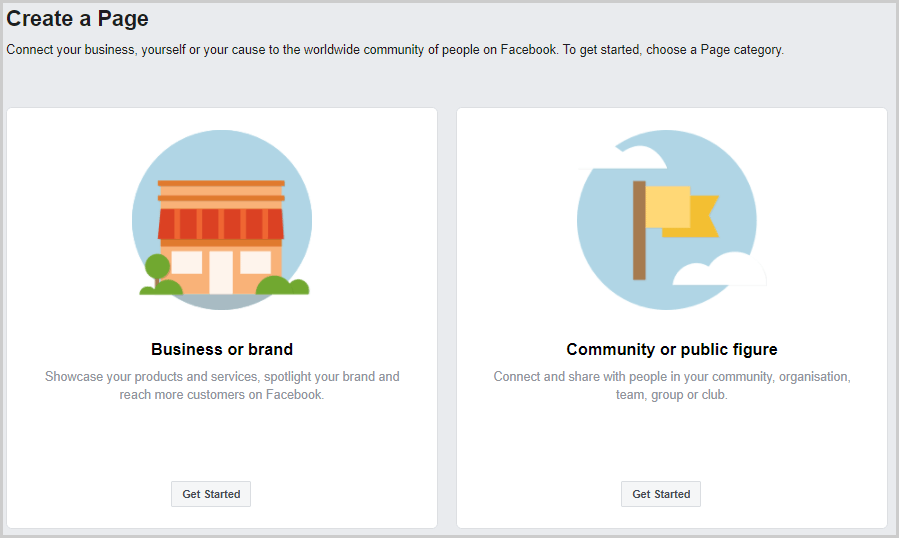
You need to first choose one Business or brand. Now, click on the “Get Started” button. Then, you will see two fields named “Page name” and “Category”.
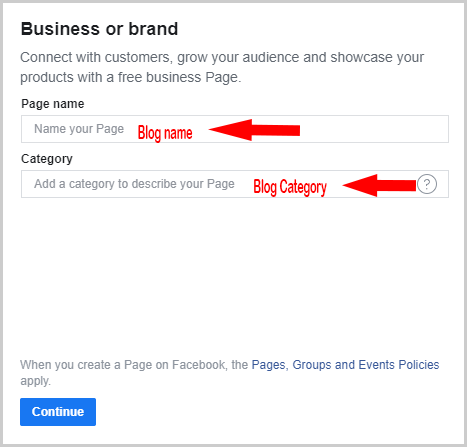
Your page name should be the same as the name of your bog. And category can be the niche of your blog.
E.g. If you are going to write about travel, then write travel in the category field and click on continue. It will show all the relevant categories, choose one which describe your blog best.
And then, click on the “Continue” option. Now click on the “Skip” option and again “Skip”. Don’t worry you can add an image later.
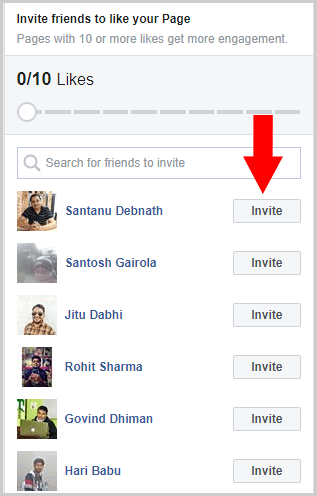
Now, you can see a new page with your blog’s name on it. Now, Upload a cover photo and profile photo. It should represent your blog name. And, invite your friend to like your page.
Inviting options are available on the right side (the screenshot will help you understand better). Click on the “Invite” button and it is done.
Create Twitter Handle for Your Blog
The process to create a Twitter handle is the same as registering a personal account on Twitter. The only difference is, you enter the name of your blog instead of your own for the account.
If your blog name is unique, and isn’t already registered, your Twitter profile URL will be something like- www.twitter.com/yourblogname.
If there are numbers or other changes to the URL and it’s not exactly your blog’s name, it means the username isn’t available.
Remove the numbers, and make it something unique.
Here are some initial that you can use to come up with a perfect handle:
- Thisis
- The
- Real
- Ask
- Iam
If above initials don’t sound good with your blog’s name, consider adding the following words as suffixes (at the end)
- Blog
- Official (only work for short blog name)
To change your username, Click on More > Settings and Privacy. Then, you will see the “Username” field under “Login and Security” at the top-right. Click on “Username” and make changes. Then save.
Create LinkedIn Fan Page
To create LinkedIn fan page for your blog, first of all login to your account. If you don’t have one then register now and wait for 8 days. To create a company page, your account should be 7 days old.
Once you’re logged in, click on “Work” option then you will see a window on the sidebar. Now, scroll down, at the bottom you will see an option named “Create a Company Page”. Click on it.
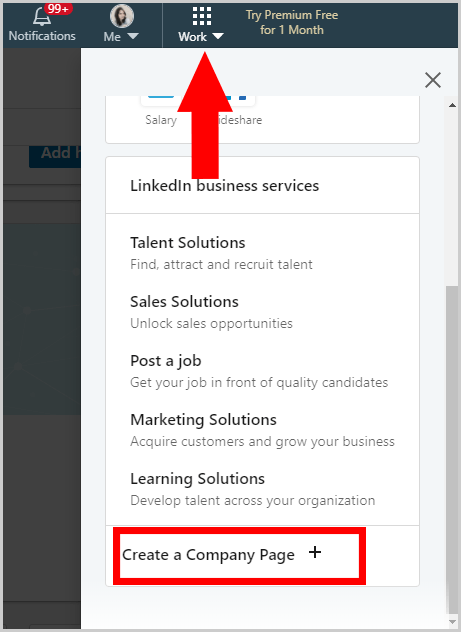
Now you have four options (Small business, Medium to large business, Showcase Page & Educational institution) to choose from.
Click on “Small business” and enter all the required details & upload your blog logo. Then, click on “Create Page” at the bottom..
Note: Upload banner that describes your blog perfectly.
Page creation is done.
Now you know how to create page to promote your blog on Facebook, Twitter and LinkedIn.
Creating fan page on Instagram and Pinterest are quite similar. And I am sure you can do that yourself without my help. In case, you do get stuck, drop a comment below and I’ll help you out.
Time to move towards the next step.
Join Relevant Groups/Community & Share Your Blog Posts
Groups/Communities are great sources to drive instant traffic to your blog post and increase brand awareness.
Here’s how to join relevant groups on Facebook.
It is very easy process.
Enter relevant keywords in the search box, then click on Groups and Facebook will show a list of relevant groups.
For example: If you blog is about SEO, then you can enter keywords such as SEO, Link Building, Search Engine Optimization, Digital marketing etc.
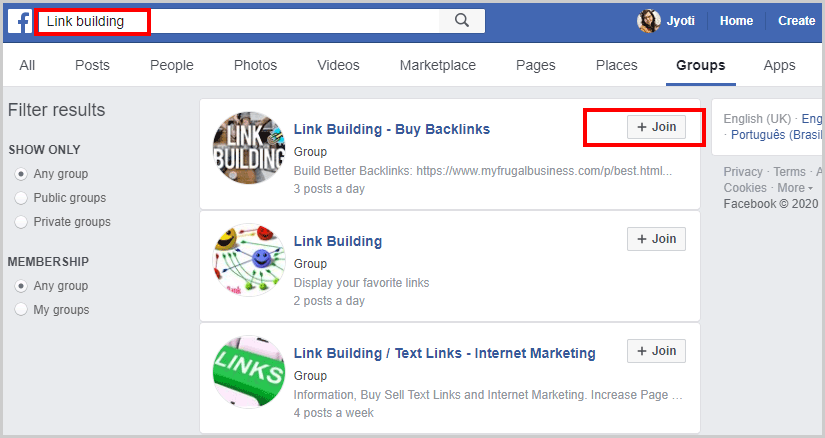
Click on the “Join” button to join groups. Once the group admin approves your request, you can share your blog posts and useful information with group members.
For LinkedIn, process of joining and searching communities is quite similar.
Note: Avoid sharing your post in more than 4-5 groups in a day to stop being banned.
If you share the same post in more groups in a day, Facebook blocks your blog URL. After that, you can’t share your blog URL even in chat with friends.
Connect With Bloggers in Your Niche & Share Their Blog Posts
Networking plays an important role in blogging. Hence, I will advise you to start making real connection (not just friend on social media) with other bloggers in your niche from day one.
Here is what I did to connect with bloggers when I was new to blogging.
I sent request to popular bloggers, few of them accepted. Then sent request to their friends (who are bloggers).
If you don’t know popular bloggers in your niche, you can google.
For e.g. if you are starting a travel blog, then you use queries like Top travel bloggers to follow at Social.
Once you’re friends with them, share their blog posts. In return, you will receive some shares for your blog posts eventually.
Ask Your Friends to Share Your Blog Post
After publishing a blog post, you can drop a message to your friends and ask them to share it.
Before asking, make sure you have already shared their posts previously.
It will increase chances of your post being shared. . Everyone love to return a favor. Exceptions are always there, ofcourse.
In fact, few bloggers have a pretty big number of fans/readers. So, if they share your blog post with their followers, you will get massive traffic and great exposure to your blog.
Now you know how to promote a blog on social media. Time to jump in towards next step of this guide on how to start a blog.
How to Create Backlinks for Your Blog
Backlinks are important as much as content for your blog.
Here, I am going to discuss some link building strategies for your blog.
Directory Submission: Directory submission is still an effective technique of link building. it provides permanent backlinks. Every directory submission site has own guidelines so always read the guidelines before submitting your website.
I shared this Directory Submission Sites List and guidelines on how to do it.
Social Bookmarking: Social Bookmarking is the best way to get instant backlinks for blog posts. It’s helps with faster indexing and also with driving traffic to the site. Use only the best sites like Reddit, StumbleUpon, delicious and Pinterest etc.
Read: Social Bookmarking Sites List
Blog Commenting: I love the blog commenting method the most.
It offers double the benefits. First, it gets you a backlink, second, it also helps build relationships with other bloggers. Is it not cool? Check below post to read blog commenting guidelines and get good blog commenting list.
Forum Posting: Forums are more of a source to connect with targeted audience than a technique of creating backlinks.
Steal Backlinks Sources from Competitor: It’s a really cool technique, I hope you’ll love this. First, find out your top 10 competitors, then, check their link sources.
If you read my SEMrush review, you’ll see how SEMrush does everything for you. It’ll show you your top competitors, their link-sources, and even help with the link-pitch!
How to monetize your blog
Here are the best ways to make money from your blog.
- Affiliate Marketing
- Placing Ads
- Sponsored Review
- Offering Your Services
- Sell an ebook
Affiliate Marketing
My favorite method to make money from blogs.
I’ll advise you to focus on affiliate marketing from day one of your blogging journey.
Affiliate marketing is a process to promote a product and earn a commission when someone buys a product using your affiliate link.
Affiliate link is a tracking link that you get when you join any affiliate program for a product.
Some affiliate programs offer one-time commission and some offer recurring commission.
One time commissions mean you get money once when someone buys a product using your link.
Recurring commission means you get money every time when referred user pays. This creates an automated, repeated source of income.
Now you know what affiliate marketing is and how it works. Time to make money.
To earn money from affiliate marketing, first, you need to find the best affiliate programs & networks.
Don’t worry, you don’t need to spend hours to find the high paying affiliate programs & networks.
I am listing them below. 🙂
Best Affiliate Marketing Programs & Networks
- ShareASale
- ClickBank
- Amazon Associates
- eBay Affiliate Program
- Impact Radius
- Avangate
- CJ Affiliate
- Awin
- Flex Offers
- StudioPress
- MyThemeShop
- Thrive Themes
- Semrush
- Grammarly
- BlueHost
- SiteGround
- WpEngine
- GetResponse
- Aweber
Now you know best affiliate marketing programs and networks. Time to take action.
So why are you waiting? Join them right now and start promoting.
Placing Ads
Another easy way to make money from a blog is by placing ads.
Google AdSense is one of the best ad networks that pays good money to place ads on your blog.
It pays based on CPC (Cost per Click). This means you get paid whenever someone clicks on an ad.
For placing Google Adsense ads on your blog, you need to apply for Google AdSense.
They manually review your blog and then decide to approve/disapprove your blog.
There are several alternatives to Google Adsense in the market. But no one can beat them in terms of the amount they pay.
In fact, they show relevant ads on your blog. While other networks’ ads are irrelevant, spammy and cheap.
So, try to get your blog Adsense approved.
If you have hard luck, you can give a try to Media.net, a true Google Adsense alternative.
Media.net offers CPM (cost per thousand impressions) ads. Ads are relevant to your blog content.
Sponsored Review
A quick way to monetize your blog.
Sponsored Review is a process of reviewing a software/service on your blog and get paid in return.
If you have a blog with decent traffic, advertisers will reach you.
In other cases, you need to reach out.
Here are some quick tips which you need to implement to get more sponsored review requests.
- Give a professional look to your blog by using a premium theme
- Get a well-designed logo
- Create a Contact, About Me & Advertise page
- Add Review Category
- Publish 4 -5 detailed review articles
- Reach out to brands that are reviewed recently by fellow bloggers
Here are some things which you need to remember while accepting/publishing sponsored review request.
- Product/service should be relevant
- The review should be honest, even if it’s sponsored.
- Give nofollow backlinks only
- If you decide to give a dofollow backlink (in an exceptional case), link it to the brand name only and also ensure that you give backlinks to at least 2 other high authority websites.
- At least 50% of the payment should be in advance.
Offering Your Services
If you’ve a specific skill-set, start offering your services to your blog visitors.
Use your blog as a platform to sell and make money online.
Create a “Service” page and list all your services there.
Ensure the service-page is accessible from home page.
Apart from your blog, you can sell you services also at freelance platforms like Fiverr.
Sell eBooks
Several PRO bloggers are making passive income by selling their eBooks.
If you know something that will be useful for your audience, you can write an eBook on the topic and sell it on your blog.
These were all best ways to make money from a blog.
I will advise you to focus on #1 Affiliate marketing from day 1 of your blogging journey to make passive income from your blog.
And thus, I have reached the end of this guide.
Now, you know how to start a blog in 2020 and earn around or more than $1000 every month.
My job is done. And yours begins.
If you face any problem when trying to start your own blog, drop a comment right now. I will love to help you.


0 comments:
Post a Comment