Friday, December 27, 2019

What is Portal use and difference from Iframe

We’ve written a comprehensive guide to Google Portals – an ambitious new concept for mobile web design. A new page transition experience for Chrome, this seems to be Google’s attempt at rethinking navigation. The goal is to help developers create web experiences with links that feel as seamless and fluid as a native app. In the world of cross-domain experiences, this is exciting news!

What are Portals and how do they work?

In May 2019, Google announced a new upgrade to iFrame technology – Portals are a new web platform API that aim to provide a new way of loading and navigating through web pages. Similar to classic < iframe> tags, portals will work with a new HTML tag < portal >, allowing web developers to embed remote content in their pages.
“Portals are like iFrames that you can navigate to,” explained Barb Palsar, who leads Google’s global product partnerships. “When a user opens a Portal, the Portal becomes the top-level page. Portal enables fluid, composed journeys within a site or across multiple sites.”
Portals are only supported in the latest version of Chrome Canary for Android, Mac, Windows, Linux, and Chrome OS.

Benefits of Portals

  • Seamless Transitions
  • Faster Page Loading Time
  • Increased Security and Privacy

Concerns Surrounding Portals:

  • Data Usage
  • Backward transition to the parent page

Why Did IFrames Need an Upgrade?

Issues that are commonly seen with IFrames include:
  • Your site becomes vulnerable to malicious sites and cross-site attacks
  • They can lead to phishing your user’s data
  • They can be confusing and causes usability issues
  • They are bad for SEO
  • They are slow to load, resulting in terrible user experience
  • Cookie support is limited

Why are portals better than using iframe or classic links?

  • Portals allow users to navigate inside the content they are embedding – something that iframes do not allow for security reasons.
  • Portals can also overwrite the main URL address bar, meaning they are useful as a navigation system, and more than embedding content – the most common way in which iframes are used today.
  • Portals have the potential to provide protection against potential phishing attacks by changing the URL bar without forcing the user to break into an entirely new popup window or tab.
  • The content inside portals can be pre-loaded while the user scrolls through a page, and be ready to expand into a new page without having the user wait for it to load.
  • Portals support speedier and better transitions between web pages and could be used to improve web page navigation on mobile devices, where touch gestures make using portals a seamless experience.
  • Portals allow a user to watch/listen to embedded content and then transition seamlessly to its origin page, where they could leave comments or open other media.
  • If you have multiple websites that cross-reference one another, you can also use Portals to create seamless navigations between two different websites.

How to use Google Portals with Your Website or Blog?

Portals are slated to be the standard way in which websites transition between links. For e.g., when a user is navigating a news site and they reach the bottom of a story, related links for other stories are embedded as portals, which the user can click and seamlessly transition to a new page.
See Portals in Action:

Portals in HTML

If you’re not using it yet, start using Chrome Canary – an experimental version of the Chrome browser aimed at developers, experienced techies, and browser enthusiasts. Try out Portals in Chrome Canary by flipping an experimental flag: chrome://flags/#enable-portals. Once Portals are enabled, confirm in DevTools that you have the new shiny HTMLPortalElement.
A simple example is showcased on web.dev. If you want to quickly experience what Portals feel like, try using uskay-portals-demo.glitch.me.on Chrome Canary.
There are 3 features you must be familiar with:
  • The <portal> element: The HTML element itself. The API is very simple. It consists of the src attribute, the activate function and an interface for messaging (postMessage). activate takes an optional argument to pass data to the upon activation.
  • The portalHost interface: Adds a portalHost object to the window object. This lets you check if the page is embedded as a element. It also provides an interface for messaging (postMessage) back to the host.
  • The PortalActivateEvent interface: An event that fires when the is activated. There is a neat function called adoptPredecessor which you can use to retrieve the previous page as a element. This allows you to create seamless navigations and composed experiences between two pages.
The demo below demonstrates how Portals can enable a seamless user experience between a website and third party embed content

How to embed Google Portals in WordPress

Since Google Portals are only available on Chrome Canary right now, we will talk through how to embed iFrame in WordPress. Embedding portals in WordPress is expected to be similar once the feature is rolled out in its entirety.
Embedding WordPress iFrame is easier than you imagine. The traditional way to do it is by using the HTML attributes <IFrame>.To do this, simply take the URL of the page you want to embed, and use it as the source for the Tag. Then, your code becomes:
<iframe src=”your_webpage_url” iframe>
You can add more parameters to your tag:
  • Width/Height– For height and Width of the iFrame window, define values in Px
  • Frameborder – For displaying or hiding the Frameborder, use values ‘0’ or ‘1.’
  • Align – For defining the window’s page alignment, Use values “left” “right” “right” “top” “bottom.”
  • Scrolling – For disabling or enabling Scrolling inside the Window. Use values “yes,” “no”
Then simply paste your code into the text editor of your post on WordPress, and that should display your post easily.
Following this process, you should be able to easily embed any page on your posts. Furthermore, content websites such as Youtube have an in-built embedding feature for you to share the content. Simply click on Share and Embed and copy the given URL.
You can also use plugins such as Advanced iFrame plugin by Michael Dempfle to embed cross-domain content.

How can you style Google Portals? How can you center Google Portals?

Once again, we’ll take the example of IFrames since Google Portals will tend to work similarly. When you embed an element in your HTML, you have two opportunities to add CSS styles to it:
You can style the IFRAME itself or you can style the page inside the IFRAME. Here are some CSS styles we should include on iframes:
  • margin
  • padding
  • border
  • Width
  • height
For your styles, you can try adding scrolling borders, rotation, shadows, corners – just like any other web page.
To center align an ‘IFrame’ or any other HTML element you can use CSS ‘margin’ property. To achieve this you should have to define the width of the element. You can set ‘margin-left: auto;’ and ‘margin-right: auto;’ to center align our iframe block.

New HTML Attributes of IFrame

HTML5 brought three new elements to the IFrame element to address certain security and design issues.
  • Sandbox Element: The “sandbox” attribute of the “IFrame” element is a very useful security feature of iframes. When you place it in an IFrame element, you are instructing the user agent to disallow features that might cause a security risk to the site and its users. You can also use it to re-enable some features.
  • srcdoc Attribute: The “srcdoc” attribute is an attribute that gives the web designer more control over the iframes as well as more security. Instead of linking to a Web page at a different URL, the web designer places the HTML that is to display in an IFeame inside the “srcdoc” attribute.
  • Seamless attribute: The “seamless” attribute is a boolean attribute that tells the browser to display the IFrameas though it were a part of the parent document. If you want your IFrame to display seamlessly, just include this attribute in the element.

Alternatives to IFrames

One of the important things to note here is that IFrames can hold back your SEO efforts. This is because anything within a <iframe> cannot be indexed and Google credits the page where the embed code was grabbed and not the page where it is embedded.
To improve your content optimisation, try the following alternatives to IFrames for common used cases:
  • Instead of Google Maps embed, try Google Maps API that generates a JavaScript code.
  • When it comes to Youtube videos, use the old embed code. You can also use a tool like Wistia.
  • Make sure to add closed captions or subtitles on videos by using a .srt file
  • Encourage reviews and ratings on site instead of embedding a widget from a third-party site
  • Use AJAX to update a container on your web page.
  • Use elements like <object> and <embed>
  • Use tools like Zoid

Conclusion

While it is early days for Google Portals, it has potential. It could become the standard technology for embedding content, replacing IFrames. Portals allow a user to watch/listen to embedded content and then transition seamlessly to its origin page, where they could leave comments or open other media.
Google has announced that it has now launched the Portals API as an experimental feature behind a flag in Chrome Canary and is looking for developer community feedback.
Have you tried using them yet? Comment below and let us know your experience!

Thursday, December 26, 2019

Connect EC2 using Putty generator

Connecting to Your Linux Instance from Windows Using PuTTY


  1. The following instructions explain how to connect to your instance using PuTTY, a
                      free 
                         SSH client for Windows. If you receive an error while attempting to connect to
                      your instance, 
                         see Troubleshooting Connecting 
                            to Your Instance.
                   
    After you launch your instance, you can connect to it and use it the way that you'd use a computer sitting in front of you.
    Note
    After you launch an instance, it can take a few minutes for the instance to be ready so that you can connect to it. Check that your instance has passed its status checks. You can view this information in the Status Checks column on the Instances page.

    Prerequisites

    Before you connect to your Linux instance using PuTTY, complete the following prerequisites:
    • . If you already have an older version of PuTTY installed, we recommend that you download the latest version. Be sure to install the entire suite.
    • Convert your private key using PuTTYgen
      Locate the private key (.pem file) for the key pair that you specified when you launched the instance. Convert the .pem file to a .ppk file for use with PuTTY. For more information, follow the steps in the next section.

    Convert Your Private Key Using PuTTYgen

    PuTTY does not natively support the private key format for SSH keys. PuTTY provides a tool named PuTTYgen, which converts keys to the required format for PuTTY. You must convert your private key (.pem file) into this format (.ppk file) as follows in order to connect to your instance using PuTTY.
    To convert your private key
    1. From the Start menu, choose All Programs, PuTTY, PuTTYgen.
    2. Under Type of key to generate, choose RSA.
      
       RSA key in PuTTYgen
      If you're using an older version of PuTTYgen, choose SSH-2 RSA.
    3. Choose Load. By default, PuTTYgen displays only files with the extension .ppk. To locate your .pem file, select the option to display files of all types.
      
       Select all file types
    4. Select your .pem file for the key pair that you specified when you launched your instance and choose Open. Choose OK.
    5. To save the key in the format that PuTTY can use, choose Save private key. PuTTYgen displays a warning about saving the key without a passphrase. Choose Yes.
    1. Note
      A passphrase on a private key is an extra layer of protection. Even if your private key is discovered, it can't be used without the passphrase. The downside to using a passphrase is that it makes automation harder because human intervention is needed to log on to an instance, or to copy files to an instance.
    2. Specify the same name for the key that you used for the key pair (for example, my-key-pair). PuTTY automatically adds the .ppk file extension.
    Your private key is now in the correct format for use with PuTTY. You can now connect to your instance using PuTTY's SSH client.

    Connecting to Your Linux Instance

    Use the following procedure to connect to your Linux instance using PuTTY. You need the .ppk file that you created for your private key. If you receive an error while attempting to connect to your instance, see Troubleshooting Connecting to Your Instance.
    To connect to your instance using PuTTY
    1. Start PuTTY (from the Start menu, choose All Programs, PuTTY, PuTTY).
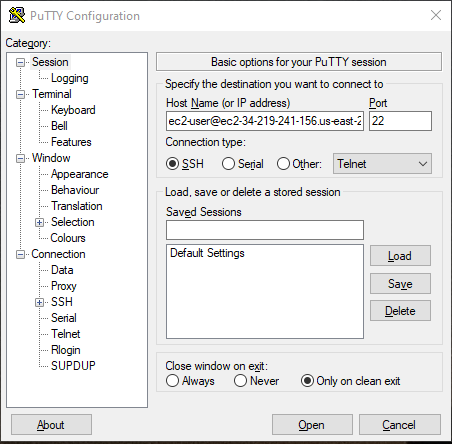
    2. In the Category pane, choose Session and complete the following fields:
      1. In the Host Name box, enter user_name@public_dns_name (see Get Information About Your Instance for how to get the public DNS name of the instance). Be sure to specify the appropriate user name for your AMI. For example:
        • For Amazon Linux 2 or the Amazon Linux AMI, the user name is ec2-user.
        • For a CentOS AMI, the user name is centos.
        • For a Debian AMI, the user name is admin or root.
        • For a Fedora AMI, the user name is ec2-user or fedora.
        • For a RHEL AMI, the user name is ec2-user or root.
        • For a SUSE AMI, the user name is ec2-user or root.
        • For an Ubuntu AMI, the user name is ubuntu.
        • Otherwise, if ec2-user and root don't work, check with the AMI provider.
      2. (IPv6 only) To connect using your instance's IPv6 address, enter user_name@ipv6_address. Be sure to specify the appropriate user name for your AMI. For example:
        • For Amazon Linux 2 or the Amazon Linux AMI, the user name is ec2-user.
        • For a CentOS AMI, the user name is centos.
        • For a Debian AMI, the user name is admin or root.
        • For a Fedora AMI, the user name is ec2-user or fedora.
        • For a RHEL AMI, the user name is ec2-user or root.
        • For a SUSE AMI, the user name is ec2-user or root.
        • For an Ubuntu AMI, the user name is ubuntu.
        • Otherwise, if ec2-user and root don't work, check with the AMI provider.
      3. Under Connection type, select SSH.
      4. Ensure that the Port value is 22.
      
       PuTTY configuration - Session
    3. (Optional) You can configure PuTTY to automatically send 'keepalive' data at regular intervals to keep the session active. This is useful to avoid disconnecting from your instance due to session inactivity. In the Category pane, choose Connection, and then enter the required interval in the Seconds between keepalives field. For example, if your session disconnects after 10 minutes of inactivity, enter 180 to configure PuTTY to send keepalive data every 3 minutes.
    4. In the Category pane, expand Connection, expand SSH, and then choose Auth. Complete the following:
      1. Choose Browse.
      2. Select the .ppk file that you generated for your key pair and choose Open.
      3. (Optional) If you plan to start this session again later, you can save the session information for future use. Under Category, choose Session, enter a name for the session in Saved Sessions, and then choose Save.
      4. Choose Open.
      
       PuTTY configuration - Auth
    5. If this is the first time you have connected to this instance, PuTTY displays a security alert dialog box that asks whether you trust the host to which you are connecting.
    6. (Optional) Verify that the fingerprint in the security alert dialog box matches the fingerprint that you previously obtained in (Optional) Get the Instance Fingerprint. If these fingerprints don't match, someone might be attempting a "man-in-the-middle" attack. If they match, continue to the next step.
    7. Choose Yes. A window opens and you are connected to your instance.
    1. Note
      If you specified a passphrase when you converted your private key to PuTTY's format, you must provide that passphrase when you log in to the instance.
    If you receive an error while attempting to connect to your instance, see Troubleshooting Connecting to Your Instance.

    Transferring Files to Your Linux Instance Using the PuTTY Secure Copy Client

    The PuTTY Secure Copy client (PSCP) is a command line tool that you can use to transfer files between your Windows computer and your Linux instance. If you prefer a graphical user interface (GUI), you can use an open source GUI tool named WinSCP. For more information, see Transferring Files to Your Linux Instance Using WinSCP.
    To use PSCP, you need the private key you generated in Convert Your Private Key Using PuTTYgen. You also need the public DNS address of your Linux instance.
    The following example transfers the file Sample_file.txt from the C:\ drive on a Windows computer to the ec2-user home directory on an Amazon Linux instance:
    pscp -i C:\path\my-key-pair.ppk C:\path\Sample_file.txt ec2-user@public_dns:/home/ec2-user/Sample_file.txt
    (IPv6 only) The following example transfers the file Sample_file.txt using the instance's IPv6 address. The IPv6 address must be enclosed in square brackets ([]).
    pscp -i C:\path\my-key-pair.ppk C:\path\Sample_file.txt ec2-user@[ipv6-address]:/home/ec2-user/Sample_file.txt

    Transferring Files to Your Linux Instance Using WinSCP

    WinSCP is a GUI-based file manager for Windows that allows you to upload and transfer files to a remote computer using the SFTP, SCP, FTP, and FTPS protocols. WinSCP allows you to drag and drop files from your Windows machine to your Linux instance or synchronize entire directory structures between the two systems.
    To use WinSCP, you need the private key that you generated in Convert Your Private Key Using PuTTYgen. You also need the public DNS address of your Linux instance.
    1. Download and install WinSCP from http://winscp.net/eng/download.php
  2. . For most users, the default installation options are OK.
  3. Start WinSCP.
  4. At the WinSCP login screen, for Host name, enter the public DNS hostname or public IPv4 address for your instance.
    (IPv6 only) To log in using your instance's IPv6 address, enter the IPv6 address for your instance.
  5. For User name, enter the default user name for your AMI.
    • For Amazon Linux 2 or the Amazon Linux AMI, the user name is ec2-user.
    • For a CentOS AMI, the user name is centos.
    • For a Debian AMI, the user name is admin or root.
    • For a Fedora AMI, the user name is ec2-user or fedora.
    • For a RHEL AMI, the user name is ec2-user or root.
    • For a SUSE AMI, the user name is ec2-user or root.
    • For an Ubuntu AMI, the user name is ubuntu.
    • Otherwise, if ec2-user and root don't work, check with the AMI provider.
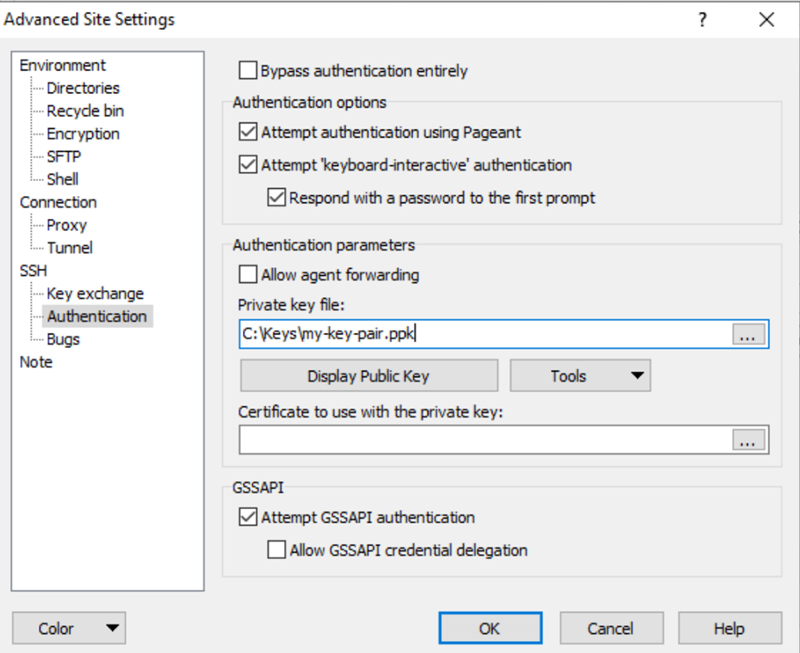
  6. Specify the private key for your instance. For Private key, enter the path to your private key, or choose the "..." button to browse for the file. To open the advanced site settings, for newer versions of WinSCP, choose Advanced. To find the Private key file setting, under SSH, choose Authentication.
    Here is a screenshot from WinSCP version 5.9.4:
    
       WinSCP Advanced screen
    WinSCP requires a PuTTY private key file (.ppk). You can convert a .pem security key file to the .ppk format using PuTTYgen. For more information, see Convert Your Private Key Using PuTTYgen.
  7. (Optional) In the left panel, choose Directories. For Remote directory, enter the path for the directory to which to add files. To open the advanced site settings for newer versions of WinSCP, choose Advanced. To find the Remote directory setting, under Environment, choose Directories.
  8. Choose Login. To add the host fingerprint to the host cache, choose Yes.
    
       WinSCP screen
  9. After the connection is established, in the connection window your Linux instance is on the right and your local machine is on the left. You can drag and drop files directly into the remote file system from your local machine. For more information on WinSCP, see the project documentation at http://winscp.net/eng/docs/start
  10. .
    If you receive a "Cannot execute SCP to start transfer" error, you must first install scp on your Linux instance. For some operating systems, this is located in the openssh-clients package. For Amazon Linux variants, such as the Amazon ECS-optimized AMI, use the following command to install scp.
    [ec2-user ~]$ sudo yum install -y openssh-clients


Tuesday, December 24, 2019

7 Bollywood actresses who worked in Hollywood.

Priyanka Chopra got a lot of worldwide prevalence and popularity after she showed up in Hollywood TV arrangement Quantico and afterward Deepika Padukone was included in Hollywood film XXX : Return of Xander Cage. Bollywood entertainers are unquestionably getting consideration of Hollywood movie producers. While still the best Bollywood on-screen character in Hollywood is Irrfan Khan, here are 7 Bollywood on-screen characters who additionally worked in Hollywood undertakings and some got a lot of acknowledgment and basic recognition also.
7 ) Mallika Sherawat with Jackie Chan in the motion picture The Myth.

6 ) Priyanka Chopra showed up in various Hollywood movies yet she got greater notoriety for the TV show Quantico.
5 ) Aishwarya Rai is one of the principal entertainers who made worldwide progress and populairty. She worked in various movies and still get remembered for the rundown of world’s most wonderful ladies.
4 ) Nimarat Kaur, the on-screen character from motion pictures like Lunchbox and Airlift, must work in Hollywood TV arrangement Home Land.

3 ) Lisa Ray worked in Bollywood films like Kasoor whose music got exceptionally famous. She additionally worked in Hollywood movies like I can’t think straight.
2 ) Deepika Padukone made huge news when she was casted for a job in XXX : Return of Xander Cage. A great many people likewise accepted that her job was superior to Priyanka Chopra’s job in Baywatch.
1 ) Tabu worked in effective movies like Life Of Pi and Namesake. She got a lot of basic assess for her exhibitions.

Solution for Redirect to website according to browser

Browser Dependent Content

Description:
We wish to provide different content based on the browser, or user-agent, which is requesting the content.
Solution:
We have to decide, based on the HTTP header "User-Agent", which content to serve. The following config does the following: If the HTTP header "User-Agent" contains "Mozilla/3", the page foo.html is rewritten to foo.NS.html and the rewriting stops. If the browser is "Lynx" or "Mozilla" of version 1 or 2, the URL becomes foo.20.html. All other browsers receive page foo.32.html. This is done with the following ruleset:
RewriteCond "%{HTTP_USER_AGENT}"  "^Mozilla/3.*"
RewriteRule "^foo\.html$"         "foo.NS.html"          [L]

RewriteCond "%{HTTP_USER_AGENT}"  "^Lynx/" [OR]
RewriteCond "%{HTTP_USER_AGENT}"  "^Mozilla/[12]"
RewriteRule "^foo\.html$"         "foo.20.html"          [L]

RewriteRule "^foo\.html$"         "foo.32.html"          [L]

Solution for Redirect to website according to country

Redirecting to Geographically Distributed Servers

Description:
We have numerous mirrors of our website and want to redirect people to the one that is located in the country where they are located.
Solution:
Looking at the hostname of the requesting client, we determine which country they are coming from. If we can't do a lookup on their IP address, we fall back to a default server.
We'll use a RewriteMap directive to build a list of servers that we wish to use.
HostnameLookups on
RewriteEngine on
RewriteMap    multiplex         "txt:/path/to/map.mirrors"
RewriteCond   "%{REMOTE_HOST}"  "([a-z]+)$" [NC]
RewriteRule   "^/(.*)$"  "${multiplex:%1|http://www.example.com/}$1"  [R,L]
## map.mirrors -- Multiplexing Map

de http://www.example.de/
uk http://www.example.uk/
com http://www.example.com/
##EOF##
Discussion
This ruleset relies on HostNameLookups being set on, which can be a significant performance hit.
The RewriteCond directive captures the last portion of the hostname of the requesting client - the country code - and the following RewriteRule uses that value to look up the appropriate mirror host in the map file.

Apache command for resource moved to another server

Resource Moved to Another Server

Description:
If a resource has moved to another server, you may wish to have URLs continue to work for a time on the old server while people update their bookmarks.
Solution:
You can use mod_rewrite to redirect these URLs to the new server, but you might also consider using the Redirect or RedirectMatch directive.
#With mod_rewrite
RewriteEngine on
RewriteRule   "^/docs/(.+)"  "http://new.example.com/docs/$1"  [R,L]
#With RedirectMatch
RedirectMatch "^/docs/(.*)" "http://new.example.com/docs/$1"
#With Redirect
Redirect "/docs/" "http://new.example.com/docs/"
I hope you get the solution, if not please comment below so that we will give you a perfect solution for you.

Apache command for redirect from one page to another


Description:
Assume we have recently renamed the page foo.html to bar.html and now want to provide the old URL for backward compatibility. However, we want that users of the old URL even not recognize that the pages was renamed - that is, we don't want the address to change in their browser.
Solution:
We rewrite the old URL to the new one internally via the following rule:
RewriteEngine  on
RewriteRule    "^/foo\.html$"  "/bar.html" [PT]

I hope you get the solution, if not please comment below so that we will give you a perfect solution for you.

Redirect example.com to www.example.com for all possible values of example.com

If you wanted to do this generically for all domain names - that is, if you want to redirect example.com to www.example.com for all possible values of example.com, you could use the following recipe:
RewriteCond "%{HTTP_HOST}" "!^www\." [NC]
RewriteCond "%{HTTP_HOST}" "!^$"
RewriteRule "^/?(.*)"      "http://www.%{HTTP_HOST}/$1" [L,R,NE]
These rulesets will work either in your main server configuration file, or in a .htaccess file placed in the DocumentRoot of the server.

This is the best solution when you are looking for redirect non www website to www. 
Dont hesitate about it work or not, but i am sure and well tested. Go for it and add above code on your website.

Saturday, December 21, 2019

High Quality Backlinks buying Websites 2020

Best Websites to Buy Backlinks for Your Site {High Quality}


“Write link-worthy content all the time.”
You might have heard the advice given above a million times. But the reality is that no one can guarantee natural backlinks even if you write an epic blog post since people always love to link to authority websites. So chances are less for you to earn links if your site is comparatively new and miles away from being an authority itself.
Niche bloggers who don’t like to reveal their identity can relate to this as no one likes to put a link, pointing to an unknown site.
So what’s the best way to get backlinks? Here in this article, you are going to read the same.

Best Websites to Buy Backlinks

Buy Backlinks
Yeah, the subhead says it all. If you don’t earn backlinks, just bargain over it. You can use this article as a cheat sheet to buying authority backlinks.
Before getting deep into the sites from which you can buy backlinks, I would like to invite your attention to a couple of things.

The Importance of Backlinks

In case you are a newbie, exploring the whole blogging thing, you might wonder why on the earth one should invest on backlinks. The following points are the answers for those you think like that.

#1. Get Good Referral Traffic on Autopilot

If you manage to get a backlink from an authoritative blog with tons of daily hits, you can easily get a small fraction (at least hundreds) of it to visit yours. And, you can convert a good percentage of them into your regular readers by the value you provide through your site. Eventually, you can generate leads sell stuff to them as well.
Mark it, not all backlinks count, just the authority ones.

#2. Boost Search Positions

As I told you, in the beginning, Google (not only Google though) considers the number of authority backlinks as one of the pivotal criteria to rank a website. As every search engine strives to provide value to the visitors, an authority backlink silently proclaims that the target site is reliable.
You know what? The trust factor has a lot to do with search engine optimization (I suppose you already know the influence of user behavior in SEO).
Moreover, a backlink can pass link juice of the source site to yours. That’s why all the experienced marketers tell you to disavow links from low-quality websites right away as it can pass the filthy link juice to your blog and ruin its credibility before search engines.
In fact, authority backlinks can push your site up in search engine rank pages.

#3. Makes Indexing Faster

Have you ever faced difficulties in indexing your new posts? Maybe, it is due to the lack of quality backlinks.
We all know that authority blogs publish posts on a regular basis, and Google crawlers continuously go through them.

#4. Helps You Build a Brand

Believe it or not, the personal branding era is going on in the blogging arena! The time had changed when people used to buy things online from a complete stranger. Now, you need to earn their trust in order to get them purchase the products you promote.
The backlinks from big authority sites announce that your site is worth visiting. So their regular visitors got to know you are a reliable guy which, in term results in revenue growth.
Now that you got an idea of substantial benefits of HQ links, it’s time to read the key points to remember while buying backlinks.

Key Points to Remember while Buying Backlinks

I know you have made your mind for buying backlinks. But it’s not a piece of cake as you need to consider a lot of things like where to buy backlinks, whether the links has got the potential to lift you up on SERPs etc.
Here in this section, I am giving you some important things to do when you buy backlinks.

#1. Set Your Budget

As you are going to BUY quality backlinks, it is obvious that you must shed some bucks. So the very first thing should be the determination of the budget. It depends on the project you work on as spending $1000 on a site that seldom has a $100 earning potential is not a good idea.
At first, analyze the earning potential of your blog. And, there is nothing wrong in spending a month’s income (from your calculation) for the link building.
Advice for Novice Bloggers: – Never ever calculate your monthly earning because chances are it will go wrong and take your investment away. So better spend $20- $25 at first to see how it works. You are free to spend more if it returns positive results.

#2. Go for Quality over Quantity

Even a hundred links from blogs of low metrics can’t match with a quality backlink from an authority site. Hence, you must always go through the site measures, not the backlink count.
In search engines’ eyes, edu and gov backlinks are most reliable. And, it can boost your ranking better than any other link. Try to buy backlinks online from edu and gov sites to increase the trust level of your website.

#3. A big NO to Identical Sources

Google hates excessive backlinks from the same sources that it will sue you for doing the same. The truth is it’s hard to hide links from Google’s hawk eyes.
That’s why I highly recommend not getting too many links from one site. You must diversify your link profile with multiple sources instead of making it garbage with tons of same websites.

#4. Purchase Links to Inner Pages

You might have been making a mistake of building all of the links to your homepage. NEVER do that again.
Most of the blogs have the latest articles’ archive as their new page that isn’t relevant backlink in a piece of content. And, it will make Google think that you are doing something illegitimate.
So, from the next time you buy SEO backlinks, make sure that it points to one of the inner pages of your blog.

#5. Go for Relevant Links ONLY

It’s true that we build backlinks to convince search engines, not the audience. But, you must always go for niche relevant backlinks, especially if it points to your money site.
Google has been rolling out search algorithms regularly to get rid of spammers from their SERPs. So, it can sense something fishy on seeing a link to ‘5 Best Keyword Researching Tools’ from an article titled ‘How not to be Overweight.’ And, it will end up in ruining all your organic traffic figures.

#6. Buy Links for Long Period

Short term contextual or sitewide links may work out for event blogs. But if you want to build links for a long-term website, I highly recommend buying links that exist for an extended period of time (say at least a year).
Why because the loss of links after a short period will harm your site badly and your dream project may disappear into oblivion.
With that being said, let’s just find out the best websites to buy backlinks to your site.

Buy High-Quality Backlinks using These Sites


You are going to read the core of this post. I have tried my best to come up with all the best sites to buy backlinks.

#1. Links Management

When it comes to buying links online, I prefer and recommend Links Management first. They have got tons of high PR sites under one roof to provide you with links.
Linksmanagement is an entire link store with a lot of features. The most useful feature I feel is the page glance option. You can view the web pages before you order a backlink from those. It will help you find out how the source site looks like.
They also got an amazing filter with which the backlink opportunities can be sorted out on the basis of price, PR or any other site metrics.
In case you are a busy person with no time to look after your link building campaign, Linksmanagement will give you a dedicated SEO manager. He will keep purchasing HQ links for you. But I suggest doing it on your own as you will experience a quick demise of your funds within no time if you seek their SEO manager’s help.
You can also buy edu backlinks from there after a deep research.

Pros

  • Perhaps the best site to buy high PR backlinks (though PR is dead).
  • The preview feature helps you have a sneak peek at the source websites before placing an order.
  • You can buy cheap backlinks from here (expensive ones are there as well).
  • Buying permanent, as well as temporary links, is possible here.

Cons

  • The payment system seems like a little complicated. You need to add funds to Linksmanagement account and pay from there instead of individual backlinks.
  • Every month they withdraw at least $15 (not to allow link contracts to expire) from your account, and you can’t turn it off from their site (It only takes an email to them, though).

#2. Backlinks

I think the most given answer for where to buy backlinks and how to buy quality backlinks are one; that’s backlinks.com. Being one of the prominent sites to buy links, Backlinks.com has helped a lot to achieve their dreams via blogging.
They possess an impressive feature of replacing bad links with good one. In case you already paid for a link and you got a bad link in return, the backlinks.com team will resolve the issue by just replacing the same. Deserves an applause, doesn’t it?
Backlinks.com team has prepared a link directory with all the web pages they have. You can search there to get a site with required measures to buy a backlink from.
Another interesting feature is that it is possible to earn some decent bucks from this amazing buy-sell platform. You only needs a good website and should have the willingness to place links. If you are craving out for more money, just keep calm and join their affiliate program. As the number of your referrals grows, you will get paid no matter what.

Pros

  • A campaign wizard is present to ease the process of link building. If you prefer taking the effort out from your shoulder, you will have to make use of their automation facility.
  • In case you happen to have a bad link from their platform, it will be replaced with a high-quality link soon.
  • Your willingness to put backlinks on your blog can fetch you a handful of money from backlinks.com. And, that double up if you use the affiliate program as well.

Cons

  • They have no feature to buy permanent backlinks. So, a fixed monthly fee should be paid to sustain each link.

#3. Blackhat World

I hope you already heard about Blackhat World at least once. It is more of a forum for those who want to bang the web using the blackhat strategies. But that doesn’t mean this site is not going to help you.
Just visit once and you will get to know how awesomely forum members share their working strategies. Very often, some members post threads about selling backlinks. They announce that you can buy high PR cheap backlinks. But you should remember the fact that BW is not a site dedicated to buying backlinks. So, it would take some time to find the right forum threads.
I am sure that you know the negative impact of a filthy backlink in organic traffic. So, you must research more about the seller before buying even a single link.

Pros

  • You can buy some really cheap high-quality backlinks.
  • It is possible to interact with the sellers to get more about him and the gig.
  • Blackhat World doesn’t want us to settle the contract within the community. You can communicate on some other platforms and close the deal.

Cons

  • You will be in big trouble if you don’t research well about the seller.
  • Tons of low quality backlink gigs are there that seem to be legitimate.

#4. Blackhatlinks

You know that term, don’t you? Whenever you hear something with blackhat in it, your mind automatically estimates a chaos.
Let me tell you one thing now. You have been doing blackhat SEO right from the beginning of your career. Yeah, you heard it right! Wondering how?
Well, Google hasn’t told us to build backlinks even if through the so-called whitehat way, be it single link you get via a legitimate comment. So everyone who builds links (consciously or unconsciously) are doing blackhat SEO.
So, I don’t think anything wrong with their site name.
If you are a person who wants to buy cheap backlinks, Blackhatlinks should be your pick. They are not into providing site-wide or contextual backlinks. But what they provide for very reasonable prices will make you spell bound.
  • Blog Comments
  • Web 2.0 Backlinks
  • Wiki Links
  • Bookmarks Links
  • Social signals.

Pros

  • Very cheap backlinks that you can buy a hundred of them for even $6.
  • You will get the links within 24 hours no matter what the volume is.
  • Give you backlinks from sites with minimum outbound links

Cons

  • The link building is fully automated. So, 100% quality may be at stake.
  • You can’t buy high quality links from sites with custom domains.
  • They only provide bulk link building service that you will not be able to buy 10 or 20 of them.

#5. PostLinks

If you are a person who wants to buy backlinks to your site from authority sites, you should not sign up for Blackhatlinks as they won’t give you the service you need. I would recommend Linksmanagement to buy authority backlinks. But the problem is you can’t purchase web 2.0 links from there. I was really exhausted after searching for a site that sells both authority and web 2.0 backlinks.
But I did it. Guess what? I found a site on which you can buy both the type of links. PostLinks.com is that site. You need to sign up for their any of the three membership plans to buy high quality backlinks. Unlike Linksmanagement, PostLinks doesn’t allow you to pay for each backlink as it works on a credit system.
They calculate the link price on the basis of Moz’s Domain Authority. The greater the DA, the higher the price will be.

Pros

  • Provides both authority and web 2.0 backlinks so that, you won’t have to visit two sites for both types of links.
  • They only give you HQ backlinks from old websites with good authority.

Cons

  • It is impossible to pay for a single link. Though you can purchase a single link, the payment for the membership plan needs to be paid in advance.
  • The basic plan costs you $49, which seems to be expensive for people looking for 3-5 links.
  • Pricing pattern may sometime make no sense as it is possible for low-quality sites (read low-quality link profile) to have good DA.

#6. SEOclerks

SEOclerks is the one-stop place for anyone looking to buy an SEO service, be it backlinks, social signals or on-page optimization. So, you must understand the fact that this one is not a dedicated platform for backlinks only.
Chances are you can find quality backlinks services on the homepage itself even if you are not signed in or up. As a cherry on the cake, the brilliant filter system allows you to classify the popular gigs on backlinks category. Due to a large number of service providers, it may be a confusing task to choose which one to go with. The ‘love’ count will be going to help you get rid of the confusion.
The filter allows you to sort the gigs based on the price too. In this way, you can find backlink gigs that won’t rip off your pocket.
If you are good at an SEO service, you can earn some quick bucks selling your expertise here as well.

Pros

  • Backlink services for almost every budget are available.
  • It is easy to find the reliability of a seller by referring to the ratings and reviews.
  • You don’t have to use another platform for your SEO needs if you choose to go with SEOclerks.

Cons

  • Sometimes, the searching process may become tedious to find gigs with the right price and good reputation.

#7. Fiverr

I am going to kill you if you say Fiverr is new for you. Just kidding!
Fiverr is one of the popular if not the best freelancing platform that has earned a lot of trust from the service sellers and buyers. As the name suggests, the price for gigs starts at $5. Though there are services with cost more than $5, the popular price choice is five.
Do you want to buy cheap quality backlinks? I recommend giving Fiverr a shot.
You must analyze the reviews and rating of the seller before placing an order because link building is the most sensitive thing in digital marketing. And I don’t think it’s a good idea to purchase from newbie service providers.

Pros

  • Tons of quality link builders are there on Fiverr, and you don’t have to spend lots of money to purchase their service.
  • Just like in SEOclerks, Fiverr also got an efficient filter to help you find gigs that meets your requirements and budget.

Cons

  • Filthy backlinks may ruin your entire business if you don’t choose sellers carefully as there are some low-quality link providers.
Read depth Fiverr Review.

Wrapping Up

Do you know how to buy links now?
I have given you all the guidelines and seven useful websites to buy backlinks. So I hope I resolved your question; where to buy backlinks, didn’t I?
In case you are left with any doubt, feel free to ask via the comment section down below.
I iterate, choose sellers carefully, and select services wisely.
You mind hitting one of those share buttons?

Free Directory Submission Sites List With High DA for 2020

Free Directory Submission Sites List With High DA for 2020


Here is a free directory submission sites list with high DA (Domain Authority), PA(Page Authority) and Moz Rank for 2020.
If you are looking for a directory submission list to submit your website/blog and create backlinks, you will love this article.
Let’s dive in.
Directory submission is still a powerful way to get quality and permanent backlinks to your website. You can get only approval by submitting into an appropriate (relevant) category with the unique description, meta keywords, and best title, avoid to use more keywords or same description for all web directory sites.

Types of Directory Submission

There are mainly three types of directory submission sites, but some webmasters define them in the form of doing submission like manual directory submission, automation directory submission and niche directory submission, etc..
Primary type of Directory Submission
1). Paid or Featured Listing
2). Free or Regular Listing
3). Regular Link with Reciprocal
Paid or Featured Listing: If you opt for paid listing, you need to pay to directory submission sites owner. The amount is depending on the directory submission sites. When you opt for paid listing, you get guaranteed approval of your directory since you have paid for them.
Free or Regular Listing: if you opt for a free directory listing, there is no guaranty for approval. And webmaster of directory website checks your directory submission info manually if he found everything is good, he approves since every day lots of sites are submitted, so it takes lots of time to get approval. Sometimes more than months. To increase chances for approval first read guidelines of directory submission sites since every directory submission has different guidelines. Some directories offer links permanent for free listing while some for a particular period.
Regular Link with Reciprocal: if you opt for Regular link with reciprocal, you need to give backlink them. It means they provide you a code and you need to paste that code into your website’s page to validate reciprocal link.
I suggest you go with free or regular listing since Google hates paid links.

Guidelines For Directory Submission

Every directory website has own guidelines. You need to follow all guidelines to get approval. Mostly directory editors check directory submission manually to ensure you followed all instructions or avoid spamming. When you submit your blog or website, ensure you follow all following guidelines.

Title

Every directory has owned criteria. Mostly directly sites accept company name without including any keyword into the title. In this case, you should only use your official website name. Ex. My blog name is Updateland.com. So Title is Updateland. It doesn’t contain any keyword. It has only official blog name.
Few directory sites accept keywords into the description to describe the website. In this case, you should remember below points into your mind while doing directory submission.
  • Title should be relevant and descriptive.
  • Title should be meaningful and not stuffed with keywords.
  • Title doesn’t seem promotional.
  • Avoid the use of exclamation mark and repetition of keywords and avoid words like best, cheaper, good, No.1, etc
  • Title length should be between 20 to 50 character.

Description & Meta Description

Many times you do directory submission, but you get a few approvals. Reason can be inaccurate description also. Below are some guidelines. Keep these points in mind while writing a description.
  •  All points that are mentioned for the title, is also applied in description except title length.
  • Don’t mention pricing, phone number, and address details, they can be varied according to time.
  • Avoid using etc., others, or even in description’s end.
  • Write more specific means what your website offers. (don’t stuff with keywords).

Keywords & Meta keywords

There are no special guidelines for keywords. Avoid using the same keyword again. Keywords format: keyword1, keywords 2, keywords 3 …. Some directories allow spaces instead of using a comma.
Check this post to know about the best keyword research tools and find out the best keywords for your website.

Category

Some people make silly mistakes choosing a category. Take some time and find the best category even you can check subcategory also. You can find the best subcategory which best suite to your website within seconds. Some websites allow an option to suggest a category. If you don’t see any relevant category. Click on suggest category button and submit your site. If directory editor or owner found this category best suits your website and best for their directory. Your website is added to a new category.

URL/Domain

Most directories don’t be strict about URL. But make sure you follow below points.
  • Submit the URL into the correct format. Most directory sites accept URL format like https://www.updateland.com. Only a few directories take without http:// means www.updateland.com. Some directories demand to add forward slash’/’ at the end of URL. When it is notified, add this. Otherwise, you can’t submit your website.
  • Do not submit parked domain websites that have no content or under construction.
  • Only submit home page URL unless specified for inner pages. Avoid use of index in the end of URL. The correct format is http://www.updatland.com.
  • Only a few directories accept hosted domain on free hosting services like updateland.blogspot.com or updatelamd.wordpress.com etc.

Email

Most sites are not particular about emails but if you use your domain email means my blog URL is www.updateland.com, my email domain email id: jyoti@updateland.com. If you use domain email, there is no chance to rejected. Some few sites don’t accept free emails like jyoti@gmail.com or jyoti@yahoo.com. So it is best if you use domain email id.

Website Content

Mostly, websites are particular about website content. Make sure you follow all below points.
Don’t submit such websites which are under construction or coming soon. Make sure your website all pages have built before you do directory submission.
Don’t submit a website that has no content or mirror content.
Some directory sites are also particular about page and don’t accept single web page site. Make sure your site has few pages before you submit.

Step by Step Guide To Website Submission into Directory Site

1.) Visit Website
2.) Select Category
3.) Select Subcategory
4.) Click on Submit or Add listing option
4.) Now select directory listing type from free, paid and reciprocal option. Go with the free option. If you want instant approval, go for the paid option.
5.) Fill form with all required information like title, website URL, meta description, keywords, meta keywords, description, name, and email.
6.) After filling form click on continue or submit button that will be shown below the form.
7.) You will get a confirmation email from verification. Now time to open your email account and click on the verification link in the mail.
8.) Directory Submission has been Done for your website.
Directory Submission List has been updated at 12/18/2018. All listed directories are working.

229 Free Directory Submission Sites List of 2019

Hopefully, you will love this 229 high DA free directory submission sites list of 2019 for your blog/website submission. If you have any doubt, leave a comment below.