Monday, August 31, 2020

Joyoshare Media Cutter Review: Features, Pros, Cons & More

 This Joyoshare Media Cutter review will get you a detailed, honest, and transparent insight into the tool.

If you need to trim a video, join two or more videos, extract audio off a video or even convert a video format, this piece is exactly for you.

Like every other tool, Joyoshare claims to be the best in all of those fields.

Obviously, you shouldn’t believe such claims. Not even from me and not without first-hand experience or solid proof.

That’s what I intend to get you.

I’d not simply list the “features”. Rather, I’ve actually used the tool, recorded its results and that’s what I share with you today.

Let’s get started then?

What is Joyoshare Media Cutter?

I picked up Joyoshare when I needed a lossless video cutter. But, it actually offers a lot more than just that.

In fact, it offers more than almost any other media cutter I’ve ever seen.

It lets me:

  • Trim videos.
  • Join/merge videos.
  • Convert video formats.
  • Extract audio.
  • Add video effects.
  • Add sound effects.
  • Add watermarks.
  • Embed subtitles and a lot more!

Before I move on to the features, let’s discuss the tool in general?

Joyoshare Media Cutter pros and cons

Here are the reasons based on which Joyoshare claims being the best video splitter, and also those which I feel could be improved:

Pros:

  • Extremely feature-rich.
  • Easy to use, drag & drop interface.
  • No quality-loss.
  • Very fast.
  • Free trial available.

Cons:

  • No major cons.

Note that this doesn’t mean the tool is perfect.

But, it markets itself as the best video splitter. Hence, I can’t list the lack of more conversion-formats or other similar features as “cons”.

That’s not what it’s supposed to do. Those are just bonus features out of good faith. As far as splitting/trimming goes, it’s truly perfect.

Joyoshare Media Cutter Review- Final verdict

When I first downloaded the tool, I wasn’t very positive about it. “Another tool claiming to be the best video trimmer”, that’s exactly what I thought.

But, once I started using it, it impressed me beyond limits.

For starters, the trimming/splitting features are so easy, I was sold right there.

Then, its “lossless” technology is what sealed the deal.

All the videos that I cut or converted retained their original qualities, completely.

Moreover, the speed was much better than what I expected from the seemingly basic-looking software.

And finally, the features. I never imagined it would have nearly a dozen individual features bundled for free.

All in all, for just a media cutter, that’s a lot of features. So yes, don’t buy it if you don’t want to, but, do give it a try, there’s a free version available anyway.

Joyoshare Media Cutter User Interface

Why I always talk of the UI at the very beginning of my reviews?

Well, if the UI is complicated or hard to understand, the features and the tool in general wouldn’t mean anything to you.

If you can’t use it, it’s useless, isn’t it?

Here’s the Joyoshare interface:

Joyoshare Media Cutter User Interface

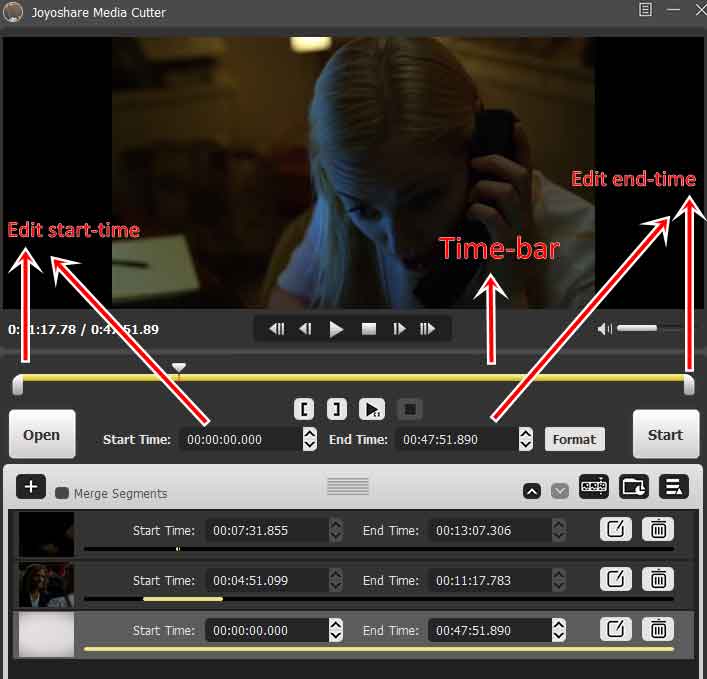
For starters, you can upload a video for editing simply by dragging and dropping in onto the tool.

You can see three blobs on the video time-bar.

Both the blobs below the time-bar let me set the “start and end time” for the edit.

I can simply set the two sliders to their respective positions and click on “Start” to either trim/merge or do anything else with the video.

Or, I can enter the “start time” and “end time” manually in the provided boxes as well.

If that’s not convenient-enough, you can see those [ and ] buttons, can’t you?

The “[“ button sets the current video timestamp to be the “start time” for the segment, similarly, the “]” button sets the current video time as the segment-end time.

Basically, the exact same thing can be done in 3 different ways.

In all the cases, it never requires more than 3 clicks!

Hence, at the least, the tool is very easy to use and doesn’t require any technical knowledge.

Trim/Cut videos and audio

Being a media cutter, obviously trimming and cutting videos is its speciality.

Simply set the two start and end blobs where you want them, and click start.

The video gets trimmed instantly.

Maybe you need clips for your social media? Creating a meme maybe? It just takes a few seconds at best.

It’s not limited to videos, rather, audio files can be edited as well.

Merge Audio/videos

Joyoshare Media Cutter offers two merging features, which are similar yet not identical.

You can use it to fragment a video, and then join/merge those fragmented parts.

Or, I can use one or more fragments from the same video + other videos and their fragments to create my new video.

There’s a neat “merge segments” button on the interface:

Joyoshare Merge Segments

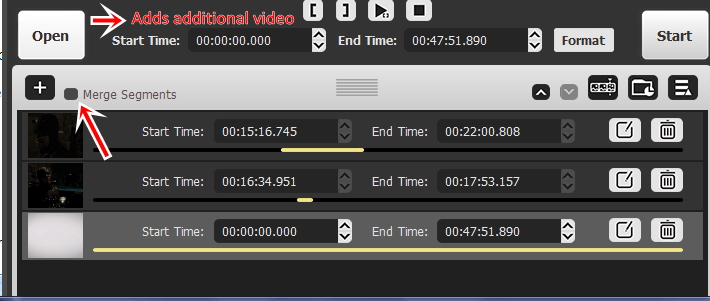
The “open” button, as shown above, lets me add additional video (or, fragments from them) for merging.

Format conversion

As mentioned earlier in this Joyoshare Media Cutter review, it’s not just a media cutter.

Format-conversion is another one of the advanced features that the tool facilitates.

Videos can be converted to many different formats, some of which include:
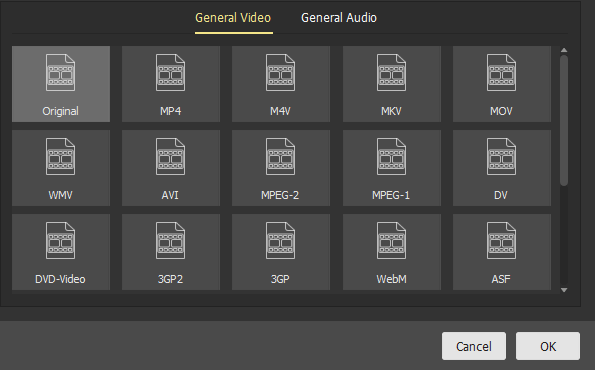
Joyshare media cutter fromat conversation

  • MP4
  • AVI
  • MKV
  • MOV
  • ASF
  • DMW
  • WEBM
  • SWF etc.

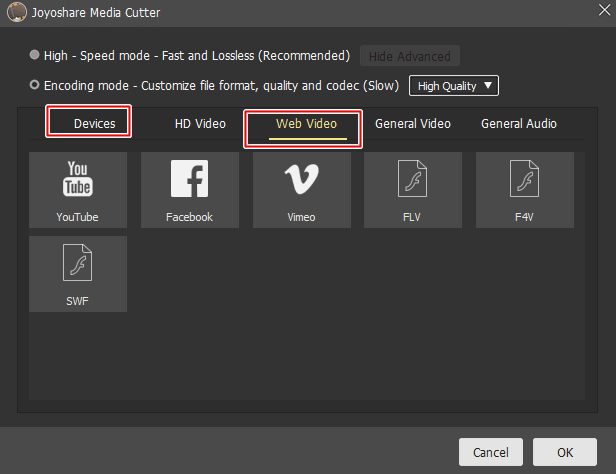
Not just that, it even has device-specific and web-specific formats.

Meaning, if you aren’t sure which format will be the best on your device, you just select your device and not the format.

Joyoshare automatically assigns the best video format for the device.

Similarly, it also has web-formats for various platforms such as Facebook, Vimeo etc.

I’m sure any other software made exclusively for video conversions will offer many other formats.

But, I’d say Joyoshare does offer the most commonly used formats.

Hence, it also can be used as a video converter for everyday purposes.

Audio extraction

This is a feature related to format conversion, but totally qualifies as an individual feature by itself.

Using Joyoshare, I can extract the audio from a video.

In other words, if I need just the song from a video, that’s possible. Or, I can make a ringtone from a video as well.

Obviously, other use-cases are possible depending on your needs.

Now, it’s not exactly a “feature” on the tool.

Rather, the format-conversion popup offers a “General Audio” tab.

I can select an audio format on this screen which lets me extract the audio.

Some of the supported audio formats are:

  • MP3
  • AC3
  • APE
  • FLAC
  • AU
  • WAV
  • CAF
  • AAC and many others.

Dual conversion modes

Some of you on this Joyoshare Media Cutter review may be people with more “technical” video knowledge than others.

Although, not everyone is a video professional.

Joyoshare caters to the need of both the type of users.

It offers dual-conversion modes:

  • High speed mode.
  • Encoding mode.

The high-speed mode is for everyone like me, that is, without a lot of technical knowledge.

The “Encoding mode” is for those who understand video technicalities better (it’s slower than the high-speed mode).

It lets us customize the resolution, frame rate, codec (AAC, AC3, MP3), channel (Stereo, 5.1 surround) , sample rate and also the bitrates.

You can also choose from two basic options- “high quality” or “small size”. This auto-determines all the settings depending on your preference.

Simultaneous outputs

I liked the fact that it exports multiple files simultaneously.

Meaning, I created 4 fragments of my video and exported them.

My initial thought was that each video will get exported individually. Well, I was wrong.

Joyoshare exported all the files at once. That reduces the overall required time exponentially.

60x faster speed

The company markets itself as being 60x faster than other tools.

Well, initially I didn’t believe that. I mean, all companies exaggerate, don’t they?

But then, I converted 3 videos and the speed did impress me.

It literally takes minutes to convert entire movies.

I’d not say it’s the fastest video conversion speed I’ve ever seen. And, it probably isn’t exactly 60x faster either.

But, given that the video-converter is just a bonus feature, the speed sure is impressive.

Real-time previews

When editing videos, you do not need to wait for the results to view them.

It’s all in real-time. The video-player lets you play videos and specific fragments.

This tells you exactly which parts of a video are being edited. No unexpected errors will show up.

Rotation/ Cropping/ Aspect ratio adjustment /Zoom

These are some other basic yet equally important features on this Joyoshare Media  Cutter review.

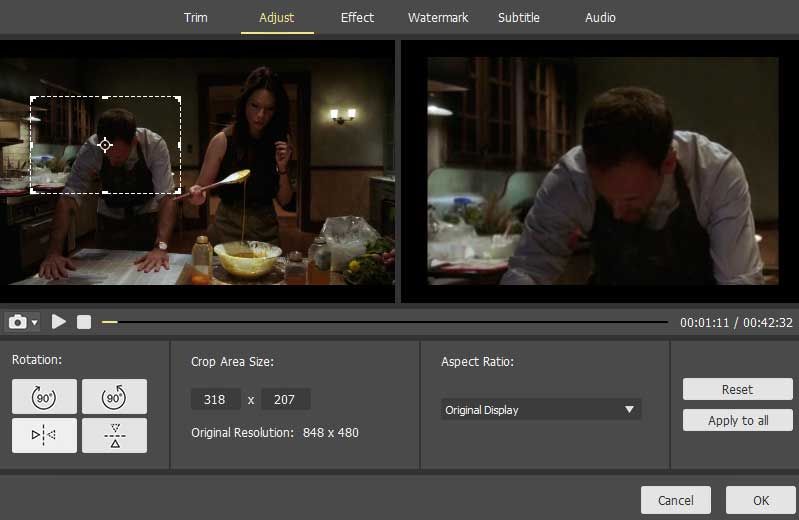
It lets me set the rotation of the videos.  Complete 360 ° rotation is possible.

There’s also a “flip” option using which I can flip the video either horizontally or vertically.

The “Crop area size” feature is interesting.

I can either enter the area size manually which I wish to crop, or, use a drag & drop cropper.

The cropping essentially makes this into a “zoom” feature. The smaller my crop-area, the higher my zoom level.

And then finally the aspect-ratio feature lets me set an aspect ratio for the videos.

A total of 5 aspect ratio options are available.

Effects, frames and display settings

Joyoshare also offers effects and frames that you can add to your videos.

A total of 10 effects are available.

And if I’m being honest, the effects are pretty good. There’s “Fireworks”, “Blue sea”, “Rain”, “Soft shine” and many other options are available.

It  also offers 12 frames which can be added to the videos in a click.

And that’s not all.

It offers a slider-based control for brightness, contrast, saturation and hue.

Okay, honestly? I’m impressed.

I mean, this is actually a media cutter, it isn’t even supposed to have all these features.

Text and image watermarks

This is one of the more impressive features on this Joyoshare Media Cutter review.

It lets me add both an image, as well as text-watermark.

A drag & drop interface lets me position the watermark with ease as well.

And finally, it lets me set the transparency.

Embed subtitles

You’ve a subtitle file that you’d like to embed on your video?

That’s what this Joyoshare subtitle embed feature does.

Just choose a subtitle file, choose the position for the subtitle, set a margin, transparency and scale and you’re done.

You can even choose a font, colour, shadow and outline for the subtitles.

Honestly, there aren’t many subtitle-embed tools as easy as this one.

Audio effects

As mentioned earlier in this Joyoshare Media Cutter review; the tool isn’t just about video but also audio.

It has an audio editor which lets me:

  • Change audio tracks in a video completely.
  • Adjust volume of the audio.
  • And, add sound effects to the audio.

A total of 9 audio effects are currently available.

Joyoshare Media Cutter pricing plans

The feature-list is extensive, but, will it cost a fortune?

Fortunately, no. There’s a 100% free trial which doesn’t even require a signup or e-mail ID.

All you have to do is, download the tool and start using it. It’s limited at 5 cut or convert exports.

There are 3 paid plans:

  • Single license: $29.95- 1PC.
  • Family license: $49.95 – 5PCs.
  • Unlimited license: $69.95- Unlimited PCs.

On top of the free plan which provides access to all the features, there’s also a generous 30-day refund period.

I guess this Joyoshare Media Cutter review offered you at least some insight into the tool? Do you think it’s worth it? Maybe not? I’d love to know your reasons either way, do use the comment-box below to drop your opinion on the tool.

Yo!Yumm Review: Introduction, Features, Pros & Cons, Pricing

 The online food industry has gone through a significant revolution in the recent past. Customers are able to order their favorite food in a few taps on their smartphones and get it delivered at their doorsteps within the shortest time possible. The online food industry has seen a dramatic growth of 20% in the last 5 years and is expected to reach 40% in the next 5 years that translates to about $220 billion.

With this rapid increase in online food ordering and delivery, restaurants are now handling digital ordering in different ways. While some manage it themselves via independent platforms, some do it via a third-party platform like Uber Eats which has resulted in a rise in the demand for online food ordering and delivery platforms. So if you are also planning to launch an online food ordering and delivery marketplace, do not think twice.

Yo!Yumm is a customizable online food ordering and delivery solution that helps budding entrepreneurs to launch their food ordering and delivery marketplace. It empowers businesses and helps restaurants to have a unique online presence to serve their customers “on the go”. I recently got to know about this power-packed solution and decided to understand it thoroughly to give you an honest review of the solution. So let’s begin.

Yo!Yumm Overview

YoYumm Review

Yo!Yumm is a white label solution that is loaded with powerful features to launch a food ordering and delivery marketplace. This scalable solution comes with easy to use mobile apps, has a top-notch interface, and is fully customizable to meet the changing requirements. Built to reinvent the way of food ordering and delivery, entrepreneurs can leverage this power-packed solution with robust design and impeccable capabilities. Yo!Yumm has interactive mobile applications enabling restaurants to serve their customers efficiently.

Mobile Applications/Web Portal

The complete solution consists of a separate mobile app/web portal for each type of user – customer, merchant, delivery staff, admin. No matter if you need a feature-rich web portal or interactive mobile applications for buyers, merchants, and delivery staff, Yo!Yumm provides everything at the same price. Let me briefly describe the features of each panel:

Customer App: For customers, there is an interactive mobile application to browse for their favorite food from the nearby restaurants and satisfy their cravings by ordering them and getting it delivered at their doorstep. Main features covered in customer application are:

  • Reviews/Ratings
  • Takeaway options
  • Restaurant listed based on location
  • Multiple payment options
  • Offers & deals
  • Reward points
  • User registration
  • Order tracking
  • Cuisine & restaurant search

Merchant App: Restaurant owners can ensure a wider reach to the customers with the merchant app. They can manage the orders, offer deals/discounts, and analyze their sales with the help of this app. Features of the merchant app are:

  • Daily sales update
  • Reply to reviews
  • Restaurant management
  • Support & assistance
  • Menu management
  • Tracking payments
  • Order management
  • Track delivery
  • Push notification

Delivery Staff App: Enabling the delivery staff to successfully manage order delivery status, profile updates, navigate to buyer/seller location, view wallet transactions, etc., Yo!Yumm has an advanced mobile app for delivery staff as well. Features for delivery staff app are:

  • Manage multiple deliveries
  • Real-time tracking
  • Secure login
  • Push notifications
  • Delivery management
  • Convenience of operating

Admin Web Portal: To manage all the operations of the other three users and gain a competitive edge in the market, the admin portal has complete control over the solution. Features of the admin web portal are:

  • Control over restaurants
  • Customer insights
  • Multi-store
  • Restaurant review
  • Multilingual
  • Multi-payment option
  • Delivery management
  • Statistical report

Revenue Channels

Yo!Yumm understands the importance of the presence of efficient revenue channels in a food ordering delivery solution and enables the entrepreneurs to maximize their profits with the help of all possible revenue channels. With Yo!Yumm, I found 3 possible revenue generation channels. 

  • On-site restaurant promotions
  • Commission from restaurants
  • Third-party advertisements

Yo!Yumm also offers 1 year of free technical support to troubleshoot any bugs and errors found in the system. The solution has been successfully implemented for a number of food ordering websites like BiteRider.my, Afritastes, Muonangi, and many more and each one of them is doing great in their respective locations.

Third-Party Integrations

While studying the portal thoroughly, I also found that the solution is integrated with several third-party APIs to enhance its functionality. The APIs I found are Stripe, PayPal, Authorize.Net, CCAvenue for payment gateways, Facebook Login, Google Login, Apple Login, for social logins. Other essential APIs are Google Map, MailChimp, Mandrill, Clickatell, and Firebase Cloud Messaging.

Conclusion

Overall, the solution is quite professional and feature-rich. The user experience and scalability of the solution makes it one of the preferred solutions for launching an online food delivery platform. However, there are a few things I did not like about the solution/I found missing in it. Below listed are the pros and cons of Yo!Yumm:

Pros:

  • The solution is integrated with features to keep the business running smoothly even in COVID-9.
  • Scalable and customizable
  • Mobile App for each user
  • Timely progress updates

Cons:

  • Web hosting is not provided

Free Demo

If you are still confused about the product, you can schedule a demo to know more about the product. Yo!Yumm is offering a FREE demo of the product helping you to be sure before finalizing anything. Just try out the demo and make your decision.

Monday, August 10, 2020

AXIOS request cheat sheet


GET request

// Make a request for a user with a given ID
axios.get('/user?ID=12345')
  .then(function (response) {
    console.log(response);
  })
  .catch(function (error) {
    console.log(error);
  });

// Optionally the request above could also be done as
axios.get('/user', {
    params: {
      ID: 12345
    }
  })
  .then(function (response) {
    console.log(response);
  })
  .catch(function (error) {
    console.log(error);
  });

POST request

axios.post('/user', {
    firstName: 'Fred',
    lastName: 'Flintstone'
  })
  .then(function (response) {
    console.log(response);
  })
  .catch(function (error) {
    console.log(error);
  });

Multiple concurrent requests

function getUserAccount() {
  return axios.get('/user/12345');
}

function getUserPermissions() {
  return axios.get('/user/12345/permissions');
}

axios.all([getUserAccount(), getUserPermissions()])
  .then(axios.spread(function (acct, perms) {
    // Both requests are now complete
  }));

POST request config

// Send a POST request
axios({
  method: 'post',
  url: '/user/12345',
  data: {
    firstName: 'Fred',
    lastName: 'Flintstone'
  }
});

GET request config

// GET request for remote image
axios({
  method: 'get',
  url: 'http://bit.ly/2mTM3nY',
  responseType: 'stream'
})
  .then(function(response) {
  response.data.pipe(fs.createWriteStream('ada_lovelace.jpg'))
});

Create instance

var instance = axios.create({
  baseURL: 'https://some-domain.com/api/',
  timeout: 1000,
  headers: {'X-Custom-Header': 'foobar'}
});

API

Request method aliases

axios.request(config)
axios.get(url[, config])
axios.delete(url[, config])
axios.head(url[, config])
axios.options(url[, config])
axios.post(url[, data[, config]])
axios.put(url[, data[, config]])
axios.patch(url[, data[, config]])

Concurrency

axios.all(iterable)
axios.spread(callback)

Instance methods

axios#create([config])
axios#request(config)
axios#get(url[, config])
axios#delete(url[, config])
axios#head(url[, config])
axios#options(url[, config])
axios#post(url[, data[, config]])
axios#put(url[, data[, config]])
axios#patch(url[, data[, config]])

Request Config

Request options

{
  // `url` is the server URL that will be used for the request
  url: '/user',

  // `method` is the request method to be used when making the request
  method: 'get', // default

  // `baseURL` will be prepended to `url` unless `url` is absolute.
  // It can be convenient to set `baseURL` for an instance of axios to pass relative URLs
  // to methods of that instance.
  baseURL: 'https://some-domain.com/api/',

  // `transformRequest` allows changes to the request data before it is sent to the server
  // This is only applicable for request methods 'PUT', 'POST', and 'PATCH'
  // The last function in the array must return a string or an instance of Buffer, ArrayBuffer,
  // FormData or Stream
  // You may modify the headers object.
  transformRequest: [function (data, headers) {
    // Do whatever you want to transform the data

    return data;
  }],

  // `transformResponse` allows changes to the response data to be made before
  // it is passed to then/catch
  transformResponse: [function (data) {
    // Do whatever you want to transform the data

    return data;
  }],

  // `headers` are custom headers to be sent
  headers: {'X-Requested-With': 'XMLHttpRequest'},

  // `params` are the URL parameters to be sent with the request
  // Must be a plain object or a URLSearchParams object
  params: {
    ID: 12345
  },

  // `paramsSerializer` is an optional function in charge of serializing `params`
  // (e.g. https://www.npmjs.com/package/qs, http://api.jquery.com/jquery.param/)
  paramsSerializer: function(params) {
    return Qs.stringify(params, {arrayFormat: 'brackets'})
  },

  // `data` is the data to be sent as the request body
  // Only applicable for request methods 'PUT', 'POST', and 'PATCH'
  // When no `transformRequest` is set, must be of one of the following types:
  // - string, plain object, ArrayBuffer, ArrayBufferView, URLSearchParams
  // - Browser only: FormData, File, Blob
  // - Node only: Stream, Buffer
  data: {
    firstName: 'Fred'
  },

  // `timeout` specifies the number of milliseconds before the request times out.
  // If the request takes longer than `timeout`, the request will be aborted.
  timeout: 1000,

  // `withCredentials` indicates whether or not cross-site Access-Control requests
  // should be made using credentials
  withCredentials: false, // default

  // `adapter` allows custom handling of requests which makes testing easier.
  // Return a promise and supply a valid response (see lib/adapters/README.md).
  adapter: function (config) {
    /* ... */
  },

  // `auth` indicates that HTTP Basic auth should be used, and supplies credentials.
  // This will set an `Authorization` header, overwriting any existing
  // `Authorization` custom headers you have set using `headers`.
  auth: {
    username: 'janedoe',
    password: 's00pers3cret'
  },

  // `responseType` indicates the type of data that the server will respond with
  // options are 'arraybuffer', 'blob', 'document', 'json', 'text', 'stream'
  responseType: 'json', // default

  // `xsrfCookieName` is the name of the cookie to use as a value for xsrf token
  xsrfCookieName: 'XSRF-TOKEN', // default

  // `xsrfHeaderName` is the name of the http header that carries the xsrf token value
  xsrfHeaderName: 'X-XSRF-TOKEN', // default

  // `onUploadProgress` allows handling of progress events for uploads
  onUploadProgress: function (progressEvent) {
    // Do whatever you want with the native progress event
  },

  // `onDownloadProgress` allows handling of progress events for downloads
  onDownloadProgress: function (progressEvent) {
    // Do whatever you want with the native progress event
  },

  // `maxContentLength` defines the max size of the http response content allowed
  maxContentLength: 2000,

  // `validateStatus` defines whether to resolve or reject the promise for a given
  // HTTP response status code. If `validateStatus` returns `true` (or is set to `null`
  // or `undefined`), the promise will be resolved; otherwise, the promise will be
  // rejected.
  validateStatus: function (status) {
    return status >= 200 && status < 300; // default
  },

  // `maxRedirects` defines the maximum number of redirects to follow in node.js.
  // If set to 0, no redirects will be followed.
  maxRedirects: 5, // default

  // `httpAgent` and `httpsAgent` define a custom agent to be used when performing http
  // and https requests, respectively, in node.js. This allows options to be added like
  // `keepAlive` that are not enabled by default.
  httpAgent: new http.Agent({ keepAlive: true }),
  httpsAgent: new https.Agent({ keepAlive: true }),

  // 'proxy' defines the hostname and port of the proxy server
  // Use `false` to disable proxies, ignoring environment variables.
  // `auth` indicates that HTTP Basic auth should be used to connect to the proxy, and
  // supplies credentials.
  // This will set an `Proxy-Authorization` header, overwriting any existing
  // `Proxy-Authorization` custom headers you have set using `headers`.
  proxy: {
    host: '127.0.0.1',
    port: 9000,
    auth: {
      username: 'mikeymike',
      password: 'rapunz3l'
    }
  },

  // `cancelToken` specifies a cancel token that can be used to cancel the request
  // (see Cancellation section below for details)
  cancelToken: new CancelToken(function (cancel) {
  })
}

Response Schema

Request response

{
  // `data` is the response that was provided by the server
  data: {},

  // `status` is the HTTP status code from the server response
  status: 200,

  // `statusText` is the HTTP status message from the server response
  statusText: 'OK',

  // `headers` the headers that the server responded with
  // All header names are lower cased
  headers: {},

  // `config` is the config that was provided to `axios` for the request
  config: {},

  // `request` is the request that generated this response
  // It is the last ClientRequest instance in node.js (in redirects)
  // and an XMLHttpRequest instance the browser
  request: {}
}

Response using then

axios.get('/user/12345')
  .then(function(response) {
    console.log(response.data);
    console.log(response.status);
    console.log(response.statusText);
    console.log(response.headers);
    console.log(response.config);
  });

Config Defaults

Global axios defaults

axios.defaults.baseURL = 'https://api.example.com';
axios.defaults.headers.common['Authorization'] = AUTH_TOKEN;
axios.defaults.headers.post['Content-Type'] = 'application/x-www-form-urlencoded';

Custom instance defaults

// Set config defaults when creating the instance
var instance = axios.create({
  baseURL: 'https://api.example.com'
});

// Alter defaults after instance has been created
instance.defaults.headers.common['Authorization'] = AUTH_TOKEN;

Config order of precedence

// Create an instance using the config defaults provided by the library
// At this point the timeout config value is `0` as is the default for the library
var instance = axios.create();

// Override timeout default for the library
// Now all requests will wait 2.5 seconds before timing out
instance.defaults.timeout = 2500;

// Override timeout for this request as it's known to take a long time
instance.get('/longRequest', {
  timeout: 5000
});

Interceptors

Intercept request/responses

// Add a request interceptor
axios.interceptors.request.use(function (config) {
    // Do something before request is sent
    return config;
  }, function (error) {
    // Do something with request error
    return Promise.reject(error);
  });

// Add a response interceptor
axios.interceptors.response.use(function (response) {
    // Do something with response data
    return response;
  }, function (error) {
    // Do something with response error
    return Promise.reject(error);
  });

Remove interceptor

var myInterceptor = axios.interceptors.request.use(function () {/*...*/});
axios.interceptors.request.eject(myInterceptor);

Custom instance interceptors

var instance = axios.create();
instance.interceptors.request.use(function () {/*...*/});

Handling Errors

Catch error

axios.get('/user/12345')
  .catch(function (error) {
    if (error.response) {
      // The request was made and the server responded with a status code
      // that falls out of the range of 2xx
      console.log(error.response.data);
      console.log(error.response.status);
      console.log(error.response.headers);
    } else if (error.request) {
      // The request was made but no response was received
      // `error.request` is an instance of XMLHttpRequest in the browser and an instance of
      // http.ClientRequest in node.js
      console.log(error.request);
    } else {
      // Something happened in setting up the request that triggered an Error
      console.log('Error', error.message);
    }
    console.log(error.config);
  });

Custom HTTP status code error

axios.get('/user/12345', {
  validateStatus: function (status) {
    return status < 500; // Reject only if the status code is greater than or equal to 500
  }
})

Cancellation

Cancel request with cancel token

var CancelToken = axios.CancelToken;
var source = CancelToken.source();

axios.get('/user/12345', {
  cancelToken: source.token
}).catch(function(thrown) {
  if (axios.isCancel(thrown)) {
    console.log('Request canceled', thrown.message);
  } else {
    // handle error
  }
});

axios.post('/user/12345', {
  name: 'new name'
}, {
  cancelToken: source.token
})

// cancel the request (the message parameter is optional)
source.cancel('Operation canceled by the user.');

Create cancel token

var CancelToken = axios.CancelToken;
var cancel;

axios.get('/user/12345', {
  cancelToken: new CancelToken(function executor(c) {
    // An executor function receives a cancel function as a parameter
    cancel = c;
  })
});

// cancel the request
cancel();